background image

10

airFiber® AF-5/AF-5U Quick Start Guide

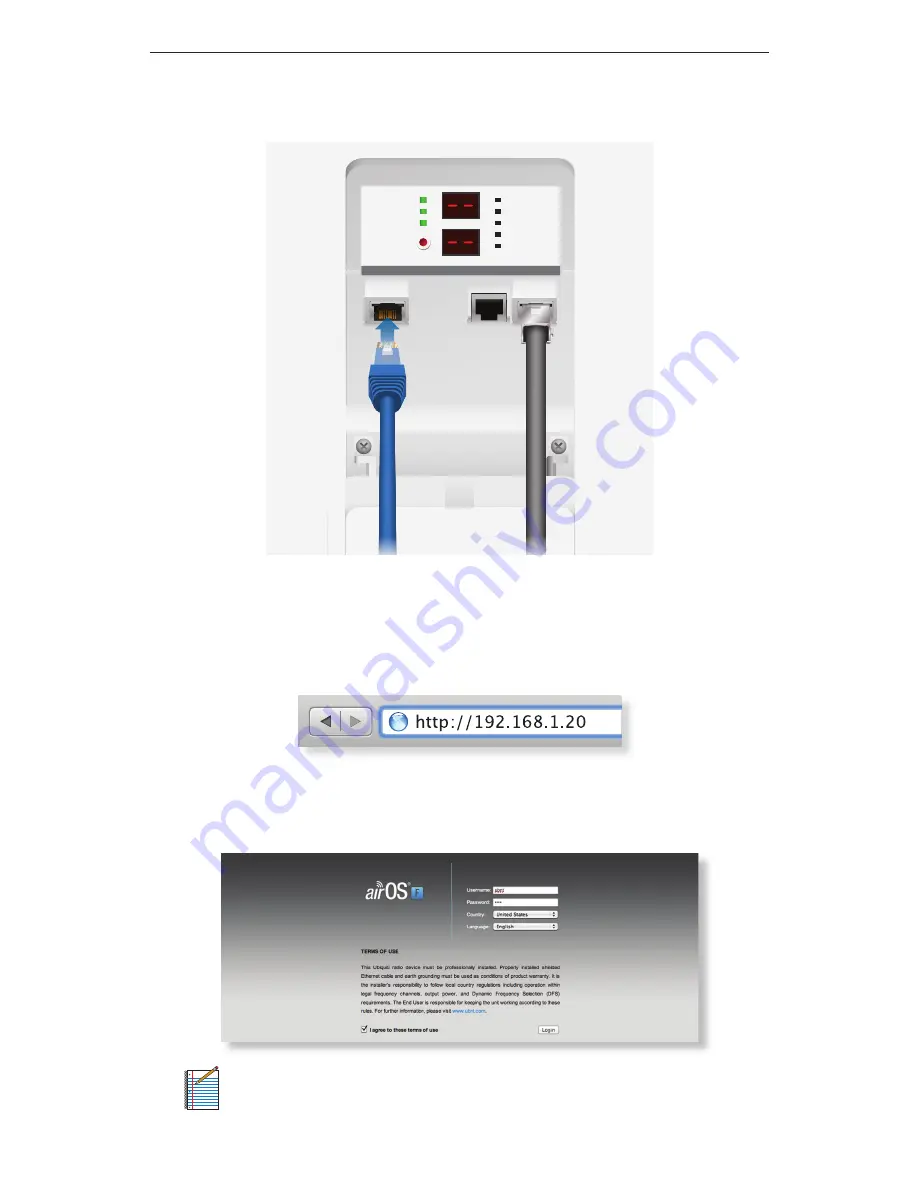
1.  Connect an Ethernet cable from your computer to the 

Management port on the airFiber radio.

GPS

MASTER

LINK

RESET

OVERLOAD

8X
6X
4X to 0.25X

REMOTE

LOCAL

AUX

MANAGEMENT

DATA

ACT

SPEED 

ACT

SPEED 

2.  Configure the Ethernet adapter on your computer with a static 

IP address on the 192.168.1.x subnet.

3.  Launch your web browser. Type http://192.168.1.20 in the 

address field and press enter (PC) or return (Mac). 

4.  The login screen will appear. Enter ubnt in the Username and 

Password fields. Select your Country and Language. You must 

agree to the Terms of Use to use the product. Click Login.

Note:

 U.S. product versions are locked to the U.S. Country 

Code to ensure compliance with FCC regulations. 

Содержание AiAF-5

Страница 1: ...5 GHz Point to Point 1 0 Gbps Radio Model AF 5 AF 5U...

Страница 2: ......

Страница 3: ...for more information Package Contents airFiber AF 5 AF 5U I Bracket Upper Mount Bracket with Elevation Rod Lower Mount Bracket Pole Clamps Qty 2 M10x150 Carriage Bolts Qty 4 M10x100 Carriage Bolts Qt...

Страница 4: ...F 5 AF 5U Quick Start Guide Hardware Overview Side Grounding Point Elevation Rod Hex Nut to adjust Elevation Rod Pre Installed M10 x25 Flanged Bolts Lanyard Attachment Loop Lanyard Attachment Loop Ass...

Страница 5: ...nds while the unit is already powered on Remote Display Displays the received signal strength in dBm of the remote airFiber radio Local Display Displays the received signal strength in dBm of the loca...

Страница 6: ...SPEED LED State Status GPS Off No GPS Synchronization On Operational Strong Signal Normal Flash Non Operational Weak Signal Master Off Slave mode On Master mode Link Off RF Off Short Flash Syncing Nor...

Страница 7: ...MO Normal Flash 1x QPSK xRT Short Flash x QPSK xRT Short Flash 1 3 on off cycle Normal Flash 1 1 on off cycle Long Flash 3 1 on off cycle xtreme Range Technology Port LEDs LED State Status Management...

Страница 8: ...t point on the structure For tower installations at least 3 m below the top of the tower Ground wires min 10 AWG 5 mm2 and max length 1 m As a safety precaution ground the airFiber radios to grounded...

Страница 9: ...the Management port Configure the device settings in the airFiber Configuration Interface Once configuration is complete disconnect the cables to move the airFiber radios Pre assemble the mounting har...

Страница 10: ...X 6X 4X to 0 25X REMOTE LOCAL AUX MANAGEMENT DATA ACT SPEED ACT SPEED 3 Connect the other end of the Ethernet cable from the Data port to the Ethernet port labeled POE on the GigE PoE Adapter 4 Connec...

Страница 11: ...ning options at the cost of higher latency and throughput Full duplex operation provides the highest throughput and lowest latency however you have fewer frequency management options Half Duplex defau...

Страница 12: ...adapter on your computer with a static IP address on the 192 168 1 x subnet 3 Launch your web browser Type http 192 168 1 20 in the address field and press enter PC or return Mac 4 The login screen w...

Страница 13: ...tion 7 Click the Wireless tab 8 Enter the Basic Wireless Settings a For one airFiber radio select Master as the Wireless Mode For the other airFiber radio keep the default Slave b Enter a name in the...

Страница 14: ...anagement is enabled by default so each airFiber radio must have a unique IP Address If the airFiber radios use the same IP Address then you may lose access to the airFiber radios via the Data ports C...

Страница 15: ...ing hardware of the airFiber radio can be pre assembled before pole mounting Mounting Hardware Pre Assembly 1 Insert two M10x150 Carriage Bolts into the Lower Mount Bracket 2 Insert two M10x150 Carria...

Страница 16: ...iber AF 5 AF 5U Quick Start Guide 3 Attach the Lower Mount Bracket to the I Bracket using two M8x14 Serrated Flange Bolts Ensure that the slots face up and securely tighten the bolts Proper slot orien...

Страница 17: ...the Upper Mount Bracket with Elevation Rod to the I Bracket using two M8x14 Serrated Flange Bolts Note Ensure that the orientation of the Upper Mount Bracket matches the illustration below with the E...

Страница 18: ...uick Start Guide 5 Attach the Pole Clamps to the Mount Brackets a Slide the slotted hole of each Pole Clamp over one upper and one lower M10x150 Carriage Bolt b Place one M10 Serrated Flange Nut on ea...

Страница 19: ...t Bracket that has two slotted holes b Slide the slotted hole of the other Azimuth Support Bracket over one M10x100 Carriage Bolt c Place one M10 Serrated Flange Nut on each M10x100 Carriage Bolt 7 Ch...

Страница 20: ...e attached Note The mounting assembly can accommodate a 38 1 101 6 mm 1 5 4 0 pole a Orient the Azimuth Support Brackets around the pole so it is aimed in the direction of the other airFiber radio b S...

Страница 21: ...g assembly around the pole so it is aimed in the direction of the other airFiber radio b Slide the open slot of each Pole Clamp over the corresponding M10x150 Carriage Bolt c Tighten the M10 Serrated...

Страница 22: ...20 airFiber AF 5 AF 5U Quick Start Guide 3 Lift the airFiber radio and align the two lower Pre Installed M10x25 Flanged Bolts with the slots on the Lower Mount Bracket Seat the bolts in the slots...

Страница 23: ...Hardware Installation 4 Align the two upper Pre Installed M10x25 Flanged Bolts of the airFiber radio next to the slots on the Upper Mount Bracket Lift the airFiber radio and seat the bolts in the slo...

Страница 24: ...min 8 AWG or 10 mm2 to the lug and replace the nut to secure the wire c Secure the other end of the ground wire to a grounded mast pole tower or grounding bar WARNING Failure to properly ground your a...

Страница 25: ...utdoor shielded CAT6 cable up through the rightmost cable feed slot on the bottom of the port cover b Connect the cable to the Data port c Create a strain relief for the Ethernet cable by feeding a Ca...

Страница 26: ...rt labeled LAN on the GigE PoE Adapter 5 Connect the Power Cord to the power port on the GigE PoE Adapter Connect the other end of the Power Cord to a power source Note For added protection we recomme...

Страница 27: ...a finished installation with recommended surge protectors installed Ground to Pole Tower or Grounding Block Max 1 m from Ground Bonding Point Max 1 m GigE PoE Adapter Power Source Outdoor GigE PoE Sur...

Страница 28: ...entation of a mounting pole or significant elevation differences between airFiber radios Before a link is established the Master s LED Display looks like this GPS and Master LEDs are solidly lit Note...

Страница 29: ...sions from the Master 1 Ensure that the following bolts and nuts are loose Four Pre Installed M10x25 Flanged Bolts on the airFiber radio two on each side Four M10 Hex Nuts used to lock the elevation a...

Страница 30: ...Master and Slave 4 Slave Visually aim the Slave at the Master To adjust the Slave s position a Rotate the airFiber radio on the pole to align the azimuth b Use the hex nut on the Elevation Rod to adju...

Страница 31: ...e airFiber AF 5 AF 5U User Guide at documentation ubnt com airfiber 8 Repeat steps 6 and 7 until you achieve a symmetric link with the signal levels within 1 dB of each other This ensures the best pos...

Страница 32: ...F 5 AF 5U User Guide for instructions on the airFiber Configuration Interface and audio tone methods Installer Compliance Responsibility Devices must be professionally installed and it is the professi...

Страница 33: ...z 5470 5950 MHz AF 5U FCC 15 247 IC RSS 21 ETSI EN 302 502 Other Regions 5725 5850 MHz 5725 5875 MHz 5725 6200 MHz Max Power Consumption 40 W Power Supply 50V 1 2A PoE GigE Adapter Included Power Meth...

Страница 34: ...PSK xRT 93 dBm 90 dBm 128 Mbps 64 Mbps x Rate QPSK xRT 95 dBm 93 dBm 32 Mbps 16 Mbps Receive Sensitivity Spatial Streams Modulation Sensitivity 40 MHz Sensitivity 50 MHz FDD Capacity TDD Capacity 8x 2...

Страница 35: ...ould be provided only by a qualified service technician 3 This equipment is provided with a detachable power cord which has an integral safety ground wire intended for connection to a grounded safety...

Страница 36: ...ysical electromagnetic or electrical stress including lightning strikes or accident V has been damaged or impaired as a result of using third party firmware VI has no original Ubiquiti MAC label or is...

Страница 37: ...interrupted In no event shall UBIQUITI NETWORKS be responsible for damages or claims of any nature or description relating to system performance including coverage buyer s selection of products includ...

Страница 38: ...erence in which case the user will be required to correct the interference at his own expense Industry Canada CAN ICES 3 B NMB 3 B To reduce potential radio interference to other users the antenna typ...

Страница 39: ...in compliance with all directives that are applicable to it Alert Sign Follows CE Marking Alert sign must be indicated if a restriction on use applied to the product and it must follow the CE marking...

Страница 40: ...d suya desechar este y cualesquiera otros aparatos el ctricos y electr nicos a trav s de los puntos de recogida que ponen a su disposici n el gobierno y las autoridades locales Al desechar y reciclar...

Страница 41: ...ice overholder de v sentlige krav og vrige relevante krav i direktiv 1999 5 EF Nederlands Dutch Hierbij verklaart UBIQUITI NETWORKS dat het toestel UBIQUITI NETWORKS device in overeenstemming is met d...

Страница 42: ...vanti li hemm fid Dirrettiva 1999 5 EC Norsk Norwegian UBIQUITI NETWORKS erkl rer herved at utstyret UBIQUITI NETWORKS device er i samsvar med de grunnleggende krav og vrige relevante krav i direktiv...

Страница 43: ......

Страница 44: ...rFiber and TOUGHCable are trademarks or registered trademarks of Ubiquiti Networks Inc in the United States and in other countries All other trademarks are the property of their respective owners Supp...

Отзывы: