


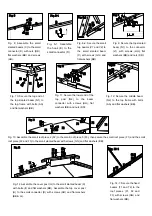
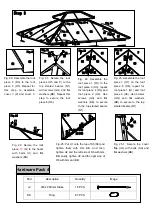


Fig. 20: Assemble the roof
piece 3 (O3) to the roof
piece 5 (O5). Repeat for
this step to assemble
cover
9
(P) and cover 3.
Fig. 21: Secure the roof
pieces (O5 and P) to the
top slanted beams (N1)
with screws (GG) and flat
washers (BB). Repeat this
step to secure the roof
piece 6 (O6).
Fig. 22: Assemble the
roof piece 1 (O1) to the
roof piece 3 (O3); repeat
for roof piece 4 (O4) and
roof piece 2 (O2). Use
screws (GG) and flat
washers (BB) to secure
to the top slanted beams
(N1).
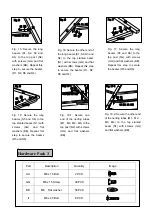
Fig. 23: Assemble the roof
piece 7 (O7) on the roof
piece 8 (O8); repeat for
roof piece 1 (O1) and roof
piece 3 (O3). Use screws
(GG) and flat washers
(BB) to secure to the top
slanted beams (N1).
Fig. 24: Secure the roof
piece
10
(Q) to the beam
with bolts (II) and flat
washers (BB).
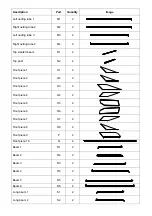
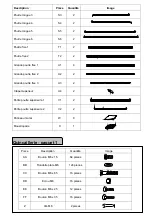
Part Description Quantity
Image
JJ
Φ
8 x 260mm Stake
16 PCS
KK Ring
67
PCS
Hardware Pack 4
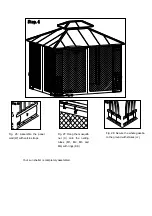
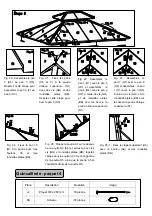
Fig. 25-1: Secure t
op cover
flap (U4) with bolts (AA) and
flat washers (BB).
Fig. 25: Put U1 onto the top of S5 (S6) and
tighten them with GG, BB. And then,
tighten U2 and the left side of R5 with GG,
BB. Lastly, tighten U3 and the right side of
R6 with GG and BB.


