


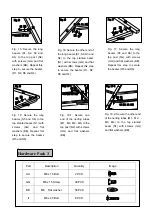
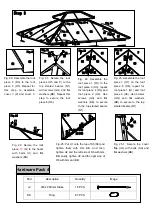


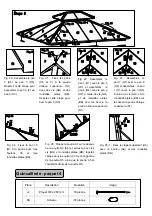


Fig. 10: Secure the top end of
the top slanted beam (N1) to
the top frame with bolts (AA)
and flat washers (BB).
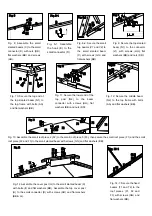
Fig. 8-1: Assemble
the hook (E) to the
small connector (D).
Fig. 14: Assemble the cover post (G) to the small slanted beam (C)
with bolts (II) and flat washers (BB). Assemble the top cover post
(H) to the small connector (D) with screws (HH) and flat washers
(BB & LL).
Fig. 8: Assemble the small
slanted beams (C) to the small
connector (D) with nuts (DD),
flat washers (BB) and screws
(HH).
Fig. 9: Secure the top slanted
beam (N1) to the connector
(J1) with screws (HH), flat
washers (BB) and nuts (DD).
Fig. 12: Secure the middle beam
(N2) to the top frame with bolts
(AA) and flat washers (BB).
Fig. 11: Secure the lower end of the
top post (N2) to the beam
connector with screws (HH), flat
washers (BB) and nuts (DD).
Fig. 13: Assemble the small roof piece 2 (F2) to the small roof piece 3 (F3), then secure the small roof piece (F1) and the small
roof piece (F2 and F3) to the small slanted beam with screws (GG) and flat washers (BB).
Fig. 14-1: Secure the fixed
beams (T1 and T2) to the
roof pieces (F1, F2 and
F3) with screws (GG) and
flat washers (BB).
Fig. 8-2: Secure the small
top beams (V1 and V2) to
the small slanted beam
(C) with screws (GG) and
flat washers (BB).


