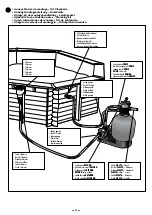
18
1a -
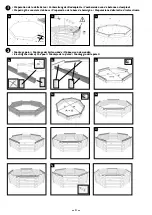
Pour a concrete slab to the dimensions specified on page 12, of a minimum thickness of 10cm
1b - Swimming pool should be oriented so that the skimmer inlet faces the prevailing wind, in order to optimise
surface particle filtration. For this, use temporarily the first row of planks.
One half plank must be directly below the skimmer.
1c - Mark the position of the structure on the ground, keeping a 50cm margin to make controlling the shape
easier.
For the warranty to be valid, a concrete slab must be in place.
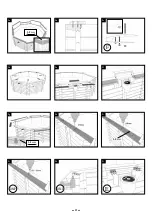
2a - Assembly principle. Use the sacrifice part for fitting together all the planks.
2b - Make the first row of planks level.
2c - Control the shape using a tape measure (10m).
2d - Control the shape using a tape measure (10m).
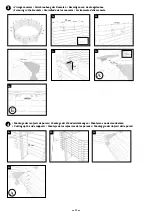
2e - Position the water jet plank on the 6th row. This can be either to the right or the left of the skimmer.
2f - Position the lower skimmer plank on the 7th row after the lower half plank.
2g - Position the upper skimmer plank and the three top planks.
SUMMARY:
- Preparing the ground
- Erecting the sides of the pool
- Screwing in the brackets
- Putting up the supports for the sides of
the pool
- Preparing the sides of the pool
- Installing the felt underlay and the
liner
- Cutting out the liner to fit the
backwash inlet nozzle and the skimmer
- Assembly of the pine edging
- The ladders
9a - Make the ladder level. To do that flush out the air under the steps if necessary.
9b - Secure the stainless steel supports using the bolts provided in the stainless steel ladder box.
If using a safety tarpaulin, make sure to centre
the stainless steel ladder on the edging.
8
9
• (see page 28)
9
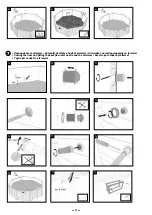
3a - Mark in the pre-drilling points on the 7 complete planks.
3b - Mark in the pre-drilling points on the on the plank for the skimmer.
3c - Position the brackets. If you are using wood composite coping, lower the bracket by 2 mm.
3d - Make the brackets level and screw them in so that the screw heads are completely embedded into the wood.
3e - Secure the wooden stops for the skimmer trap doors
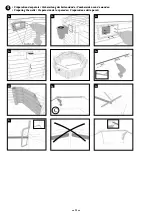
4a - Saw a length of post 45x135 for the skimmer.
4b - Mark the position of the holes and arrange the posts. Cut the wall reinforcement posts (cross-section 45x135) to the height of the swimming pool.
4c - Drill the sides of the pool.
4d - Screw all planks and countersink all screw heads into the wood.
5a - Screw in the skimmer intake in the upper plank using two screws provided in the skimmer box.
5b - Install the outer skimmer seal and the skimmer itelf.
5c - Secure the whole unit tightening it really well to ensure it is completely waterproof.
5d - Once you have put Teflon tape round the fed through unit, screw the fed through stop valve into the body of the skimmer. Shut off the valve.
5e - Drill the tracks according to the measurements (3 cm from the ends and then approximately every 20 cm).
5f - Unroll the wall felt (16.5 x 1.35 m roll) and press the plastic rail on top, flush with the upper plank.
5g - Screw in the first track of the liner.
5h - Mark out where the corner cut is to be made.
5i - Cut the corners according to the diagram.
5j - Feel where the outside frame of the skimmer is.
5k - Cut out the felting around the outer edge of the skimmer.
5l - Do the same with the backflow inlet nozzle.
5m - Put in one of the skimmer seals.
5n - Put in the backflow inlet nozzle seal. It must make contact with the wood. Therefore cut out the felting
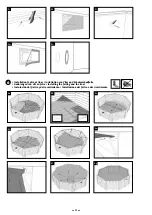
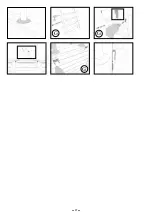
6a - Put the ground protection felt (dim. 2m x 7m) in place.
6b - Cut out the protective felting using a Stanley knife or a pair of scissors.
6c - Put the liner in place.
6d - Fit the corners of the liner into the corners of the pool.
6e - Hook the liner on to the lip of the track.
6f - Check the position of the liner and smooth out the biggest creases.
6g - Adjust the corners of the liner to fit the frame of the pool.
6h - Fill the pool with water to a level of 2 cm.
6i - Smooth out the creases.
6j - Resume filling with water
7a - Stop filling when the water is just below the backflow inlet nozzle.
7b - Position the backflow inlet nozzle from the inside of the pool.
7c - Cut out the liner for the backflow inlet nozzle, leaving about 2 mm play around it.
7d - Tighten the nut on the backflow inlet pipe enough to make sure it is waterproof.
7e - Bind the fed through ends of the fittings with Teflon tape, working in an anti-clockwise direction. Wrap round at least 20 times.
7f - Screw one of the ends to the backflow inlet nozzle and the other one to the skimmer.
7g - Install one of the pipes to the backflow inlet nozzle and secure it using a metal collar.
7h - Put the other end of the pipe into the swimming pool and resume filling with water.
7i - Mark in the position of the skimmer seal.
7j - Put in the skimmer seal and the frame.
7k - Cut out the liner in the inside of the skimmer frame. Then place and clip in the cover flange.
7l - When the water is halfway up the skimmer, it is at the correct level (after you have put the filter in place).
7m - Cut off the finishing profiles at the height of the swimming pool, making sure to leave 2cm clearance between the end of the finishing profile and the
edging.
Содержание 7524430
Страница 1: ...Ref 7524430 www outsideliving com ...
Страница 28: ...27 G G G ...
Страница 30: ...2a 2b 2c 2d 2e 2f 2j 2k 2l DMI E DMP 29 2g 2h 2i 5 8 mm 5 8 mm 5 8 mm F ...
Страница 44: ......


