Service Bulletin
31
UAV-1005757-005 Rev A
AV-30-
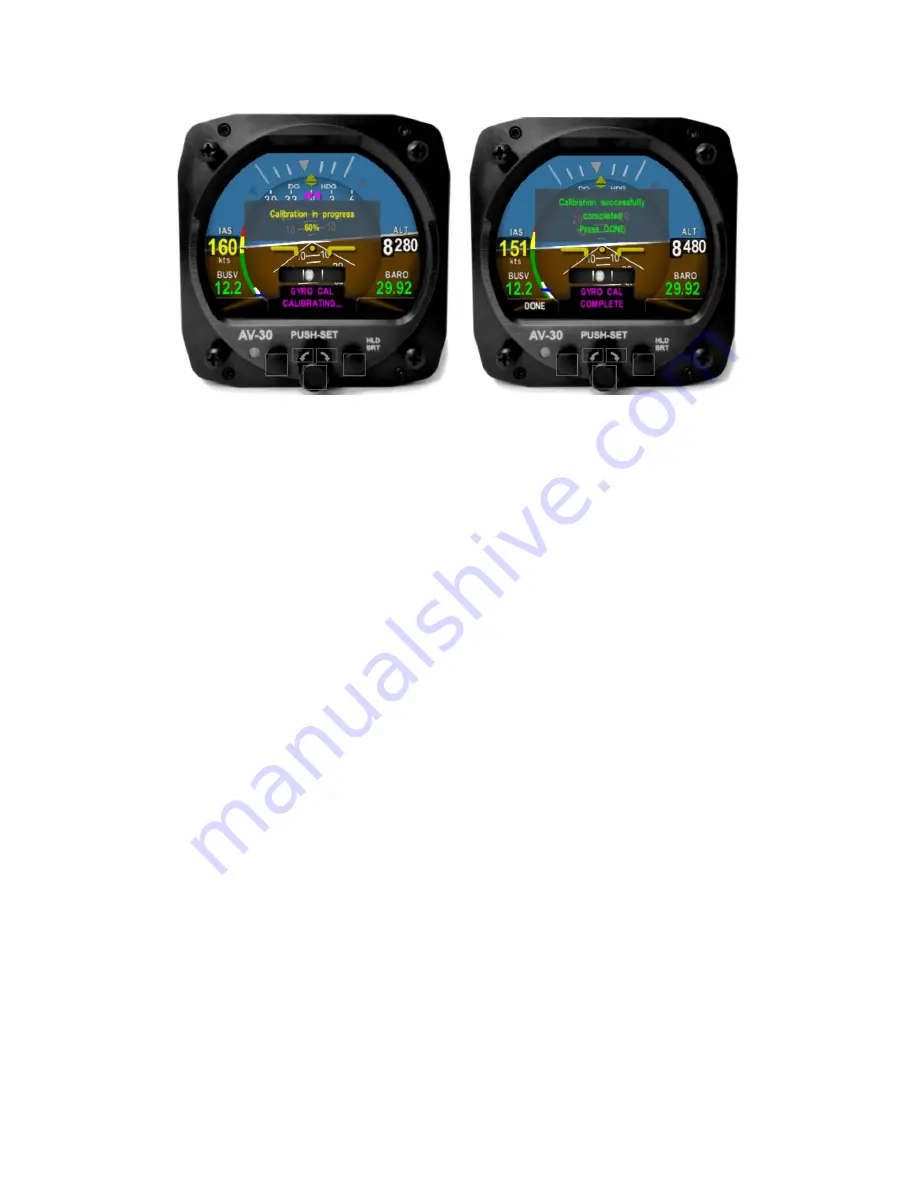
E will indicate “Calibration successfully completed Press DONE”.
Push the left button under “DONE” and the calibration will be complete. If an error is shown, repeat the calibration process.
Страница 1: ...Service Bulletin UAV 1005757 005 Rev A AV 30 E Service Bulletin Software Upgrade to 2 3 3...
Страница 2: ...nload a single copy of this guide onto an electronic storage medium to be viewed for personal use provided that the complete text of this copyright notice is retained Unauthorized commercial distribut...
Страница 3: ...Service Bulletin 3 UAV 1005757 005 Rev A 1 Revision History Revision Date Comments A 9 2 2022 Initial release...
Страница 4: ...s are controlled by the U S Government and authorized for export only to the country of ultimate destination for use by the ultimate consignee or end user s herein identified They may not be resold tr...
Страница 5: ...4 6 Applicable Publications 9 5 Required Items 10 5 1 Windows PC with Serial Port 10 5 2 AV Link E 11 6 Update Notes 12 7 PC Serial Update 13 7 1 Serial Update Preparation 13 7 2 Serial Update Procedu...
Страница 6: ...Bulletin 6 UAV 1005757 005 Rev A 9 6 GYRO CAL 2928 9 7 MAG CAL 3231 9 7 1 Internal Magnetometer 3231 9 7 2 AV Mag External Magnetometer 3332 10 System Checkout 3534 11 Support 3635 12 Maintenance Reco...
Страница 7: ...dware P N Marking Applicability UAV 1004035 001 Verify by procedure UAV 1004035 002 Verify by procedure Table 4 1 Applicability Parts identified above as Verify by procedure may have software release...
Страница 8: ...Adds support for connecting a BeaconX transponder in parallel between two AV 30 Es Adds the ability to switch from DG to MFD displays when the DG function is locked Prevents field calibration data fr...
Страница 9: ...d if pitot and static connections are not installed For AV Mag External Magnetometer installation the installation time will vary Calibration time will vary depending on the aircraft and the location...
Страница 10: ...2 3 3 Click on the link in the section AV 30 E v2 3 3 Firmware and save it to your PC or mobile device Ensure the software and any necessary update tools have been downloaded prior to visiting the air...
Страница 11: ...ver Wi Fi Quantity Description 1 PC or mobile device 1 uAvionix AV Link E UAV 1004413 001 or UAV 1004414 001 running software version 0 2 39 or later 1 AV 30 E Software as shown in Table 5 1 Software...
Страница 12: ...roved methods for update of the AV 30 E The AV 30 E can be updated using either a traditional direct serial connection or the AV Link E can be used to update the AV 30 E via wireless interface Either...
Страница 13: ...ness or ground the new wire directly to aircraft ground 2 Connect the new wires to the DB 9 connector as shown below Upon completion of wiring connect the new assembly to an available serial port or U...
Страница 14: ...v A 4 Apply power to the AV 30 E Do not interrupt power during the update process 5 Launch the previously downloaded AV Updater application 6 On the AV Updater tool select the appropriate COM Port fro...
Страница 15: ...al guidance 6 Once proper connection has been made select the firmware file to upload to the AV 30 E by clicking Open File and selecting the previously downloaded firmware file as identified in Table...
Страница 16: ...Write Firmware to begin the upload DO NOT POWER OFF THE AV 30 E OR CLOSE THE UPDATER TOOL UNTIL THE UPDATE IS COMPLETE THE SCREEN OF THE AV 30 E WILL GO BLACK DURING THE UPDATE THIS BEHAVIOR IS NORMAL...
Страница 17: ...process is complete 10 The unit will automatically restart Upon restart of the unit verify the startup screen indicates the updated software version 11 If the unit was removed to perform the update it...
Страница 18: ...Service Bulletin 18 UAV 1005757 005 Rev A 13 Following the completion of the update follow Section 9 to perform required post installation procedures...
Страница 19: ...eparation for Update via AV Link E If AV Link E is already installed in the aircraft proceed to Section 8 2 If AV Link E is available but not installed follow the installation procedure as described i...
Страница 20: ...Do not interrupt power during the update process 2 If using an Apple iPhone or iPad you must put the device into Airplane Mode then turn on Wi Fi only 3 Connect a PC to the AV Link E Wi Fi Network Thi...
Страница 21: ...57 005 Rev A 4 In a Web Browser such as Google Chrome navigate to the AV Link E home page via the following URL 192 168 4 1 A page similar to shown on the right should appear 5 At the bottom of the pa...
Страница 22: ...05 Rev A 6 On the AV Display Firmware Update page select Choose File then select the previously downloaded AV 30 firmware 7 Once the file has been selected you will be prompted with Install AV 30 E v2...
Страница 23: ...update is not complete until you see the Update complete message DO NOT power off the unit or close the web browser until the update is complete The AV 30 E will restart when complete and the AV Link...
Страница 24: ...Service Bulletin 24 UAV 1005757 005 Rev A 8 Upon restart of the AV 30 E verify the startup screen indicates the updated software version...
Страница 25: ...To enable access to the Installation Menu ensure the unit is completely turned off Push and hold the main control knob in while power is applied 2 Keep the knob pushed until the startup screen displa...
Страница 26: ...the center knob until SERIAL 2 is displayed If this value is changed to AEROCRUZE or PRO PILOT the AV 30 will communicate with an autopilot The SERIAL 2 setting is verified if the AUTOPILOT setting i...
Страница 27: ...and aiding to core AHRS algorithm AVMAG Not available for use with internal magnetometer automatically selected when AV Mag external magnetometer installed Follow the procedure in Section 9 to access...
Страница 28: ...t be changed AVMAG AV Mag external magnetometer provides continuous aiding data to DG and aiding to core AHRS algorithm Follow the procedure in Section 9 to access the Installation Menu Rotate the cen...
Страница 29: ...MONITOR is displayed Push and release the center knob to start monitoring current and peak vibrations in the accelerometer and gyroscopic sensors Record the data on the screen to share with uAvionix...
Страница 30: ...dure The Gyro Calibration feature can be accessed by selecting GYRO CAL from the Installation Menu At least 15 minutes of warmup is required before performing a Gyro Calibration Follow the procedure i...
Страница 31: ...n 31 UAV 1005757 005 Rev A AV 30 E will indicate Calibration successfully completed Press DONE Push the left button under DONE and the calibration will be complete If an error is shown repeat the cali...
Страница 32: ...has an internal magnetometer then an initial Internal Mag Calibration may need to be completed This need will be indicated by a red flag indicating MAG CAL once the ALIGN flag extinguishes For more i...
Страница 33: ...Calibration may need to be completed This need will be indicated by a red flag indicating MAG CAL once the ALIGN flag extinguishes For more information on AV Mag Calibration reference the procedure as...
Страница 34: ...Rev A 3 Follow the on screen instructions pressing the right button once the aircraft is oriented to heading 360 Keep the aircraft as motionless as possible at each of the headings while the Calibrati...
Страница 35: ...ervice Bulletin 35 UAV 1005757 005 Rev A 10 System Checkout Perform the System Checkout procedure as described in AV 30 E Installation Manual UAV 1004234 001 Section 13 2 prior to returning to service...
Страница 36: ...Service Bulletin 36 UAV 1005757 005 Rev A 11 Support For additional questions or support please visit http www uavionix com support...
Страница 37: ...intenance Record Service Bulletin UAV 1005757 005 Rev A to install software v2 3 3 for AV 30 E UAV 1004035 006 has been complied with A copy of this form must be submitted by visiting https uavionix c...