12
Revised 03/15
MCB
Crossflow Dust Collector
2. Open the louver doors and verify the filters
are properly installed. See section 7.1 for filter
installation.
3. Turn on the blower(s). On initial start-up, make
certain the blower rotation is correct. All blower
wheels rotate in a clockwise rotation as viewed from
the drive end.
NOTE:
Proper blower rotation is required to move
the designed amount of air. A blower rotating
in the incorrect direction will only move about
40% of design airflow.
4. Turn on the compressed air supply to the unit.
Adjust the pressure regulator until the gauge
reads 90-110 PSIG (6.2-7.7 BAR).
5. Check the exhaust. Exhausting air should remain
visibly clean. If a leak develops, it will be first noticed
after cleaning pulsation as a puff of dust.
6. Check the pressure differential reading on the
pressure measurement device (DPM/DPC panel).
7. Check the cleaning system for proper operation.
The compressed air pressure should be between
90-110 PSIG (6.2-7.6 BAR). UAS’ pulse control
panels are factory set to pulse every 10 seconds.
Refer to the DPM/DPC Installation and Operation
Manual specified with the dust collector to change
these initial settings. Check to ensure the pulse
(diaphragm) valves are “firing” at approximately
10-second intervals and delivering a “cri sp” sounding
pulse to each filter. The valves should not deliver a
weak or lingering pulse. To check the pulse sequence
for proper firing, perform the following:
• If your system is supplied with a DPM/DPC panel,
place the “Continuous Clean/PS” switch on the
timerboard to the “Continuous Clean” position. The
MOT AUX terminals at the timerboard should be field
wired for the pulsing to become active. To activate,
energize the motor starter to close the isolated
auxiliary contact wired to the timerboard MOT AUX
terminals. Verify consistent pulse firing of each
solenoid valve exhaust port.
6.2 OPERATING ADJUSTMENTS
Confirm the type of pulse cleaning controller delivered
with the system. The system is typically provided with
one of the following:
• DPM Digital Pulse Monitor Panel
• DPC Digital Pulse Control Panel
NOTE:
It is important that the compressed air pressure is in
the 90-110 PSIG range (6.2-7.6 BAR) immediately
prior to a pulse. If the delivery capability of your
compressed air source cannot return the manifold
pressure to above 90 PSIG during the “Pulse Delay”
(factory set at 10 sec.) interval, adjust the pulse
delay at the timerboard and monitor the pressure.
A longer interval will raise the operating pressure,
which is the pulse delay. (Adjust from position 2 or
position 3 on the timerboard.) Allow sufficient time
for the system to stabilize after each adjustment
before further adjustment is made. Adjust until the
desired pressure differential is reached.
6.2.1 DIGITAL PULSE MONITOR PANEL (DPM)
THE DPM is always set to “Continuous Clean” pulse
mode, which means pulse cleaning is operating
continuously when the system is on line. Refer to
the DPM/DPC Installation and Operations Manual for
detailed information.
6.2.2 DIGITAL PULSE CONTROL PANEL (DPC)
The DPC is set for “Pressure Switch” or “PS” pulse
mode. With the DPC, the desired pressure can be
maintained by adjusting the high and low setpoints on
the panel. The factory setting is 3.0 (high setpoint) and
2.5 (low setpoint). This allows a 0.5" “deadband” where
the pulse system will maintain the desired pressure.
The high and low setpoints on the DPC can be adjusted
as the filters season and continuous pulsing occurs.
Adjust setpoints upward in 0.5" increments until pulsing
stops. Continue adjustments, when required, until the
high setpoint reaches 5". No further adjustments should
be made above 5" w.g.
7. SERVICE
7.1 CARTRIDGE FILTER REMOVAL AND
REPLACEMENT
1. Protura® Nanofiber cartridge filters are the only
replacement filters that will provide the highest level
of performance expected from the dust collector.
!
C A U T I O N
Shut off and slowly release the pressure in the
compressed air piping and/or the MCB compressed air
reservoir manifold prior to servicing this equipment.
Disconnect all electrical power to the unit and
control panel.
Shut off and slowly bleed the compressed air supply
from the manifold.
Collected dust may be hazardous. Consult proper
authorities for handling and disposal.
Collected dust may be a potential fire hazard.
Grinding or operations involving open flames should
not be performed without fire protection measures in
place. Refer to Section 1 for additional precautions.
Wear appropriate protective clothing when servicing
the dust collector.
Disposal of collected dust must be according to state
and local environmental regulations.
!
DANGER
Содержание CLARCOR MCB 06-01-S
Страница 1: ...Cross Ventilation Cartridge Dust Collector l MCB Series OWNER S MANUAL ...
Страница 6: ...2 Revised 03 15 MCB Crossflow Dust Collector Figure 1 MCB Operation Detail 44 10343 0001 ...
Страница 9: ...5 Revised 03 15 MCB Crossflow Dust Collector Figure 3 MCB Installation Detail 44 10360 0001 ...
Страница 11: ...7 Revised 03 15 MCB Crossflow Dust Collector Figure 4 Motor Installation Diagram 44 10342 0001 ...
Страница 12: ...8 Revised 03 15 MCB Crossflow Dust Collector Figure 5 MCB Booth Assembly 44 10361 0001 ...
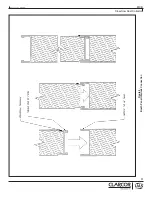
Страница 13: ...9 Revised 03 15 MCB Crossflow Dust Collector Figure 6 Booth Panel Interlock Connection ...
Страница 15: ...11 Revised 03 15 MCB Crossflow Dust Collector Figure 7 MCB Pressure Gauge Installation 44 10350 0001 ...
Страница 17: ...13 Revised 03 15 MCB Crossflow Dust Collector Figure 8 Solenoid Wiring to Pulse Controls 61 10017 0001 REV B ...
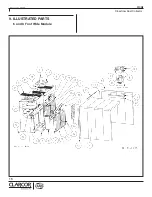
Страница 20: ...16 Revised 03 15 MCB Crossflow Dust Collector 9 ILLUSTRATED PARTS 6 and 9 Foot Wide Module ...
Страница 22: ...18 Revised 03 15 MCB Crossflow Dust Collector 11 ILLUSTRATED PARTS 3 Foot Wide Module ...


