background image

For questions or concerns, email: [email protected]

7

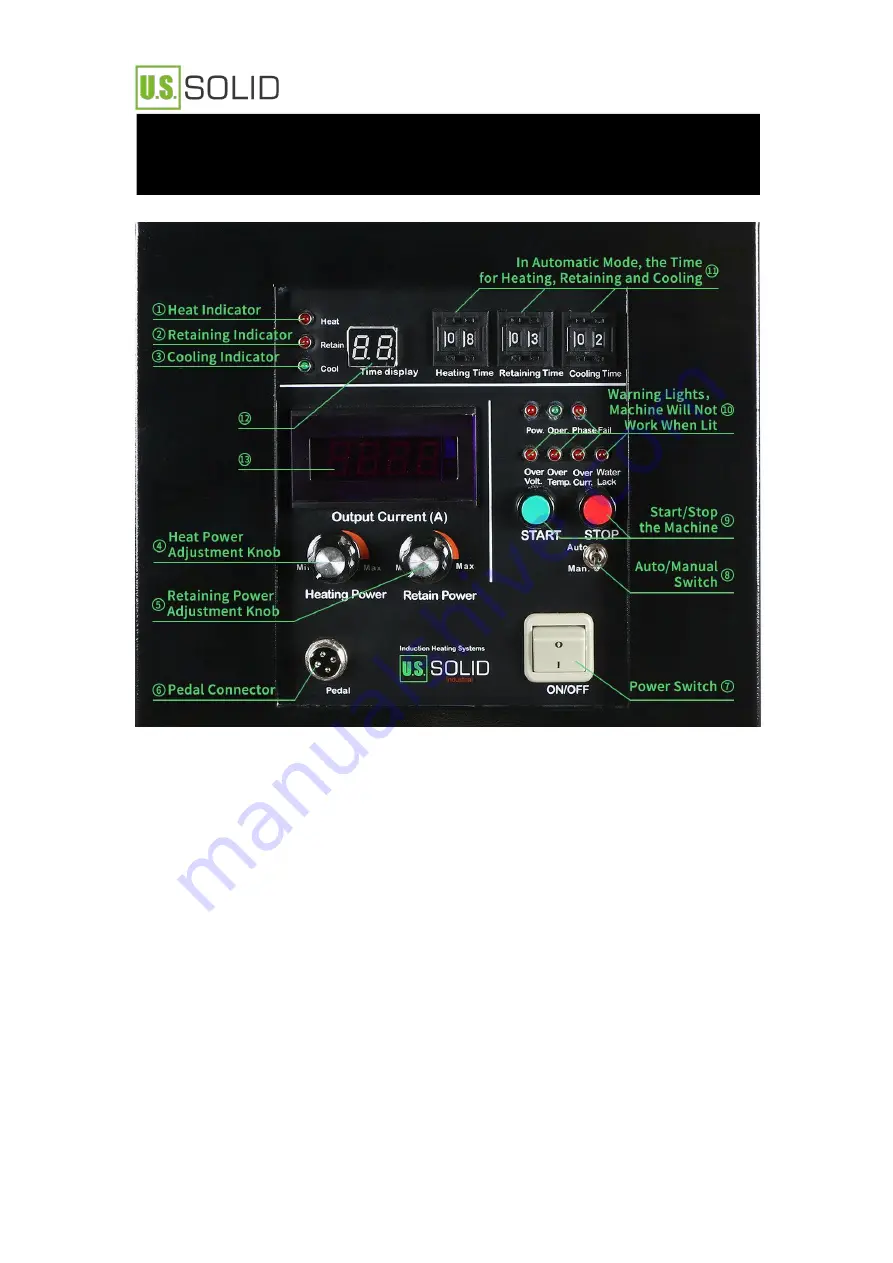
⑤ Retaining Power Adjustment Knob: Controls the current when in heat retention

mode. This is only applicable when the machine is in automatic mode.

⑥ Pedal Connector: If the foot pedal is connected to the machine, the machine can

be controlled using the pedal instead of the Start/Stop Buttons on the machine.

⑦ Power Switch: Turns the machine on or off.

⑧ Auto/Manual Switch: Switches the working mode between automatic and

manual.

⑨ Start/Stop Buttons: Starts or stops the working process when the pedal is not

connected.

VI. Front Panel in Auto Mode

Содержание USS-HFIH00001-110V

Страница 1: ...n heater To ensure the best results and maximum durability of this U S SOLID LLC hereafter U S SOLID or The Company product read and follow all instructions carefully Failure to do so may lead to serious bodily injury and catastrophic damage to the heater supplies or surrounding area All safety suggestions must be followed closely and precautions must be taken to guarantee this heater is only used...

Страница 2: ...ty Foot pedal 1x Fuse 3x Clamps stainless steel 4x Tubing copper to connect your own coil 2x each 0 5 ft long Tubing copper to create your own coil 1x 5 ft long Coil copper 1x 3 3 ft long Hose rubber 1x 32 ft long 3 4 diameter High frequency induction heater 1x Parts ...

Страница 3: ...ty Instructions 3 IV Setting Up 4 V Back of the Heater 5 VI Front Panel in Auto Mode 6 VII Operating the Heater in Auto Mode 10 VIII Front Panel in Manual Mode 11 IX Operating the Heater in Manual Mode 13 X Other Factors 13 XI Potential Applications 14 XII Troubleshooting 15 XIII Specifications 17 Contents ...

Страница 4: ...hanges Because this new electromagnetic field contradicts the initial magnetic field this process produces an eddy current sometimes referred to as Foucault s current Based on Joule s first law 1 Joule heating is then generated As time passes the density of the workpiece increases leading to growing resistance 2 which in turn generates more Joule heating causing the workpiece to get incrementally ...

Страница 5: ...als in different sizes You have 30 days from the date of delivery to return this product If the returned item has been opened a 15 restocking fee will be applied We provide a 12 month warranty from the date of the sale Within the warranty window we are responsible for any replacement parts needed caused by quality issues If you want to return a defective item please contact our customer service te...

Страница 6: ...nts repairs or when storing the machine Remove all metal from your hands and arms when operating this machine including rings and watches Metal may heat up if exposed to the coil and could lead to serious bodily injury Place heated materials in a safe place after heating to avoid fire or injury Since the induction heater generates a magnetic field anyone with a pacemaker or other medical device sh...

Страница 7: ...r pump or a water chiller may be used as a cooling device You can also connect the heater to a tap water outlet In this case it is important that the tap water is clean and has enough water pressure Dirty water will lead to the machine breaking down Please make sure the flow rate of the cooling water is at least 7 5 L min the water pressure is more than 0 3 MPa and the head should be more than 30 ...

Страница 8: ... the water inlet and water outlet in this photo of your heater are located Also note the ground wire screw which is towards the bottom of your machine In this image the housing is flipped up to show where to connect the two current carrying wires V Back of the Heater ...

Страница 9: ...ng through the coil allowing for the workpiece to cool down Heat Power Adjustment Knob Controls the current going through the coil in manual mode and during the heating portion in automatic mode It is recommended to start at a low current when first turning the machine on and then slowly increase the current by rotating the knob as the machine warms up The more this knob is turned clockwise the hi...

Страница 10: ... mode Pedal Connector If the foot pedal is connected to the machine the machine can be controlled using the pedal instead of the Start Stop Buttons on the machine Power Switch Turns the machine on or off Auto Manual Switch Switches the working mode between automatic and manual Start Stop Buttons Starts or stops the working process when the pedal is not connected VI Front Panel in Auto Mode ...

Страница 11: ...e is overheating the water pressure to the machine is not high enough or the phase power is failing Time for Heating Retaining and Cooling Heating Time Time in seconds for heating the workpiece according to the level selected using the Heat Power Adjustment Knob Retaining Time Time in seconds for heat retention of the workpiece according to the level selected using the Retain Power Adjustment Knob...

Страница 12: ...e of the current phase when in automatic mode When the Heat Indicator lights up it shows the heating time When the Retaining Indicator lights up it shows the retaining time When the Cooling Indicator lights up it shows the cooling time Output Current When twisting the Heating Power Knob this shows the heating power When twisting the Retain Power Knob it shows the retain power When the machine is o...

Страница 13: ...ling Mode The coil will not be energized for the duration of the selected Cooling Time Once the program is finished to run it again simply press the Start Button again Automatic mode can be very useful for repeating the same action on different workpieces Similarly when soldering brazing or otherwise needing two different working temperatures automatic mode can provide that as well Step 1 Flip the...

Страница 14: ...Retain Power Adjustment Knob Pedal Connection If the foot pedal is connected to the machine the machine can only be controlled using the pedal instead of the Start Stop Buttons on the machine Power Switch Turn the machine on or off Auto Manual Switch Toggles between working modes Start Stop Buttons Start or stop the working process when the pedal is not connected VIII Front Panel in Manual Mode ...

Страница 15: ...he machine is overheating the water pressure to the machine is not high enough or the phase power is failing Time Display Shows the working time in seconds This increases as time passes Output Current When turning the Heating Power Knob this displays the heating power When the heater is working it shows the induced current on the coil Note Indicators and knobs covered by a gray box in the picture ...

Страница 16: ...start heating Step 4 Turn off and unplug the heater when not in use Note If the pedal is connected to the machine you can only start the machine by pressing foot pedal In actual use many factors will determine the speed and temperature of the heating process While the adjustment knobs do control current the heating power also depends on the material of the workpiece the thickness of the workpiece ...

Страница 17: ...al type used in the seal Hardening Many metals can be heat treated to induce hardening Most often this process requires quenching right after heating so have a quenching station available Annealing Some heat treated metals will end up softer Be aware of the type of metal you are heat treating results can differ Soldering Much like brazing clean the surfaces to be used Be aware that solder can melt...

Страница 18: ...e it enters the machine Remember to always use cool clean water Problem Over Voltage Light comes on Cause The machine is not hooked up to the proper voltage Solution Make sure the machine is hooked up to the appropriate voltage based on the model Problem Over Current Light comes on Causes Internal issue Coil design issue Solutions Contact us for help Ensure the coil does not have too many turns co...

Страница 19: ...and tighten all connections Check that electricity is reaching the machine Problem Machine beeps when attempting to start the machine Causes Coil not properly connected Improper coil design Solutions Check the connection between the coil and the machine Ensure the coil does not have too many turns or covers too much area enclosed within it Problem Water Lack Light comes on Causes Lack of water pre...

Страница 20: ...220 V Single Phase Fluctuating Frequency 30 80 KHz Output Current 200 600 A Max Heating Temperature 1200 C 2192 F Time Settings 01 to 99 seconds Product Dimensions 22 x 9 x 19 Weight 25 kg 55 lbs Water Temperature Protection Point 40 C 104 F Flow Rate of Cooling Water 7 5 L min Min Water Pressure 0 3 MPa Head of Cooling Water 30 m 98 ft Min Wire Gauge 9 gauge XIII Specifications ...

Отзывы: