


Part Number 1955202 1/15
20
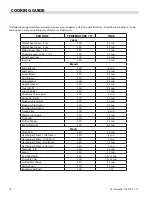
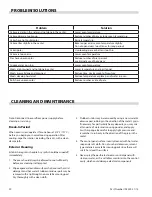
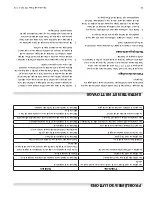
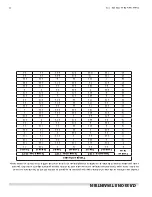
PROBLEM/SOLUTIONS
Problem
Solution
Cakes are dark on the sides and not done in the center
Lower oven temperature
Cakes edges are too brown
Reduce number of pans or lower oven temperature
Cakes have light outer color
Raise temperature
Cake settles slightly in the center
Bake longer or raise oven temperature slightly.
Do not open doors too often or for long periods
Cake ripples
Overloading pans or batter is too thin
Cakes are too coarse
Lower oven Temperature
Pies have uneven color
Reduce number of pies per rack
or eliminate use of bake pans
Cupcakes crack on top
Lower oven temperature
Meats are browned and not done in center
Lower temperature and roast longer.
Meats are well done and browned
Reduce time. Limit amount of moisture
Meats develop hard crust
Reduce temperature or place pan of water in oven.
Rolls have uneven color
Reduce number or size of pans.
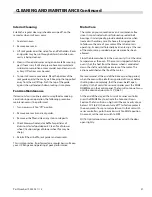
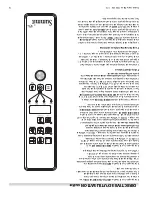
CLEANING AND MAINTENANCE
Note: Disconnect line cord from power supply before
cleaning or servicing.
Break-In Period
When oven is new, operate it for one hour at 375°F (191°C)
before you begin your normal cooking operation. After
cooling, wipe the interior, including the racks, with a clean
damp cloth.
Exterior Cleaning
Establish a regular schedule. Any spills should be wiped off
immediately.
1. The oven should always be allowed to cool sufficiently
before any cleaning is attempted.
2. Wipe exposed, cleanable surface when cool with a mild
detergent and hot water. Stubborn residue spots may be
removed with a lightweight non-metallic scouring pad.
Dry thoroughly with a clean cloth.
3. Stubborn stains may be removed by using a non-metallic
abrasive pad, rubbing in the direction of the metal’s grain.
If necessary, for particularly heavy deposits, you may mix
a thin paste of water and scouring powder, and apply
it with a sponge. Be careful to apply light pressure and
remember to rub only in the direction of the grain in the
metal.
4. The control panel surface is easily cleaned with hot water,
soap and a soft cloth. Do not use hard abrasives, solvent
type materials or metallic scouring pads since these will
scratch or cloud the surface.
5. Never spray the perforated areas or control panel with
steam or water, as this will allow moisture into the control
cavity, which could damage electrical components.
Содержание Manitowoc Summit series
Страница 2: ......
Страница 4: ...THIS PAGE INTENTIONALLY LEFT BLANK...
Страница 6: ...THIS PAGE INTENTIONALLY LEFT BLANK...
Страница 22: ...THIS PAGE INTENTIONALLY LEFT BLANK...
Страница 23: ......
Страница 26: ......
Страница 27: ...CETTE PAGE EST LAISS E BLANCHE INTENTIONNELLEMENT...
Страница 43: ...CETTE PAGE EST LAISS E BLANCHE INTENTIONNELLEMENT...
Страница 45: ...CETTE PAGE EST LAISS E BLANCHE INTENTIONNELLEMENT...
Страница 47: ......


