background image


23 

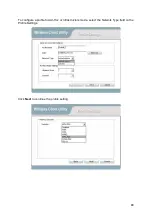
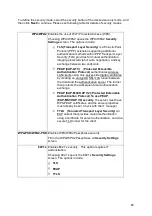
To define the security mode, select the security button of the desired security mode. And 
then click Next to continue. Please see following table for details of security modes. 


WPA/WPA2  Enables the use of Wi-Fi Protected Access (WPA).    

Choosing WPA/WPA2 opens the WPA/WPA2 Security 
Settings 
screen. The options include: 


TLS (Transport Layer Security) is a Point-to-Point 
Protocol (PPP) extension supporting additional 
authentication methods within PPP. Transport Layer 
Security (TLS) provides for mutual authentication, 
integrity-protected cipher suite negotiation, and key 
exchange between two endpoints. 


PEAP (EAP-GTC)    (Protected Extensible 
Authentication Protocol) 
authenticates wireless 
LAN clients using only server-side digital certificates 
by creating an encrypted SSL/TLS tunnel between 
the client and the authentication server. The tunnel 
then protects the subsequent user authentication 
exchange. 


PEAP (EAP-MSCHAP V2) (Protected Extensible 
Authentication Protocol)
 To use PEAP 
(EAP-MSCHAP V2) security
, the server must have 
WPA-PEAP certificates, and the server properties 
must already be set. Check with the IT manager 


TTLS    (Tunneled Transport Layer Security) An 
EAP variant that provides mutual authentication 
using a certificate for server authentication, and via a 
secure TLS tunnel for the client 

WPA-PSK/WPA2-PSK  Enables WPA/WPA2 Passphrase security.     

Fill in the WPA/WPA2 Passphrase on Security Settings 
screen.   

802.1x  Enables 802.1x security.   This option requires IT 

administration.   

Choosing 802.1x opens the 802.1x Security Settings 
screen. The options include:   


TLS   


PEAP   


TTLS   


Содержание WUB-375L

Страница 1: ...802 11n g b Wireless USB Adapter Model WUB 375L User s Guide...

Страница 2: ...eration is subject to the following two conditions 1 This device may not cause harmful interference and 2 this device must accept any interference received including interference that may cause undesi...

Страница 3: ...N Security 9 Data Encryption with WEP 10 Chapter 2 Getting Started About Your 802 11n b g WLAN USB2 0 Adapter 11 Package Content 11 System Requirement 11 LED Definition 11 Wireless Utility and Adapter...

Страница 4: ...dually increases the transmission data rate again until it reaches the highest available transmission rate Types of Wireless Networks Wireless LAN networking works in either of the two modes ad hoc an...

Страница 5: ...When a number of wireless stations are connected using a single access point you have a Basic Service Set BSS 6...

Страница 6: ...communication is done through the access points which relay data packets to other wireless stations or devices connected to the wired network Wireless stations can then access resources such as a pri...

Страница 7: ...able to move from one access point to another without losing the connection In the diagram below when the user moves from BSS 1 to BSS 2 the adapter automatically switches to the channel used in BSS 2...

Страница 8: ......

Страница 9: ...pter starting with the most secure EAP Extensible Authentication Protocol is used for authentication and utilizes dynamic WEP key exchange EAP requires interaction with a RADIUS Remote Authentication...

Страница 10: ...se sensitive You must use the same passphrase for all WLAN adapters with this feature in the same WLAN For WLAN adapters without the passphrase feature you can still take advantage of this feature by...

Страница 11: ...ally shifts based on signal strength for maximum availability and reliability of connection Support both 20MHz 40MHz bandwidth Support WEP 64 128 WPA WPA2 encryption Support QoS WMM Multi path 1x2 des...

Страница 12: ...tion procedures will be started Otherwise open your CD folder and double click on the setup exe file STEP 3 The InstallShield Wizard prepares for installation STEP 4 The InstallShield Wizard prompts y...

Страница 13: ...reen you are asked to confirm the Destination Folder for the application software If you would like you may change the destination folder to another location Click Next STEP 6 The wizard is ready to b...

Страница 14: ...14 STEP 7 The Install shield Wizard setup for installation STEP 8 Click Finish to complete the client utility installation...

Страница 15: ...s moment please insert your USB Adapter to your Laptop through the cradle After the following window pop up click Next on the Fund New Hardware Wizard STEP 10 Choose Install the software automatically...

Страница 16: ...16 STEP 11 Click Finish to complete the installation...

Страница 17: ...procedure a new icon as shown below will automatically appear in the lower right tray bar Hold your mouse pointer over the icon and press the right mouse button to open the Wireless Client Utility The...

Страница 18: ...figuration name on the Profile tab SSID Displays the wireless network name Link Status Shows whether the station is associated to the wireless network Network Type The type of network the station is c...

Страница 19: ...Displays the authentication mode TCP IP Status IP Address Displays the computer s IP address Subnet Mask Displays subnet mask Gateway Displays gateway address 2 6 2 Site Survey Click the Site Survey t...

Страница 20: ...network Click the Connect button to connect the available network If no configuration profile exists for that network the Profile Settings window opens to ask to create a profile for the network Follo...

Страница 21: ...iguration from the Profile list and click the Edit button Scan Available Networks Click the Browse button on the Profile Settings screen to scan for available infrastructure and ad hoc networks On thi...

Страница 22: ...22 To configure a profile for Ad Hoc or Infrastructure mode select the Network Type field on the Profile Settings Click Next to continue the profile setting...

Страница 23: ...ients using only server side digital certificates by creating an encrypted SSL TLS tunnel between the client and the authentication server The tunnel then protects the subsequent user authentication e...

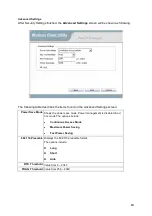
Страница 24: ...on the Advanced Settings screen Power Save Mode Shows the power save mode Power management is disabled in ad hoc mode The options include Continuous Access Mode Maximum Power Saving Fast Power Saving...

Страница 25: ...w You can activate the profile now or later WPS Setting The user obtains a device password PIN Code from the STA and enters the password into the Registrar Both the Enrollee and the Registrar use PIN...

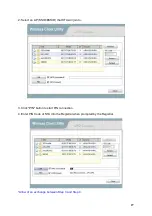
Страница 26: ...26 1 Click Refresh button to update available WPS APs...

Страница 27: ...lect an AP SSID BSSID that STA will join to 3 Click PIN button to start PIN connection 4 Enter PIN Code of STA into the Registrar when prompted by the Registrar Allow of an exchange between Step 3 and...

Страница 28: ...28 5 The result will look like the below figure 6 Then connect successfully The result will look like the below figure...

Страница 29: ...d M4 Sending M5 Received M6 Sending M7 Received M8 Sending EAP Rsp Done Configured WPS status is disconnected WPS status is connected successfully SSID 2 WPS configuration doesn t complete after two m...

Страница 30: ...g to uninstall the driver 3 2 Uninstall the Client Utility Follow the steps below to remove the Client Utility from your computer Step 1 To remove the utility from the OS go to Start Control Panel Ste...

Страница 31: ...ntication By using EAP to interact with an EAP compatible RADIUS server an access point helps a wireless station and a RADIUS server perform authentication ENCRYPTION The reversible transformation of...

Страница 32: ...E 802 1X and Extensible Authentication Protocol EAP to authenticate wireless clients using an external RADIUS database If you do not have an external RADIUS server use WPA PSK WPA2 PSK WPA Pre Shared...

Отзывы: