0509 IH-99
PAGE 3 OF 5
OPERATION
USING AUTOMATIC FEED
1. Plug in power cord and turn unit on.
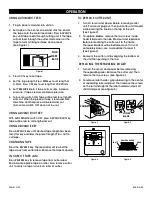
2. Set tape on the center of reel and stick the end of
the tape onto the metal feed roller. Press ADVANCE
key until tape feeds through cutting unit. If the tape
will not feed through the cutter, fold corners of the
tape to form a triangle shape and re-feed.
(See Figure 1)
3. Press CUT key to cut tape.
4. Set the tape length. Press MM key to set length of
0-9mm. Press CM key to set length of 20-990mm.
5. Set PrESSUrE knob. If tape curls or slips, increase
pressure. If tape creases, decrease pressure.
6. Turn sensor switch ON. Tape will be fed to set length
and cut. When the piece of tape is removed from
machine, another piece will be fed and cut.
(Turn sensor switch OFF when not in use.)
USING ADVANCE/CUT KEy
With AUTO SENSOr switch OFF, press ADVANCE/CUT key.
Tape will be fed to set length and cut.
USING ADVANCE KEy
Press ADVANCE key until desired tape length has been
fed. (This key overrides the preset length.) Press CUT to
cut tape.
CHANGING TAPE
Press the rEVErSE key. The feed roller will rewind the
tape away from cutter area. remove the tape manually.
IN CASE OF TAPE jAM
Press rEVErSE key to remove tape from cutter area.
rewind and replace tape on roller. Also, remove cutter
unit to verify no tape is stuck on roller or cutter.
TO rEPLACE CUTTEr UNIT
1. Turn off sensor and power before removing cutter
unit. Pull sensor plug out, then pull cutter unit forward
while pressing the knob on the top of the unit.
(See Figure 2)
2. To replace blades, remove the two screws inside
head. blade can then be lifted out and replaced.
before remounting the cutter unit to the frame,
the lower blade must be bottomed out. If it is not
completely down, use a screwdriver to lower it.
(See Figure 3)
3. remount the cutter unit by aligning the bottom of
the unit then pushing in the top.
rEPLACING THE SEPArATING rOLLEr
1. Turn off the sensor and power before removing
the separating roller. remove the cutter unit, then
remove the two screws. (See Figure 4)
2. To remove roller holder, grip rubber ring in the center
of separating roller and pull. Then remove the screws
on the left and right of the roller holder and pull off
shaft and gear. (See Figure 5)
KNOB
LOWER
BLADE
Figure 2
Figure 3
SHAFT
ROLLER HOLDER
GEAR
Figure 4
Figure 5
FOLD
TAPE
BACK
Figure 1

