background image

PAGE 2 OF 33 

0819 IH-8093

CAUTION! First, check the local line voltage is 

in the range 100 – 240V AC, 50 – 60 Hz and 

determine whether the power plug fits your 

local power supply connection. If this is not the 

case, do not connect the printer or the  
AC adapter to the power supply. Contact Uline 
Customer Service at 1-800-295-5510.

•  Only plug adapter into a grounded socket.

WARNING! Before operating, check all cables 
for damage.

•  Guide the cables so that they are not damaged 

or interfere during the weighing process.

•  Make sure that the AC adapter cannot come 

into contact with liquids.

•  The power plug must always be accessible.

PRINTER SETUP 

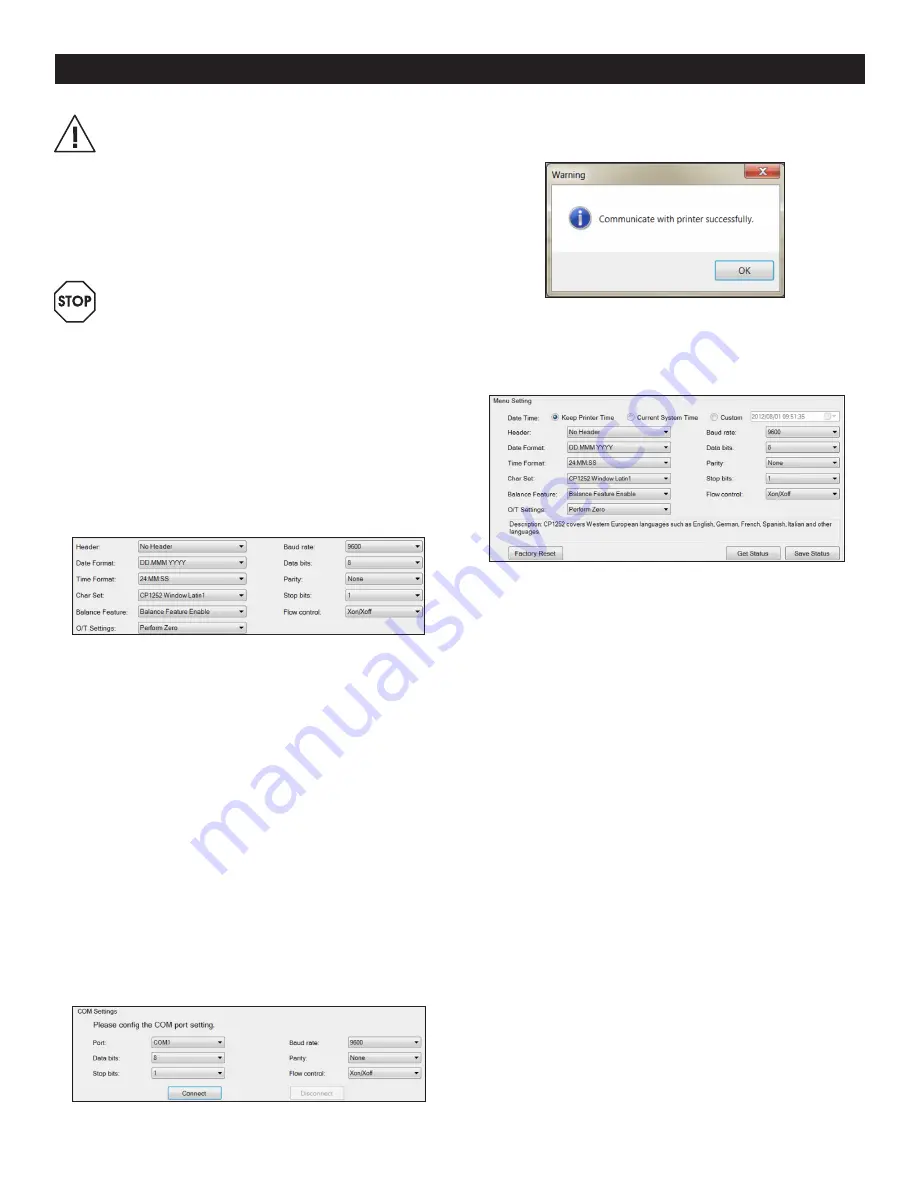
•  Default printer settings are shown below. (See Figure 1)

There are two ways to change the default setting:

•  Use accompanying software.

•  Operate on the printer only.

PRINTER SETUP USING ACCOMPANYING SOFTWARE

1.  Attach the interconnecting cable to the printer 

interface on the computer and to the printer.

2.  Connect printer to the main power supply.

3.  Use the main switch <I/O> to power on.

4.  Insert CD into the computer and install the printer 

software.

5.  Run the software and set up the RS-232 parameter of 

computer, then click the Connect button.  

(See Figure 2)

6.  The following window will appear if connection is 

successful. Click OK to continue. (See Figure 3)

7.  The printer Menu setting is now activated and all 

settings can be changed. (See Figure 4)

a. 

Date Time:

 Sets date and time for the printer.

•  Keep Printer Time: Keep existing date and time 

in the printer.

•  Current System Time: Get date and time from 

your computer.

•  Custom: Set date and time manually. 

b. 

Header

: Sets the header of the printing content.

•  No Header: No header for printing content.

•  Date/Time: Header with date and time.

•  Date/Time/Balance: Header with date, time 

and S/N.

c. 

Date Format

: Sets date format.

d. 

Time Format

: Sets time format.

e. 

Char Set

: Sets code page for different 

languages.

•  CP 1252 Windows Latin1: Covers Western 

European languages such as English, German, 

French, Spanish and Italian.

•  CP 1251 Windows Cyrillic: Covers languages 

that use the Cyrillic alphabet such as Russian, 

Bulgarian and Serbian Cyrillic.

SETUP CONTINUED

Figure 1

Figure 2

Figure 3

Figure 4

Содержание H-8093

Страница 1: ...y tests related to the methods and purposes of its intended use Observe the following safety measures CAUTION The printer must only be used indoors and never in hazardous areas The electronics of the...

Страница 2: ...ly 3 Use the main switch I O to power on 4 Insert CD into the computer and install the printer software 5 Run the software and set up the RS 232 parameter of computer then click the Connect button See...

Страница 3: ...e RS 232 settings please see scale manual Reset printer to factory default setting Get current setting from the printer Save the setting to the printer 8 Click the Save Status button to save the setti...

Страница 4: ...the printer The printer prints out the current settings Terminating the Test Power off printer SETUP MENU SETUP MENU SAMPLE PRINTOUT Tare Reset List Settings 8 Bit None 1 Xon Xoff CP1252 Zero Enable...

Страница 5: ...RESS AND HOLD Zero or tare the balance Print of date and time One line feed Continuous feed until release Print Open menu MENU LEVEL Store FUNCTION LEVEL Start totaling application Conclude totaling a...

Страница 6: ...ermitted Maximum 999 samples Sample weight must be in the range of 70 130 of the current average value Minimum sample weights should be larger than 1d During sample change the scale reading needs to c...

Страница 7: ...de Baud Rate 9600 Bit Parity 8 bit None 1 Handshake Xon Xoff Language ANSI WIN Czech CP852 MS DOS Latin2 Hungarian Printer Mode Baud Rate 9600 Bit Parity 8 bit None 1 Handshake Xon Xoff Language ANSI...

Страница 8: ...ge 10 NOTE You may obtain the paper rotary axis from the old paper roll REPLACING THE RIBBON 1 Remove the paper cover 1 See Figure 8 2 Pull paper out of printing unit 2 3 To remove the ribbon cartridg...

Страница 9: ...ge settings of the printer or the connected scale See page 4 Timeout Data transfer not completed within 45 seconds Move scale to a more stable location Check the scale Over Load Balance in overload ra...

Страница 10: ...ut of range Sample weight must be in the range of 70 130 of the current average value CONSUMABLES AND SPARE PARTS 3 1 2 5 6 4 DESCRIPTION QTY ULINE PART NO MFG PART NO 1 Paper Cover 1 30047939 2 Paper...

Страница 11: ...ix printer 5 x 7 40 character line length Printing Speed 1 2 lines per second Ribbon Cartridge Exchangeable black Paper Roll Standard paper 57 5 x 50 60 mm integrated in housing commercial size Print...

Страница 12: ...n Es su responsabilidad el llevar a cabo las pruebas necesarias relacionadas con los m todos y prop sitos de su uso previsto Observe las siguientes medidas de seguridad PRECAUCI N Se debe usar la impr...

Страница 13: ...l software y configure el par metro RS 232 de la computadora despu s haga clic en el bot n Connect Conectar Vea Diagrama 2 6 La siguiente ventana aparecer si la conexi n es exitosa Haga clic en OK par...

Страница 14: ...rada Control de Flujo Establece los par metros de la configuraci n RS 232 La configuraci n debe ser la misma que la de la b scula para ser conectada Para la configuraci n RS 232 de la b scula vea el m...

Страница 15: ...a impresora La m quina imprime la configuraci n actual Final de la Prueba Apague la impresora SETUP CONTINUED CONTINUACI N DE CONFIGURACI N SETUP MENU MEN DE CONFIGURACI N MEN DE CONFIGURACI N IMPRESI...

Страница 16: ...Cero o Tara Imprimir fecha y hora Alimentaci n de Una L nea Alimentaci n Continua hasta soltar Imprimir Abrir el Men NIVEL DE MEN Almacenar NIVEL DE FUNCI N Aplicaci n para comenzar la totalizaci n Ap...

Страница 17: ...la unidad durante la aplicaci n M ximo de 999 muestras El peso de la muestra debe estar en el rango de 70 130 del valor promedio actual El m nimo de muestras de peso debe ser m s grande que 1d Durant...

Страница 18: ...Velocidad de Transmisi n 9600 Bit Paridad 8 bits Ning n 1 Protocolo de Intercambio Xon Xoff Idioma ANSI WIN Checo CP852 MS DOS Lat n 2 H ngaro Modo de Impresora Velocidad de Transmisi n 9600 Bit Parid...

Страница 19: ...el eje de rotaci n del papel del rollo anterior REEMPLAZAR LA CINTA 1 Retire la cubierta del papel 1 Vea Diagrama 8 2 Saque el papel de la unidad de impresi n 2 3 Para retirar el cartucho de la cinta...

Страница 20: ...gina 15 Timeout L mite de tiempo La transferencia de datos no se complet en 45 segundos Mueva la b scula a una ubicaci n m s estable Verifique la b scula Over Load Sobrecarga B scula en rango de sobr...

Страница 21: ...ange Fuera de rango El peso muestra est fuera de rango El peso de la muestra debe estar en el rango de 70 130 del valor promedio actual CONSUMIBLES Y PARTES DE REPUESTO 3 1 2 5 6 4 DESCRIPCI N CANT NO...

Страница 22: ...ategor a De Sobrevoltaje Clase II Grado de Contaminaci n 2 Unidad de Impresi n Impresora de matriz de puntos 5 x 7 longitud de 40 caracteres por l nea Velocidad de Impresi n 1 2 l neas por segundo Car...

Страница 23: ...r les tests n cessaires relatifs aux proc d s et aux fins de l utilisation pr vue Veuillez respecter les mesures de s curit suivantes MISE EN GARDE L imprimante doit tre utilis e uniquement l int rieu...

Страница 24: ...r puis installez le logiciel d imprimante 5 Ex cutez le logiciel et tablissez les param tres RS 232 de l ordinateur puis cliquez sur le bouton Connect connecter Voir Figure 2 6 La fen tre suivante app...

Страница 25: ...la balance connecter Consultez le guide d utilisation de la balance pour conna tre les param tres du RS 232 de la balance R initialiser l imprimante au param tre par d faut d usine Rep rer le param t...

Страница 26: ...sur la touche et allumez l imprimante L imprimante imprime les param tres actuels Achever le test teignez l imprimante CONFIGURATION DU MENU CONFIGURATION DU MENU EXEMPLE D IMPRESSION Tare Reset List...

Страница 27: ...nce Impression de la date et l heure Alimentation une ligne Alimentation continue jusqu rel chement Impression Acc der au menu NIVEAU DU MENU Sauvegarder NIVEAU DES FONCTIONS Lancer l application de t...

Страница 28: ...t en cours d application n est pas autoris Maximum de 999 chantillons Le poids de l chantillon doit tre compris dans la plage de 70 130 de la valeur moyenne actuelle Le poids minimum de l chantillon d...

Страница 29: ...auds 9 600 Bits parit 8 bits Aucun 1 tablissement de liaison Xon Xoff Langue ANSI WIN Tch que CP852 MS DOS Latin2 Hongrois Mode d imprimante D bit en bauds 9 600 Bits parit 8 bits Aucun 1 tablissement...

Страница 30: ...n de papier de l ancien rouleau de papier REMPLACER LE RUBAN 1 Retirez le couvercle 1 Voir Figure 8 2 Retirez le papier du m canisme d impression 2 3 Pour retirer la cartouche de ruban poussez dans le...

Страница 31: ...de donn es non compl t en 45 secondes Placez la balance dans un endroit plus stable V rifiez la balance Over Load surcharge Balance dans la plage de surcharge Mise z ro en dehors de la plage de r glag...

Страница 32: ...de l chantillon hors de port e Le poids de l chantillon doit se trouver dans la plage de 70 130 de la valeur moyenne actuelle CONSOMMABLES ET PI CES DE RECHANGE 3 1 2 5 6 4 DESCRIPTION QT R F ULINE R...

Страница 33: ...re jusqu 50 104 F 40 C sans condensation Cat gorie de surtension Classe II Niveau de pollution 2 M canisme d impression Imprimante matrice de points 5 x 7 40 caract res par ligne Vitesse d impression...

Отзывы: