background image

PAGE 6 OF 12

0314 IH-161

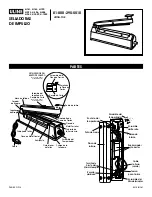
fUNCioNAMieNTo

SellAdoRA

1 Mil

2 Mil

3 Mil

4 Mil

6 Mil

H-161

3

3

3

4

5

H-163

3

3

3

4

5

H-190

3

3

3.5

4

5.5

H-293

3

3

3.5

4

5.5

H-306

3

3

3.5

4

5.5

H-458

3

3

3

4

5

H-963

3

3

3.5

4

5

H-1029

3

3

3.5

4

5.5

H-1252

3

3

3.5

4

5

eSPeCifiCACioNeS

Modelo

fUeNTe

PoTeNCiA de 

iMPUlSo

lARGo MÁx. de 

SellAdo

GRoSoR MÁx. 

de SellAdo

PeSo

diMeNSioNeS

H-161

120 V

410 W

20 cm (8")

6 Mil

3.5 kg (7.7 lbs.)

8.1 x 38.1 x 16 cm  

(3.2 x 15 x 6.3")

H-163

120 V

410 W

20 cm (8")

6 Mil

2.6 kg (5.8 lbs.)

8.1 x 32 x 15 cm  

(3.2 x 12.6 x 5.9") 

H-190

120 V

580 W

30 cm (12")

6 Mil

3.9 kg (8.5 lbs.)

8.4 x 45.2 x 18.8 cm  

(3.3 x 17.8 x 7.4")

H-293

120 V

580 W

30 cm (12")

6 Mil

4.6 kg (10.1 lbs.)

8.1 x 45.5 x 18.8 cm 

(3.2 x 17.9 x 7.4")

H-306

120 V

670 W

40 cm (16")

6 Mil

4.5 kg (9.9 lbs.)

7.6 x 53.3 x 17.8 cm  

(3 x 21 x 7")

H-458

120 V

160 W

10 cm (4")

6 Mil

1.7 kg (3.7 lbs.)

7.1 x 21.1 x 15 cm 

(2.8 x 8.3 x 5.9")

H-963

120 V

670 W

40 cm (16")

6 Mil

5.4 kg (11.9 lbs.)

8.1 x 55.4 x 18.5 cm  

(3.2 x 21.8 x 7.3")

H-1029

120 V

870 W

52 cm (20")

6 Mil

5.9 kg (13 lbs.)

11.4 x 71.1 x 19.8 cm  

(4.5 x 28 x 7.8")

H-1252

120 V

870 W

52 cm (20")

6 Mil

5.9 kg (13 lbs.)

8.1 x 25.8 x 18.8 cm 

(3.2 x 25.9 x 7.4")

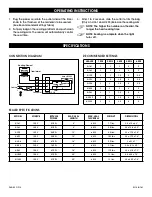
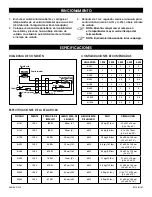
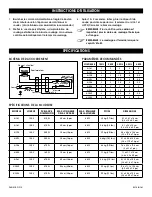
1.  Enchufe el cable al tomacorriente y configure el 

temporizador de acuerdo al material que va a sellar. 

(Vea Tabla de configuraciones Recomendadas) 

2.  coloque una bolsa de polietileno en la plataforma 

de sellado y presione hacia abajo el brazo de 

sellado. la selladora automáticamente controlará  

el tiempo de sellado. 

3.  después de 1 a 2 segundos, deslice la navaja para 

cortar la bolsa (solo en H-161 y H-293). libere el brazo 

de sellado. 

NoTA: Mientras mayor sea el número en 
el temporizador, mayor será el tiempo del 
termosellado. 
NoTA: el sellado termina cuando la luz se apaga. 

cOnFiGURAciOnES REcOMEndAdAS

DIAGRAMA DE CONEXIÓN

ESPEciFicAciOnES dE lA SEllAdORA

Resistencia

Transformador

Conector

Microinterruptor

Fuente

N

L

Relevador DC24V

Luz de Sellado

Temporizador

D

R

Control P.C.B.

Содержание H-1029

Страница 1: ...e Timer Assembly Sealer Body Heating Element Front Metal Plate Teflon Cover Power Cord Hinge Pin Hinge Bracket Lower Teflon Tape Heating Element Cover Pressure Plate Assembly Pressure Plate Spring Cutting Blade Microswitch Assembly Wire Nut Ground Wire green Transformer Support Brackets Internal Wiring Timer Connector Plug Base Plate Rubber Foot Timer Assembly Bow Spring Assembly Microswitch Adjus...

Страница 2: ...s 2 8 x 8 3 x 5 9 H 963 120 V 670 W 16 6 Mil 11 9 lbs 3 2 x 21 8 x 7 3 H 1029 120 V 870 W 20 6 Mil 13 lbs 4 5 x 28 x 7 8 H 1252 120 V 870 W 20 6 Mil 13 lbs 3 2 x 25 9 x 7 4 Heating Element Transformer Connector Microswitch Source N L Relay DC24V Sealing Light Timer D R Control P C B 1 Plug the power cord into the outlet and set the timer knob to the thickness of the materials to be sealed See Reco...

Страница 3: ...of metal cover plates teflon tapes and element clean sealing surface E with cleaner until free of glue and debris Adhesive remover is recommended See Figure 2 4 Peel off backing of adhesive teflon tape Apply evenly onto sealer Excess tape should extend all the way to the terminal posts F If the element touches any metal the sealer will short out See Figure 2 5 Attach new heating element 6 Reassemb...

Страница 4: ...time is too long Reset the timer knob to a lower number If the plastic bag sticks to the sealing arm it was because there was not enough cooling time Keep the arm down for a longer period of time after the light turns off It is okay to leave the unit plugged in The unit is off unless the sealing arm is down Information regarding potential risks of fire electric shock or injury to persons that are ...

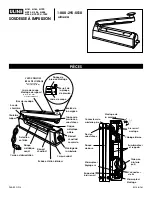
Страница 5: ...Metal Posterior Ensamble del Temporizador Cuerpo de la Selladora Resistencia Placa de Metal Frontal Cubierta de Teflón Cable Pasador de Bisagra Soporte de Bisagra Cinta Inferior de Teflón Cubierta de la Resistencia Ensamble de la Placa de Presión Resorte de la Placa de Presión Navaja de Corte PARTES Ensamble del Microinterruptor Tuerca para Cable Cable de Tierra verde Transformador y Soportes Cabl...

Страница 6: ...x 8 3 x 5 9 H 963 120 V 670 W 40 cm 16 6 Mil 5 4 kg 11 9 lbs 8 1 x 55 4 x 18 5 cm 3 2 x 21 8 x 7 3 H 1029 120 V 870 W 52 cm 20 6 Mil 5 9 kg 13 lbs 11 4 x 71 1 x 19 8 cm 4 5 x 28 x 7 8 H 1252 120 V 870 W 52 cm 20 6 Mil 5 9 kg 13 lbs 8 1 x 25 8 x 18 8 cm 3 2 x 25 9 x 7 4 1 Enchufe el cable al tomacorriente y configure el temporizador de acuerdo al material que va a sellar Vea Tabla de Configuracione...

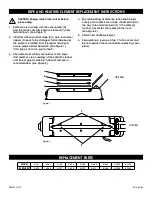
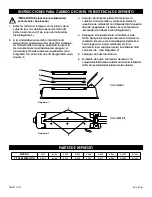
Страница 7: ...e la cubierta cintas de teflón y resistencia limpie la superficie de sellado E con limpiador hasta quedar libre de pegamento y residuos Se recomienda un removedor de adhesivo Vea Diagrama 2 4 Despegue el respaldo de la cinta adhesiva de teflón Aplique de manera uniforme encima de la selladora El exceso de cinta deberá extenderse a hasta llegar a los postes terminales F Si la resistencia toca cualq...

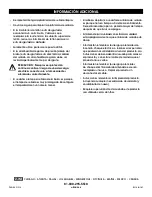
Страница 8: ...e el sellado de la bolsa es porque el tiempo de sellado es muy prolongado Reconfigure el temporizador en un número menor Si la bolsa de plástico se adhiere al brazo de sellado es porque no tuvo tiempo suficiente de enfriamiento Deje el brazo abajo por un periodo mayor de tiempo después de que la luz se apague Está bien dejar la unidad conectada La unidad está apagada a menos que el brazo de sellad...

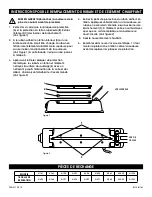
Страница 9: ...lage vis Rappel de bras ressort π 2 1 3 4 5 6 Bras de soudage Lame de coupe Montage du support H 161 H 293 H 963 et H 1252 uniquement Bouton de la poignée VUE DU DESSOUS BRAS DE SOUDAGE H 161 H 293 H 963 et H 1252 uniquement Tampon de pression en caoutchouc Plaque métallique arrière Montage de la minuterie Corps soudant Élément chauffant Plaque métallique avant Protection en téflon Cordon d alimen...

Страница 10: ...nt plus la durée de soudage thermique est longue REMARQUE Le soudage est terminé lorsque le voyant s éteint Paramètres recommandés Schéma de raccordement Modèle Source Puissance d impulsion Max Longueur de la soudure Max Épaisseur de la soudure Poids Dimensions H 161 120 V 410 W 20 cm 8 po 6 Mil 3 5 kg 7 7 lbs 8 1 x 38 1 x 16 cm 3 2 x 15 x 6 3 po H 163 120 V 410 W 20 cm 8 po 6 Mil 2 6 kg 5 8 lbs 8...

Страница 11: ...iques les rubans en téflon et l élément nettoyez la surface de soudage E avec un nettoyant jusqu à l élimination de la colle et des débris Un dissolvant d adhésif est recommandé Voir figure 2 4 Retirez la pellicule protectrice du ruban adhésif en téflon Appliquez uniformément sur la soudeuse Le ruban en excès doit s étendre jusqu aux bornes de branchement F Si l élément entre en contact avec quoi ...

Страница 12: ...ée ou cassée cela signifie que le temps de chauffage est trop long Réglez le bouton de la minuterie sur un nombre inférieur Si le sac en plastique colle au bras de soudage cela signifie que le temps de refroidissement n est pas assez long Maintenez le bras vers le bas plus longtemps une fois le voyant éteint L unité peut rester branchée L unité est éteinte à moins que le bras de soudage ne soit ve...

Отзывы: