background image

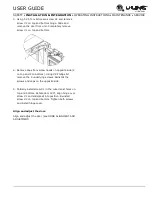
SAFETY • INSTALLATION & INTEGRATION • 

OPERATING INSTRUCTIONS 

• MAINTENANCE • SERVICE


 U-Line Wine Guide 2


USER GUIDE


u-line.com


Pork, Veal, Lamb and 
Poultry


Light-Bodied Red Wines


Fruit


Sweet White and Sparkling 

Wines


A Toast to Wine Truths


Like the grapes themselves, many wine myths have 

been cultivated over the centuries. 


Myth 1:


Most wines taste better when aged.


Truth:


In fact, less than 5% of wines produced today 

are  meant  to  be  aged.  Most  wines  are  crafted  to  be 
consumed within the first one to two years.


Myth 2:

 Wines should be uncorked and decanted 

allowing them to “breathe.”


Truth:


To breathe or not breathe? While it is better 

to allow a young tannic Red to breathe in a glass or 
decanter to soften the tannins, an old Red reaches a 
stage in its life where it should be enjoyed soon after 
opening. Allow an old Red to breathe for a short time 
to dissipate any off odors. Most white wines can be 
served, ideally, 10-15 minutes after opening.


Myth 3:


When age worthy wines peak, they must be 

consumed almost immediately.


Truth:

 Most great wines reach a plateau period 

rather than a peak. Great Bordeaux’s may have as 

much as a 10-year plateau before fading.


Myth 4: 

Wine color does not change with aging.


Truth:


As red wines age they get lighter in color 

while whites get darker.


The Cork: A Mystery on Its Own


Cork Presentation. The ritual of the presentation of the 

cork has a rich and fascinating history dating back to 

the late 1800’s. A phylloxera (root louse) devastation 

to  the  vineyards  severely  limited  the  supply  of  great 
wines. Restaurateurs would remove labels on inferior 
wines  and  replace  them  with  labels  from  superior 
wines.  This  made  it  necessary  for  patrons  to  protect 
themselves  by  checking  the  branding  on  the  cork  to 
ensure that what they ordered was, in fact, what they 
were served. 


When presented with a cork today, feel it to check for 

its integrity, read and match the branding on the cork 
to the bottle and set it aside. There is little to be 
learned from the cork. The proof is in the wine.


“Corked” wines. If you’ve ever had a wine that smelled 

or tasted of mold, you’ve experienced a wine that may 
have  been  “corked.”  Today,  between  five  and  eight 

percent  of  wines  are  tainted  with  Trichloroanisole 
(TCA).  This  substance,  found  naturally  in  plants  and 
trees, is imparted to the wine through the cork. Corked 
wines  are  a  major  concern  for  winemakers  as  it 
destroys  millions  of  cases  per  year  and  puts 
reputations at stake. Amazing as it may seem twist-off 
caps  may  offer  a  better  alternative  and  many  great 
wineries in California, Australia and New Zealand are 
pioneering the trend.


Common Tasting Terms 

IDEAL WINE STORAGE CONSIDERATIONS


Terminology


Description


Acidity


A critical element of wine that is 
responsible for preserving the wines 
freshness. Excess acidity results in an 
overly tart and sour wine.


Содержание 3024BEV

Страница 1: ...OPERATING INSTRUCTIONS MAINTENANCE SERVICE Modular 3000 Series 3024BEV 24 Beverage Center SAFETY INSTALLATION INTEGRATION OPERATING INSTRUCTIONS MAINTENANCE SERVICE Contents Intro Safety Safety and Warning RIGHT PRODUCT RIGHT PLACE RIGHT TEMPERATURE SINCE 1962 ...

Страница 2: ...sis Guide Compressor Specifications Troubleshooting Extended Control Quick Guide Thermistor Defrost Remove Fan and Cover First Use Control Operation Sabbath Mode Airflow and Product Loading U Line Wine Guide Recommended Wine Storage Interior Shelves Maintenance Cleaning Cleaning Condenser WELCOME TO U LINE Congratulations on your U Line purchase Your product comes from a company with over five dec...

Страница 3: ... and Product Warranty information are all available for reference and download at u line com PROPERTY DAMAGE INJURY CONCERNS In the unlikely event property damage or personal injury is suspected related to a U Line product please take the following steps 1 U Line Customer Care must be contacted immediately at 1 800 779 2547 2 Service or repairs performed on the unit without prior written approval ...

Страница 4: ...w this safety statement could result in serious personal injury or death CAUTION Caution means that failure to follow this safety statement may result in minor or moderate personal injury property or equipment damage DANGER This unit contains R600a Isobutane which is a flammable hydrocarbon It is safe for regular use Do not use sharp objects to expedite defrosting Do not service without consulting...

Страница 5: ...dren may not easily climb inside If the unit is being removed from service for disposal check and obey all federal state and local regulations regarding the disposal and recycling of refrigeration appliances and follow these steps completely 1 Remove all consumable contents from the unit 2 Unplug the electrical cord from its socket 3 Remove the door s drawer s Disposal and Recycling 1 ...

Страница 6: ... ambient temperatures may reduce the unit s ability to reach low temperatures and or reduce ice production on applicable models For best performance keep the unit out of direct sunlight and away from heat generating equipment In climates where high humidity and dew points are present condensation may appear on outside surfaces This is considered normal The condensation will evaporate when the humi...

Страница 7: ...n extension cord to connect power to the unit Always keep your working area dry NOTICE Electrical installation must observe all state and local codes This unit requires connection to a grounded three prong polarized receptacle that has been placed by a qualified electrician The unit requires a grounded and polarized 115 VAC 60 Hz 15A power supply normal household current An individual properly gro...

Страница 8: ...surements The opening must be square and plumb front to back Although not required you may choose to increase the overall cutout width for ease of installation The Modular 3000 Series units are engineered with a variety of adjustment features to help ensure a seamless installation Adjustable doors leveling legs and grille will assist in fine tuning the installation All 3000 Series models fully int...

Страница 9: ...SAFETY INSTALLATION INTEGRATION OPERATING INSTRUCTIONS MAINTENANCE SERVICE USER GUIDE u line com Product Dimensions ...

Страница 10: ...isted under Cutout Dimensions in each unit s Installation Guide Each door can be opened individually one at a time without interference However to ensure unobstructed door swing opening both doors at the same time 1 4 6 4 mm of space needs to be maintained between the units Hinge by Hinge Installation Mullion When installing two units hinge by hinge 13 16 22 mm is required for integrated models Ad...

Страница 11: ...etry 3 Using a 3 32 2 50 mm drill bit drill 3 pilot holes 5 8 16 mm deep into bottom of counter top Use the anti tip bracket as a template 4 Install 3 8x5 8 screws into the plate using a 2 Phillips head screwdriver SIDE MOUNT Side mount position is used when you are unable to mount the bracket to the underside of your countertop 1 Remove the pre installed anti tip bracket from the top mount positi...

Страница 12: ...ening adjust the rear legs to achieve a total unit rear height of 1 8 3 mm less than the opening s rear height Shorten the unit height in the front by adjusting the front legs This allows the unit to be gently tipped into the opening Adjust the front legs to level the unit after it is correctly positioned in the opening INSTALLATION 1 Plug in the power electrical cord 2 Gently push the unit into p...

Страница 13: ...2 Finish or stain your grille plinth strip base fascia panel to match your surrounding furniture Finish front back and edges to prevent warping Carefully follow the manufacturer s recommendations for finish application and cure times 3 Apply double sided tape to the backside of the integrated grill plinth strip base fascia Use the diagram below for reference U Line recommends 3M VHB tape a high st...

Страница 14: ...rille plinth strip base fascia rail with screw heads in base of unit 2 Push grille plinth strip base fascia rails towards the center of the unit and set rails over screw head 3 Slide grille plinth strip base fascia into position Using included 7 64 Allen wrench tighten grille plinth strip base fascia lock screws ADJUSTING GRILLE PLINTH STRIP BASE FASCIA The grille plinth strip base fascia has an a...

Страница 15: ...n door approximately 90 2 Remove hinge cover by lifting top and bottom of hinge cover and sliding the cover inwards to remove from hinge 3 Once cover is removed slide hinge pin into hole as shown Pin should slide into place stopping the door at 90 if the pin does not go into the hole shown hold the door less than 90 open and try again 4 To fully seat the pin tap it lightly with a hammer 5 Carefull...

Страница 16: ...examine the door s gasket to ensure that it is firmly in contact with the cabinet Also make sure the door gasket is not pinched on the hinge side of the door CAUTION Do not attempt to use the door to raise or pivot your unit This would put excessive stress on the hinge system Alignment and Adjustment Procedure 1 Open door and remove gasket near the hinges 2 Using a T 25 Torx Bit loosen each pair o...

Страница 17: ...ON INTEGRATION OPERATING INSTRUCTIONS MAINTENANCE SERVICE USER GUIDE u line com b y l i f t i n g t o p a n d b o t t o m f l a p s a n d s l i d e i n w a r d s R e p e a t o n b o t t o m h i n g e Door Adjustments 1 ...

Страница 18: ...ps from screw heads on opposite side 2 on top and 2 on bottom Using 2 Phillips bit remove the 4 underlying screws Reinstall the screws and caps on the opposite side 5 Partially install screw 1 in the outer most holes on top and bottom Rotate door 180 align hinge over screw 1 and slide seat into position Reinstall screw 2 on top and bottom Tighten both screws and install hinge cover Align and adjus...

Страница 19: ...SAFETY INSTALLATION INTEGRATION OPERATING INSTRUCTIONS MAINTENANCE SERVICE USER GUIDE u line com Door Adjustments 2 ...

Страница 20: ...nds allowing the unit to run overnight before loading with product When plugged in the unit will begin operating under the factory default setting Follow the on screen prompt for language selection and temperature units To turn the unit off press and hold for 5 seconds and release The display will show a countdown to switching the unit off To power your unit on simply press and the unit will immed...

Страница 21: ...dium or high Light ON OFF with door Press to have light on off with door Press and release to scroll through timer settings Customer menu Press and hold for 5 seconds Press to scroll through menu Mode Set Point F C Temperature Range F C Deli 36 2 34 40 1 4 Beverage Drinks 38 3 34 65 1 18 Market Fresh 38 3 34 40 1 4 Root 50 10 45 55 7 12 Pantry 42 5 34 70 1 21 U SELECT CONTROL Digital Display The 3...

Страница 22: ...etables Potatoes Onions Lemon Lime Melon Peppers Beans Cucumber Cut Vegetables QUICK CHILL CAUTION Quick chill is designed to quickly pull warm beverages and foods down to optimum storage temperature It is important to only initiate quick chill modes when the Refrigerator or Wine Captain have been fully loaded with warm product Failure to follow this notice could result in food or beverages that a...

Страница 23: ... Thrm Short Ambient thermistor circuit shorted Contact Customer Care L R Temp Hi 6H Left or right zone temperature 10 over set point for over 6 hours Verify door is closed and sealing Contact Customer Care if persistent L R Temp Hi 12H Left or right zone temperature 10 over set point for over 12 hours Verify door is closed and sealing Contact Customer Care if persistent L R Temp Lo 6H Left or righ...

Страница 24: ...nergy Saver Mode a small leaf icon will be displayed on the main screen 1 To enter Energy Saver Mode first select Energy Saver from the Customer Menu 2 Press to select Off in the menu 3 Press 4 Press to change the selection from Off to On 5 Press to confirm your selection 6 To return to the Customer Menu press and select Return to Menu 7 To cancel Energy Saver Mode simply return to the Customer Me...

Страница 25: ...played in either Fahrenheit or Celsius To change from Fahrenheit to Celsius enter the Fahrenheit Celsius Menu from within the Customer Menu 1 Press to select Degrees 2 Press The selection will begin to flash 3 Press to select between F Fahrenheit or C Celsius 4 Press to confirm your choice Factory Default Factory Default will restore all settings to their factory default To access Factory Default ...

Страница 26: ...and press to confirm Help To access the Help Menu select Help from the Customer Menu Press to scroll through available information The Help screen displays the following Model U Line contact information Software version Serial Number To exit the Help menu press to select Return to Menu and press to confirm Up Select Down RETURN TO MENU Help Model 3045WC 1 800 779 2547 or ...

Страница 27: ...in internal temperatures and set points To enable Sabbath Mode 1 Open the unit s door to activate the display 2 To access the Customer Menu hold for 5 seconds 3 Press or to scroll through available selections 4 Select Sabbath Mode from the Customer Menu by pressing 5 Press to select Off 6 Press Off will begin to flash 7 Press to change Off to On 8 Press to confirm your selection The Display will f...

Страница 28: ...ding your unit leave space between the internal fans or vents and product loaded Anything blocking the required airflow circulation will result in uneven temperature distribution in the cabinet and can also freeze product Do not install the unit behind a door When properly loaded your U Line unit will store up to 123 12 oz 330 ml cans or 79 12 oz 330 ml bottles and 10 750 ml bottles of wine For op...

Страница 29: ...SAFETY INSTALLATION INTEGRATION OPERATING INSTRUCTIONS MAINTENANCE SERVICE USER GUIDE u line com Airflow and Product Loading 1 ...

Страница 30: ......

Страница 31: ...ment discover but most of all enjoy yourself and your new ULine product Guide To Common Styles Of Wine Red Wines Full Bodied Dry California French Italian Zinfandel Cabernet Rhone Chateauneuf du Pape Barbaresco Barolo Medium Bodied Dry California French Pinot Noir Bordeaux Burgundy Light Bodied Dry French Italian Beaujolais Chianti Bardolino White Wines Full Bodied Dry California French Chardonnay...

Страница 32: ...Presentation The ritual of the presentation of the cork has a rich and fascinating history dating back to the late 1800 s A phylloxera root louse devastation to the vineyards severely limited the supply of great wines Restaurateurs would remove labels on inferior wines and replace them with labels from superior wines This made it necessary for patrons to protect themselves by checking the branding...

Страница 33: ... direct light for long periods of time Vibration Provided that sediment is left undistributed and particles are not suspended vibration in a storage environment is not an issue Wines can become flat or tired when voids and vacuums are created inside the wine bottle In order to create voids and vacuums within a liquid aggressive motion or shaking of the wine bottle would have to occur Balance A des...

Страница 34: ...the first North American appliance manufacturer to develop a residential wine storage unit the Wine Captain Each U Line Wine Captain model is designed to impress and inspire anyone with an interest in wine by providing cellar conditions in stylish undercounter units U Line Wine Captain models offer stable storage temperatures a 50 internal relative humidity and protection from UV light rays U Line...

Страница 35: ...e racks properly position the bottles so the wine remains in contact with the cork which ensures the cork does not become dry U Line recommends arranging wine bottles as shown in the illustrations below NOTE After stocking allow unit to stabilize product temperatures for 24 hours Larger diameter bottles may be stored on the shaded racks illustrated below ...

Страница 36: ...ed to accommodate a broad range of product To alter your shelf spacing follow the instructions below 1 Remove the 4 Shelf clips from the shelf clip holes 2 Move shelf clips as a group to the desired shelf height 3 Insert shelf clips into the holes of the desired shelf height Be certain shelf clip is fully seated into shelf clip hole CAUTION Clips MUST be installed with the ribbed side down Failure...

Страница 37: ...less steel to become blurred Rust not cleaned up promptly can penetrate the surface of the stainless steel and complete removal of the rust may not be possible Integrated Models To clean integrated panels use household cleaner per the cabinet manufacturer s recommendation INTERIOR CLEANING Disconnect power to the unit Clean the interior and all removed components using a mild nonabrasive detergent...

Страница 38: ...ain pan and possibly damaging water sensitive flooring the unit must be removed from cabinetry To defrost 1 Disconnect power to the unit 2 Remove all products from the interior 3 Prop the door in an open position 2 in 50 mm minimum 4 Allow the frost to melt naturally 5 After the frost melts completely clean the interior and all removed components See INTERIOR CLEANING 6 When the interior is dry re...

Страница 39: ...denser when necessary Depending on environmental conditions more or less frequent cleaning may be necessary WARNING Disconnect electric current to the unit before cleaning the condenser NOTICE DO NOT use any type of cleaner on the condenser unit Condenser may be cleaned using a vacuum soft brush or compressed air 1 Remove the grille plinth strip base fascia See GRILLE PLINTH INSTALLATION 2 Clean t...

Страница 40: ... in the cabinet 1 Align the left and right rack channels with the tracks in the cabinet Ensure an even track engagement on both sides by gently pushing the rack into the cabinet until it stops 2 Before reloading the rack ensure proper movement of the travel stops in the left and right track rails by pulling the rack out gently until it stops To clean wine racks 1 Saturate a soft cloth with a soapy...

Страница 41: ...ally 4 Clean and dry the interior of the unit Ensure all water has been removed from the unit 5 The door must remain open to prevent formation of mold and mildew Open door a minimum of 2 50 mm to provide the necessary ventilation WINTERIZATION If the unit will be exposed to temperatures of 40 F 5 C or less the steps above must be followed For questions regarding winterization please call U Line at...

Страница 42: ......

Страница 43: ...ve a tendency to reflect normal appliance operating noises Listed below are common refrigeration components with a brief description of the normal operating sounds they make NOTE Your product may not contain all the components listed Compressor The compressor makes a hum or pulsing sound that may be heard when it operates Evaporator Refrigerant flowing through an evaporator may sound like boiling ...

Страница 44: ...e displayed on the user interface See below for a list of errors NOTE Single zone models will not use L left or R right zone indicators in error notification ID Description Solution No Comm Unit lost communication to the display Disconnect and reconnect power to unit Contact Customer Care if persistent L R Zone T Open Left or right zone thermistor circuit open Contact Customer Care Amb Thrm Open A...

Страница 45: ...water If required adjust the temperature control in a small increment see CONTROL OPERATION Causes which affect the internal temperatures of the cabinet include Temperature setting Ambient temperature where installed Installation in direct sunlight or near a heat source The number of door openings and the time the door is open The time the internal light is illuminated This mainly affects product ...

Страница 46: ...s that U Line will provide either under these warranties or under any warranty arising by operation of law U Line will not be responsible for any consequential or incidental damages arising from the breach of these warranties or any other warranty whether express implied or statutory Some states do not allow the exclusion or limitation of incidental or consequential damages so the above limitation...

Страница 47: ...NSTALLATION INTEGRATION OPERATING INSTRUCTIONS MAINTENANCE SERVICE USER GUIDE u line com Copyright 2014 2017 U Line Corporation All Rights Reserved Publication Number 30379 04 2017 Rev K Warranty 1 Wire Diagram ...

Страница 48: ...ent of a part the servicer is authorized to replace the part in question The part that caused the damage must be returned to U Line in its entirety The part must be clearly labeled with the serial number of the unit it was removed from the date and the servicer who removed the part If the service technician determines the damage is the result of installation issues water connection drain etc the c...

Страница 49: ...on year The number between the dashes 12 represents the production month In most cases warranty status can be verified by the production date information within the serial number Alternatively a Proof of Purchase or equivalent may submitted with the warranty claim to document warranty status We also accept the following information to verify warranty status New Construction Occupancy Documents Clo...

Страница 50: ...SAFETY INSTALLATION INTEGRATION OPERATING INSTRUCTIONS MAINTENANCE SERVICE USER GUIDE u line com Warranty Claims 1 ...

Страница 51: ......

Страница 52: ... at no charge after U Line confirms warranty status Please provide the model serial number part number and part description Some parts will require color or voltage information If U Line requires the return of original parts we will inform you when the parts order is taken This requirement will be noted on your packing list A prepaid shipping label will be included with the replacement part Please...

Страница 53: ...cking up Lower than normal Complete Restriction In deep vacuum Room temperature cool Room temperature cool Room temperature cool Room temperature cool No refrigeration Lower than normal No Gas 0 PSIG to 25 Room temperature cool Cool to hot Room temperature cool Room temperature cool No refrigeration Lower than normal System Diagnosis Guide 1 Compressor Specifications DANGER Electrocution can cause...

Страница 54: ...re not shorted check the S and R to ground EMX20CLC Refrigerant R600a Voltage 115 127 VAC Frequency 60 Hz Run Cap 12μF 165 VAC Start Winding 6 7 Ohm at 77 F Run Winding 12 6 Ohm at 77 F LRA 3 7 A FLA 0 5 A Starting Device 8EA14C Overload 4TM142RFBYY 53 All resistance readings are 10 Compressor Specifications 1 ...

Страница 55: ...ion explanations Verification of temperature and thermistor performance can be identified by directly viewing actual temperature readings in the service mode Component failure issues can be identified through service mode menu selection Relay Toggle Individual components can be switched on and off to check for both proper function of a specific component and also delivery of supply voltage to the ...

Страница 56: ...duct Ensure proper use of Quick Chill mode Refer to Control Operation Section Control set too cold Refer to Adjusting Temperature Settings Section Review logged error codes Refer to Fault System Diagnosis Guide Thermistor failure Refer to Thermistor Failure Section Frost Buildup Inside Unit Door Ajar or Restricted from Closing Check door clearance to adjoining cabinetry Check distribution of produ...

Страница 57: ...he board for any suspected failures before attempting to remove the board for replacement or service Follow the guidelines below to fully test and diagnose the main control Power Fault If the unit does not or seems to not power on follow the flow chart below to help diagnose the issue Before beginning it is important to first verify the unit is not simply set to sabbath mode Testing The Main Contr...

Страница 58: ...ring the unit to its factory default setting Factory defaults may be restored through the service menu CAUTION Precautions must be taken while working with live electrical equipment Be sure to follow proper safety procedures while performing tests on live systems CONVECTION COOLING All 3000 series units are equipped with an advanced convection cooling system Convection cooling stabilizes cabinet t...

Страница 59: ...pect wire harness from main control board for pinch points or damage Repair split or pinched cabling Temp Hi 6H If excessive frost is also noted inspect door and door gasket for proper seal and alignment Inspect evaporator fan for proper operation Inspect refrigeration system Reference the System Diagnosis Guide Temp Hi 12H If excessive frost is also noted inspect door and door gasket for proper s...

Страница 60: ...cles The unit will otherwise operate normally Evaporator thermistor errors will be displayed in the error log Always assure that all thermistor connections are clean and dry Whenever opening a thermistor connection be sure to apply a fresh dab of die electric grease REED SWITCH A reed switch is used to monitor door state When the door is closed magnetic force pulls the reed to its contact and clos...

Страница 61: ...RE USED TO DETERMINE AT WHAT TEMPERATURE THE UNIT CYCLES O SETTING IS 2 DIFFERENTIAL RETURN TO MENU DIFFERENTIALS LEFT 16 C RIGHT 16 C EVAP FAN THIS MENU IS USED TO SET THE DURATION THE EVAPORATOR FAN WILL RUN AFTER THE COMPRESSOR CYCLES OFF RETURN TO MENU EVAP FAN EVAP FAN ON 1 EVAP FAN OFF 60 MULLION THIS MENU IS USED TO SET THE DURATION THE MULLION HEATER WILL BE ON AFTER THE COMPRESSOR CYCLES ...

Страница 62: ...at the main board where the communication cable plugs onto the pins for the red and black conductors If 5 VDC is not present replace the main control board If 5 VDC is present replace the communication cable Zone T Open Zone thermistor circuit open Check thermistor connection to harness for moisture or corrosion Also check connection where thermistor harness attaches to main board If connections a...

Страница 63: ...on of zone valve Temp Lo Zone temperature Verify thermistor connections 12H 10 F under set are clean and dry Verify point for over 12 thermistor resistance Verify hours correct operation of zone valve Door Door switch open Check door switch magnet reed Open 5Mfor more then 5 switch alignment when door is in minutes closed position Check reed switch connection at the harness and the main board To a...

Страница 64: ...aporator Fan DC F3 Condenser Fan DC L1 Zone Lighting DC To access Relay Toggle 4 Press to select Relay Toggle 5 Press 6 Press to scroll through each relay and DC output 7 Press to toggle To exit the Relay Toggle menu press to select Return to Menu and press to confirm Input Status Input status displays the current state of each available input ID Description State Door Door Switch Open Closed To a...

Страница 65: ...stomer All Temps menu To access Offsets 1 Press to select Offsets 2 Press 3 Press and to scroll through available thermistors To change offsets 4 Press the selected thermistor will begin to flash 5 Press to modify offset value 6 Press to confirm setting To exit the Offset menu press to select Return to Menu and press to confirm Self Test Self test is used to initiate a self diagnostic report Any s...

Страница 66: ...th various differentials Evap Fan The Evap Fan option in the service menu allows servicers to change the Evaporator Fan runtime in minutes from 0 to 98 and OFF cycle time 0 to 98 To access Evap Fan 1 Press to select Evap Fan 2 Press 3 Press to scroll through available settings To exit the Evap Fan menu press to select Return to Menu and press to confirm Mullion The MULL option in the service menu ...

Страница 67: ...the manufacturer warranty Re Select Model allows the units model information to be modified Changing the units model completely reprograms available zones relay assignments DC output assignments etc To access Re Select Model 1 Press to select Re Select Model 2 Press To change model setting 3 Press to select Model and press Model will begin to flash 4 Press to scroll through each available model 5 ...

Страница 68: ...of fan run times during and after a cooling cycle In order to allow time for the evaporator to properly cool the evaporator fan is delayed from starting with the cooling cycle for a given amount of time In order to remove as much warmth as possible from the cabinet the evaporator fan will continue to run at the end of the cooling cycle for a given amount of time Fan Delay On Fan Delay On is the am...

Страница 69: ...o select Off and press Off will begin to flash 4 Press to toggle between off and on 5 Press to confirm If set to on showroom mode will begin immediately To exit showroom mode press and hold for 5 seconds and release The display will show a countdown to switching the unit off Press again and the unit will immediately switch on retaining the presets from before it entered showroom mode To exit the s...

Страница 70: ...ation can be found in the Control Operations Service section This unit has three thermistors Thermistor one Zone Located along the right hand side wall It is used to maintain the operating temperature within that zone Thermistor two Evaporator Located on the evaporator It is used for defrost Thermistor three Ambient Located in the base of the unit secured to the condenser It is used to monitor the...

Страница 71: ...tor 1 Thermistor Resistance Data Temp F Temp C Nominal Resistance OHMS 40 40 169157 31 35 121795 22 30 88766 13 25 65333 4 20 48614 5 15 36503 14 10 27681 23 5 21166 32 0 16330 41 5 12696 50 10 9951 59 15 7855 68 20 6246 77 25 5000 86 30 4029 95 35 3266 104 40 2665 113 45 2186 122 50 1803 131 55 1495 140 60 1247 149 65 1044 158 70 879 167 75 743 176 80 631 5 ...

Страница 72: ...rost Hours Duration in Minutes Minimum Duration in Minutes Maximum Stop Temperature F C Beverage Drinks 12 5 60 42 6 Market Fresh 12 5 60 42 6 Root Root Cellar 12 5 60 45 7 Pantry 12 5 60 42 6 White Wine 12 5 60 45 7 Red Wine 12 5 60 45 7 Sparkling Wine 12 5 60 45 7 Polar 6 5 20 42 6 Deli 12 5 60 42 6 Defrost 1 Remove Fan and Cover CONVECTION COOLING This unit is equipped with an advanced convecti...

Страница 73: ...nd free of any dust buildup Evaporator Fan Replacement Should the evaporator fan need to be replaced follow the steps below 1 Remove any product from the unit 2 Uninstall unit 3 Disconnect power to the unit 4 Remove rear cover from unit 5 Disconnect fan electrical connection at rear of unit 6 Remove insulating foam from refrigerant line passthrough hole as needed to gain clearance for fan plug 7 R...

Страница 74: ...rough lower evaporator cover vents and push air out at fan mounting location 15 Installation is the reverse of removal 16 Care must be taken to assure the bottom of the evaporator cover is reinstalled behind the front edge of the train trough 17 Use sealant gum to seal any openings at rear of unit before replacing rear cover 18 Reinstall unit taking care to level space and secure as found Remove F...

Отзывы: