background image

10 


Decorative Ice

Assembly method

Basic components

decorative object

  decorative lid 

z

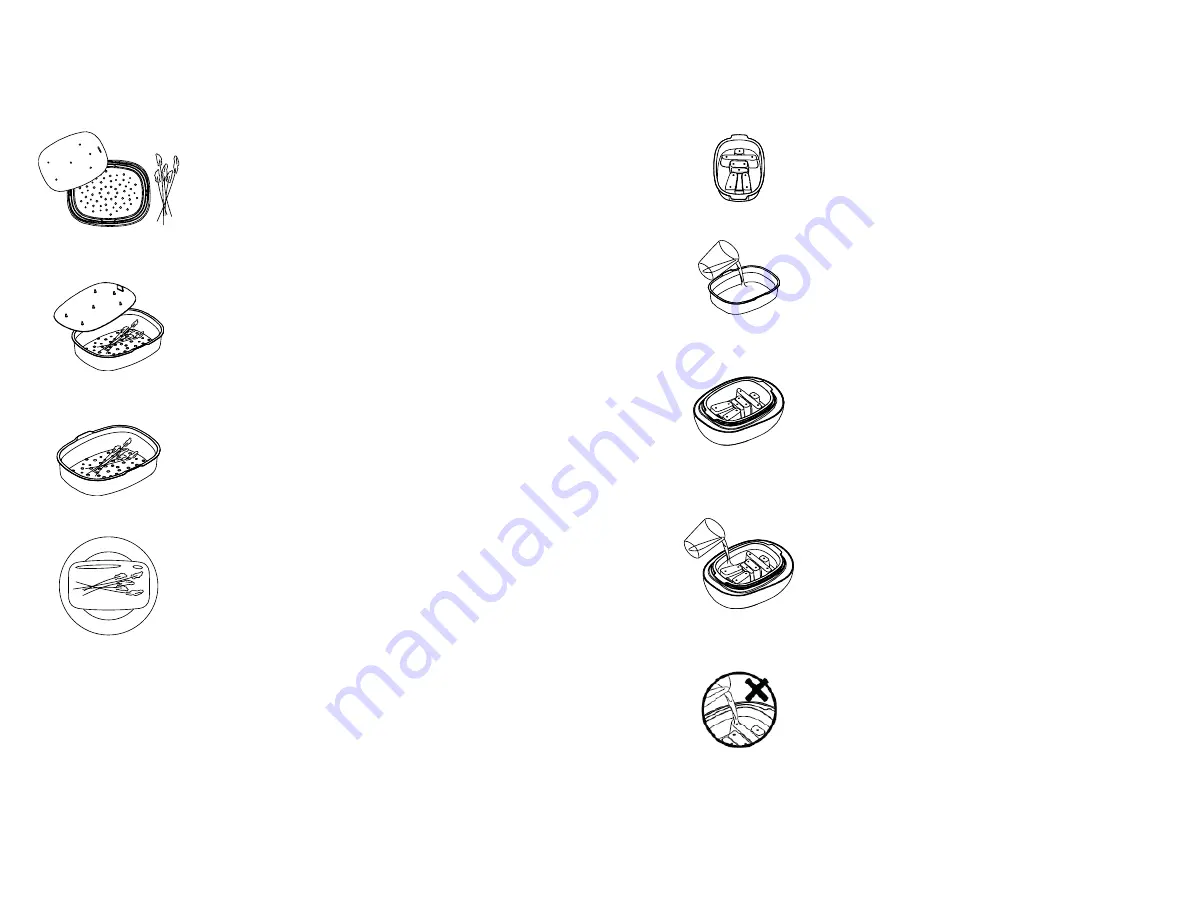
  Adding a decorative object such as flora, 

letters, or photographs before ice production 
will make decorative ice. 

z

  To prevent decorations from floating to the top, 

the decorative lid must be place on top to keep 
the object(s) below water. 

z

  After assembly, fill the tray with water, then 

place on the decorative ice layer slowly, at a 
slanted angle. 

z

  The lid will stick to the surface of the water, 

keeping the decorative objects beneath the 
water. 

z

  Allow the tray 8-12 hours to solidify in the 

freezer. 

z

  If you have difficulty removing the decorative 

ice, avoid flushing with water as this will cause 
the ice to crack. 

z

  Allow the ice to sit in room temperature for 1-3 

minutes for easy removal. 

z

  Decorative ice can be used for plating or 

centerpiece purposes. 

z

  For example, Japanese cuisine such as 

sashimi can be placed upon a decorative ice 
block to improve its freshness and appeal. 

11 


3D Sculpture Ice 

Assembly method

Basic components

Sculpture compartment   

z

  The sculpture compartment can mould the clear ice 

to improve its versatility and enjoyment. 

z

  Fill the “white ice” layer 2/3 with water. 

z

  Place the clear ice compartment on top. 

z

  Slowly press the sculpture down, the water will seep 

through the holes.   

z

  When the sculpture compartment layer reaches the 

bottom, press down so slide flaps click firmly into 
place. Excess water will exit through vents. 

z

  Place compartments in base and put into freezer. 

z

  If you have difficulty removing the sculpture ice, 

avoid flushing with water as this will cause the ice 
sculpture to crack. 

z

  Allow the ice to sit in room temperature for 1-3 

minutes for easy removal. 

z

  Avoid pouring water into holes as shown in diagram 

as this will affect the shape of the ice sculpture. 

● Adding a decorative object such as flora, letters, or  


   photographs before ice production will make 
   decorative ice. 

● To prevent decorations from floating to the top, the  


   decorative lid must be place on top to keep the object(s)  
   below water. 

● After assembly, fill the tray with water, then place on the  
   decorative ice layer slowly, at a slanted angle. 

● The lid will stick to the surface of the water, keeping the  
   decorative objects beneath the water.
 

● Allow 8-12 hours to freeze in the freezer. 

● If you have difficulty removing the decorative ice, do not  
   flush with water as this will cause the ice to crack. Instead,  
   allow the ice to sit at room temperature for 1-3 minutes 
   for easy removal. 

● Decorative ice can be used for plating or centerpiece    
   purposes. For example, Japanese cuisine such as sashimi  
   can be placed upon a decorative ice block to improve its 
   freshness and appeal. 

● The sculpture compartment can mould the clear ice into  
   an ice sculpture for decorative purposes.
 

● Fill the “white ice” layer 2/3 with water. 
● Place the clear ice compartment on top. 

● Slowly press the sculpture mould down, the water will    
   seep through the holes. 
● When the sculpture compartment layer reaches the  


   bottom, press down so slide flaps click firmly into place.  
   Excess water will exit through vents. 
● Place compartments in the base and place in the freezer. 

● If you have difficulty removing the sculpture ice, do not   
   flush with water as this will cause the ice sculpture to    
   crack. Instead, allow the ice to sit at room temperature for  
  1-3 minutes for easy removal. 

● Avoid pouring water into holes as shown in diagram as   
   this will affect the shape of the ice sculpture. 

Содержание Polar Ice

Страница 1: ...n 4 How to Make Polar Ice 6 Steps of Assembly 6 How to Extract the Ice 7 Conditions of Solidification 8 Completely Frozen 8 Incompletely Frozen 8 Multi Purpose Usage 9 Cracked Ice 9 Decorative Ice 10 3D Sculpture Ice 11 Rapid Ice Production 13 Ice Bucket Function 13 Q A 14 Difficulty with ice removal 14 Bubbles in the ice 14 Lengthy freeze time 15 Adjustments in freezer settings 15 ...

Страница 2: ...ack Specification Dimensions of Casing outer L 229 x W 183 x H 134 mm Dimensions of Casing inner L 174 x W 134 x H 55 mm Dimensions of Ice Ice Block 600 ml Ice Sculpture 250 ml Materials Food container plastics PP ABS Colors Black White Red or Customized color Easy to Use Just add water and place in the freezer to enjoy crystal clear ice Convenient Unique patented design allows for easy retrieval ...

Страница 3: ... production compresses ice Protruding pick aids in the removal of ice Cupule handle Material Silicone Main Function Sticks to container for easy ice removal Suction handle Clear Ice compartment Material PP Main function With small holes on bottom To hold the clear ice block White Ice compartment Material PP Main function To hold opaque white ice block Base Material ABS Insulating Main function to ...

Страница 4: ...icepacks Pour cold water into the White Ice compartment filling it close to its brim DO NOT OVERFILL The quality of ice produced will vary depending on the water used Tap water will still produce clear ice but we suggest residents of areas with undrinkable tap water to use boiled or mineral water instead Place the clear ice compartment inside the White Ice compartment and slowly begin pressing dow...

Страница 5: ...e edges of the holes Handle with caution 9 Multi Purpose Usage Cracked Ice Assembly method Basic components z Flush the clear ice with room temperature water and the difference in temperature will cause the ice to crack z Use the back of a spoon or another hard object to strike the ice z Light strikes will break ice into chunks of various sizes z Un uniform ice chunks are perfect for use with beve...

Страница 6: ...to crack z Allow the ice to sit in room temperature for 1 3 minutes for easy removal z Avoid pouring water into holes as shown in diagram as this will affect the shape of the ice sculpture Adding a decorative object such as flora letters or photographs before ice production will make decorative ice To prevent decorations from floating to the top the decorative lid must be place on top to keep the ...

Страница 7: ... bucket function z In room temperature ice can be kept without melting for 2 3 hours The inukshuk is a traditional sculptural form used by the Inuit a tribe of people who inhabit the arctic circle of Canada They are sculptures of welcome and friendship and this is why they have also been chosen to be the official logo of the 2010 Winter Olympics held in Vancouver BC An inukshuk sculpture would mak...

Страница 8: ... solidified after 12 hours this is most likely due to insufficiently low temperatures in your freezer or too many items in the freezer Adjustments in freezer settings Generally a freezer set to 18 C has the optimum freezing temperature This would be the middle setting of the spectrum Setting your freezer to low will cause for a longer freezing time but it will improve the transparency of the ice c...

Отзывы: