


Copyright © 2021 Fametech Inc. All Rights Reserved.
All other brands, product names, company names, trade names, trademarks and service marks used
herein are the property of their respective owners.
17
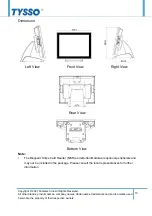
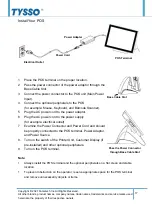
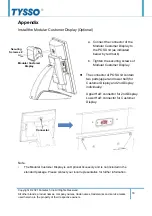
Install Your POS
1. Place the POS terminal on the proper location.
2. Pass the power connector of the power adaptor through the
Base Cable Slot.
3. Connect the power connector to the POS unit (Main Power
Input).
4. Connect the optional peripherals to the POS
(for example: Mouse, Keyboard, and Barcode Scanner).
5. Plug the AC power cord to the power adaptor.
6. Plug the AC power cord to the power supply
(for example: electrical outlet).
7. Examine the Power Connector and Power Cord and should
be properly connected to the POS terminal, Power Adaptor,
and Power Source.
8. Turn on the switch of the Printer Unit, Customer Display (if
pre-installed) and other optional peripherals.
9. Turn on the POS terminal.
Note:
Always install the POS terminal and the optional peripherals on a flat, clean and stable
location.
To prevent obstruction on the operator, reserve appropriate space for the POS terminal
and remove unnecessarily objects or items.
Electrical Outlet
Power Cord
Power Adapter
POS Terminal
Base Cable Slot
Pass the Power Connector
through Base Cable Slot