background image


-


14 - 

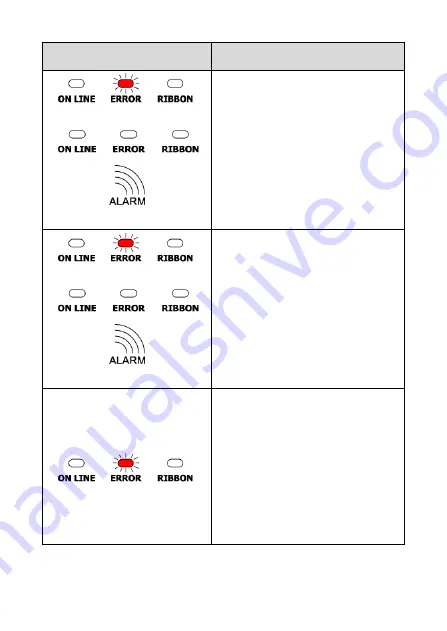
Indicator Status 

Descriptions 


Paper Out 

Power indicator is off, 
Error indicator flashes every 
160ms; after two times 
flashing, error indicator goes 
off for 320ms 
Printer starts beeping 


Black Mark Detection Error 

Power indicator is off 
Error indicator flashes every 
160ms; after three times 
flashing, error indicator goes 
off for 320ms 
Printers starts beeping 


Overheat Protection 

The mode is activated and 
the Error indicator flashes 
every160ms 
After 1 minute, the printer 
CPU will check print head 
temperature again 
When temperature return 
normal, printer will work 
normally


Содержание BLP-410

Страница 1: ...Keep the user manual for future reference BLP 410 Thermal Transfer Thermal Direct 1D 2D Barcode Label Printer Installation Guide...

Страница 2: ...ication 5 4 Product Description 8 4 1 Product Overview 8 4 2 Control Buttons 12 4 3 LED Audio Indicators 13 4 4 I O Ports 16 C PRINTER INSTALLATION 18 1 Connecting Your Printer 18 2 Install Replace th...

Страница 3: ...lf Test 31 1 1 Print Test 31 1 2 DIP Switch Baud Rate Settings 32 1 3 Debugging Mode 35 2 Reset Your Printer 37 3 Maintenance Cleaning Your Printer 38 3 1 The cleaning process 39 Tips Cleaning the Inn...

Страница 4: ...VOID THE WARRANTY Refer servicing to qualified personnel only Do not attempt to repair or dissemble the product on your own Opening or removing cover can expose you to dangerous voltage or other haza...

Страница 5: ...product where people may walk on the cord Do not make the power outlet and extension cords overload Overload can result in fire or electric shock If any of the following situations occurs unplug the...

Страница 6: ...6 inches sec Large Paper Roll Capacity Audio Alert Notification 1D 2D QR Code Barcode Printing Support Image Printing bmp pcx format available Interface Serial Parallel USB LAN optional Easy Paper Jam...

Страница 7: ...et Power Adaptor Thermal Ribbon Quick Installation Guide Power Cord is selectable depending on the types of electrical plug Printer cable is selectable depending on the interface required RS 232 Paral...

Страница 8: ...ese Traditional Chinese Korean Barcode Support 1D EAN 8 EAN 13 EAN 128 EAN 14 EAN and UPC 2 5 digits add on Codabar Code 39 Code93 Code 128 subsets A B C China Postage ITF MSI MSIC PLESSEY ITF 14 UPC...

Страница 9: ...AC 50 60Hz Color Black Material ABS Compliance FCC CE WEEE RoHS Weight 2 09 kg Dimension mm 222 94 W x 190 H x 284 83 D Operating Temperature 5 C 45 C Operating Humidity 25 85 RH non condensing Storag...

Страница 10: ...r Roll Diameter 127 mm 5 inches max Paper Thickness tag bottom paper 0 254 mm 10 mil max 0 06 mm 2 36 mil min Paper Roll Axis Diameter 25 4 mm 38 mm 1 inch 1 5 inch Label Length 10 2286 mm 0 39 inch 9...

Страница 11: ...8 4 Product Description 4 1 Product Overview Top View Bottom View Front View Rear View...

Страница 12: ...9 Right View Left View...

Страница 13: ...External Overview Cover Release Levers Press the two levers backward to open the printer cover Printer Cover Cover Release Levers Left Right Control Buttons LED Indicators Power Switch Label Paper Out...

Страница 14: ...11 Internal Overview Printer Cover Label Roll Holder Set Thermal Ribbon Holder Print Head Module Print Head Module Release Lever Ribbon Adjusting Gears...

Страница 15: ...several times to adjust the label paper to move the specified label to the proper position Pause Button This function is to interrupt the print tasks Press the button to interrupt the print task The O...

Страница 16: ...red on and in normal printing status Printer Paused Power indicator flashes every 640ms Printer Cover Is Opened Power indicator is off Error indicator goes on for 80ms then goes off for 160ms Printer...

Страница 17: ...Black Mark Detection Error Power indicator is off Error indicator flashes every 160ms after three times flashing error indicator goes off for 320ms Printers starts beeping Overheat Protection The mode...

Страница 18: ...Ribbon ON Ribbon is installed successfully Ribbon ERROR Ribbon is not properly installed No Ribbon Ribbon end Ribbon broken The Ribbon indicator flashes every 300ms The Audio Alarm beeper sounds ever...

Страница 19: ...16 4 4 I O Ports Rear View...

Страница 20: ...contact the local representative for further information Note When plug the printer cable to the printer make sure the printer cable is properly secured Arrange the printer cable and then re install t...

Страница 21: ...r on the designate location 2 Use the supplied Printer Cable and connect to the Host PC 3 Arrange the Printer Cable and connect to the Printer 4 Plug the Power Cord to the Power Adaptor and then plug...

Страница 22: ...19 2 Install Replace the Label Roll and Ribbon 2 1 Install the Ribbon Roll 1 Pull the left and right Cover Release Levers backward to open the Cover Cover Release Lever Cover Release Lever...

Страница 23: ...20 2 Push the release lever to lift up the Print Head Module Remove the two Thermal Ribbon Holders in the Print Head Module Print Head Module Release Lever...

Страница 24: ...pass the two ribbon holders to the ribbon roll and the empty ribbon roll Tips Attach the Ribbon to the Empty Ribbon Roll Roll out the new ribbon roll to a certain length Use a sealing tape to attach t...

Страница 25: ...tall a using ribbon roll pass the ribbon holders to the ribbon roll and printed ribbon roll Tips Arrange the ribbon with care and keep the ribbon in flat position Ribbon Roll Printed Ribbon Roll Therm...

Страница 26: ...ith holders into the slot of Print Head Module Tips Arrange the ribbon with care and keep the ribbon in flat position Adjust the two Adjusting Gears of ribbon holders and make sure the ribbon is flat...

Страница 27: ...24 5 Press the Print Head Module with force so as to make sure the module is secured...

Страница 28: ...25 2 2 Install the Label Paper Roll 1 Pull the left and right Cover Release Levers backward to open the Cover Cover Release Lever Cover Release Lever...

Страница 29: ...26 2 Take out the Label Roll Holder Set from the printer 3 Install the Label Roll to the Holder Set Paper Roll Holder Set...

Страница 30: ...27 4 Install the Label Roller Holder Set with label roll to the printer Tips Roll out the label roll to proper length so as to pass through the printer outlet...

Страница 31: ...28 5 Push the Printer Head Module Release Lever to lift up the Print Head Module Place the paper over the edge of printer Print Head Module...

Страница 32: ...to make sure the module is secured Close the Printer Cover back to the printer and the printer is ready for printing Note Check the LED Indicators of the printer and make sure the printer is in On Lin...

Страница 33: ...30 Tips Installation Check Please check the ribbon and label roll are properly installed onto the printer slots Print Head Module Ribbon Roll Label Roll...

Страница 34: ...erform the test make sure the test paper or ribbon roll is properly installed 1 Close the Printer Cover 2 Turn off the printer 3 Press and hold the Feed Button 4 Turn on the Power Switch of the printe...

Страница 35: ...tion settings Before perform the test make sure the test paper or ribbon roll is properly installed 1 Close the Printer Cover 2 Turn off the printer 3 Press and hold the Pause Button 4 Turn on the Pow...

Страница 36: ...n DIP Switches To change the settings of the printer manually 1 Turn off the printer 2 Remove the DIP Switch Cover 3 Adjust the DIP switches to configure the printer 4 Re install the DIP Switch Cover...

Страница 37: ...F 1 Audio Alarm Disable Enable 2 Reserved 3 Ribbon End Detection Disable Enable 4 Label Gap Sensibility High Low 5 Power On Test Paper Disable Enable 6 Find Mark Max Value Disable Enable 7 8 Baud Rate...

Страница 38: ...engineer to debug the program Before perform the test make sure the test paper or ribbon roll is properly installed 1 Close the Printer Cover 2 Turn off the printer 3 Press and hold the Feed and Paus...

Страница 39: ...arts printing out the print data in ASCII and HEX codes Restore the Normal Print Mode Turn off the printer to interrupt the Debugging Mode then turn on the printer again The printer will restore to no...

Страница 40: ...he printer 3 Press and hold the Feed and Pause Buttons 4 Turn on the Power Switch of the printer 5 As the POWER LED indicator ON LINE is on and ERROR LED indicator is OFF release the two buttons The s...

Страница 41: ...printing quality it is recommended to clean the print head and keep your printer in good conditions and extend its life as well The materials listed as below can be used to clean the printer Cotton sw...

Страница 42: ...ethanol to clean the print head surface Note It s recommended to clean when change new label paper Rubber Roller 1 Turn off the printer 2 Rotate the platen roller and use a cotton swap to clean with 1...

Страница 43: ...of sensor Note It s recommended to clean by month Tips Cleaning the Inner of Printer The dust or tiny paper fragment may also cause mal function of printer Use air brush or vacuum to clean the dust a...

Отзывы: