3
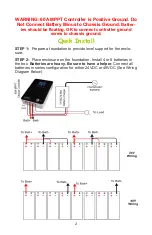
STEP 3:
Install green DIN rail adapters to the 60A
MPPT Battery Charge Controller mounting plate. At-
tach mounting plate to the controller.
STEP 4:
Install DIN rail to enclosure using the two
screws provided. Install MPPT battery charge control-
ler to DIN Rail.
STEP 5:
Remove the black cover from the MPPT
controller to access the wire connection screws. Con-
nect the temperature probe to the controller and
place it on one of the batteries for temper-
ature compensated charging.
STEP 6:
Remove the fuses from the bat-
tery cables and connect the battery cables
to the batteries and the MPPT Charge
Controller BAT+ and BAT–
connections.
STEP 7:
Make sure to set the AC input
voltage selector on the 72V 900W AC/DC
Power Supply to either 115 or 230 de-
pending on your AC voltage source. The 900W Power Supply can sit in
the bottom of the enclosure next to the batteries. Connect the Power
Supply DC output wires to the MPPT Charge Controller PV+ and PV–
inputs. The Brown wire is V+. Make sure to observe proper polarity.
STEP 8:
Connect normal loads to the MPPT Charge Controller load
output. Maximum load is 30A Max. If connecting an inverter or pump or
motor, it
’
s best to connect directly to the batteries.
STEP 9:
Double check connections and then re
-
install the fuses in the
battery cables. You may see a spark when connecting the fuse. This is
normal. Once the MPPT charge controller is connected to the batteries,
it
’
s display should turn on and you will see status on the screen. The
controller has a display that turns on with vibration so if display is dark,
tap it to turn on.
Warning:
Battery should always be connected first and discon-
nected last from the MPPT charge controller.
STEP 10:
Route any external wires
through the cable glands on the back of the
enclosure. Tighten the cable glands on the
wires to make weatherproof connections.
Plug unused holes using the supplied hole
plugs. If any cable glands are installed but
unused, cut a short piece of wire and tight-
en in the cable gland to seal it.
If desired, attach a security cable/chain
through the features on the back of the enclosure to an existing pole/
tree.
Содержание UPSPro UPAL24/48-900
Страница 8: ...8 ...


