background image

6. To save the label, press [#], and the label is automatically saved. To delete a

character, use the [<][>] keys to move the cursor under the character, then

press [0]. If any key other than [<] or [>] is pressed before [0], the cursor

moves one space to the right and deletes that character.

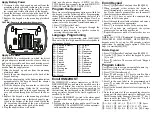
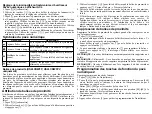
ASCII Characters

Label Library

The Label Library is a database of words commonly used when programming

labels. Individual words can be combined as needed (e.g., Front + Door). Each

line of the display supports a maximum of 14 characters. If a word will not fit on

a line, scroll right until the cursor appears at the first character of the second line

then add the word.

To program a custom label using the Label Library:

1. Press [*][8][Installer Code][000][001] (to program the label for zone 01).

2. Press [*] to open the menu.

3. Press [*] again to select the “Word Entry” option.

4. Enter the 3-digit number corresponding to a word (see Words Library) or

use the scroll keys [<][>] to view words in the library.

5. Press [*] to select the word.

6. To add another word, repeat the previous procedure from step 2.

7. To add a space, press the right scroll key [>].

8. To clear characters, select “Clear to End” or “Clear Display” from the

“Select Options” menu.

9. To save the label, press [#], and the label is automatically saved.

Broadcast LCD Labels

If more than one LCD keypad is present on the system, labels programmed at

one keypad will be broadcast to all other LCD keypads right after the change is

confirmed.

Voice Prompt/Voice Chime

Voice Prompt Control (for wireless keypads only)

Menu: [*][6][access code] > Voice Prompt

This function is used to change the volume level of keypad voice prompts, for

example, “User arming in progress.” The voice prompt speaks the zone labels

programmed for zone openings/closings. Use the scroll keys [<][>] to increase

or decrease the volume from levels 0-10. Selecting 00 turns off keypad voice

prompts.

Voice Chime Control

Menu: [*][6][access code] > Chime Control

This function is used to change the keypad voice chime volume level. Use the

scroll keys [<][>] to increase or decrease the volume from levels 0-10. Selecting

00 turns off voice chime.


Change Brightness/Contrast/Buzzer/

LCD Keypads

1. Press [*][6][Master Code].

2. Use the [<][>] keys to scroll to either Bright Control, Contrast Control,

Buzzer Control.

3. Press [*] to select the setting you want to adjust.

4. a) Brightness/LED Bar Control: There are 15 backlighting levels. Use the

[<][>] keys to scroll to the desired level. Changing this level adjusts the

LED bar accordingly. 

b) Contrast Control: There are 15 different display contrast levels. Use the

[<][>] keys to scroll to the desired contrast level.

c) Buzzer Control: There are 15 different buzzer control levels. Use the [<][>]

keys to scroll to the desired buzzer level.

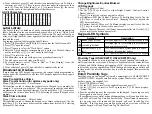
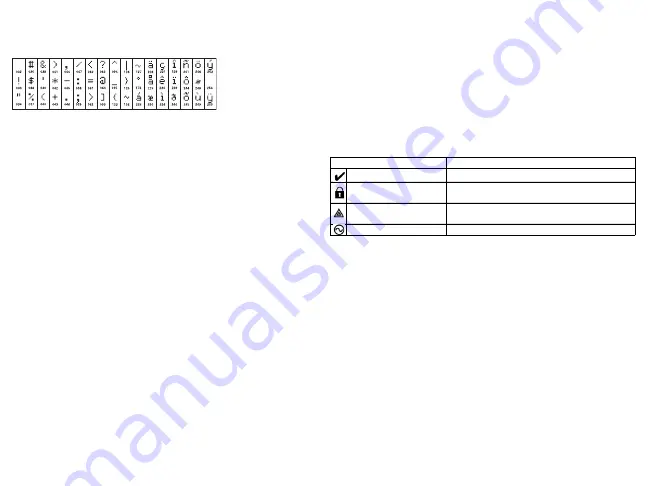
Keypad LED Symbols

Proximity Tags (HS2LCDWFP, HS2LCDWFPV only)

The proximity tag can be used to perform any keypad function that would nor-

mally require a user access code. The tag is to be presented to the center left face

of the keypad. While the keypad is running off AC, the transceiver is always on

to detect any prox tag approaching. While the keypad is running on battery and

in sleep mode, the user can press any key to wake the keypad, then present the

prox tag. 

Enroll Proximity Tags

Enrolling a tag on one keypad will enroll it automatically to all HS2LCDWFP

or HS2LCDWFPV


keypads enrolled on the system. Master code (code 1) can-

not have a prox. tag assigned to it.

1. Press [*][5][Master Code]. 

2. Use the [<][>] keys to scroll to the applicable user and press [*].

3. Use the [<][>] keys to scroll to Prox Tag and press [*]. The screen displays:

“Present Tag”.

4. Pass the enrolled tag near the tag reader on the keypad. A prox tag can only

be assigned to one user at a time. 

5. If enrollment is successful, acknowledgment beeps will sound and the key-

pad LCD will read ‘Tag Enrolled Successfully’. If enrollment is unsuccess-

ful, an error tone will sound and the keypad will read ‘Invalid Tag Not

Enrolled’. If the tag has been enrolled previously, an error tone will sound

and the keypad will read ‘Duplicate Tag Not Enrolled’.

Symbol

Description

Ready Light (Green)

If Ready light is ON, the system is ready to arm.

Armed Light (Red)

If Armed light is ON/Flashing, the system has 

been armed successfully.

System Trouble (Yel-

low)

ON - Indicates that a system trouble is active.

Flashing - Keypad low battery.

AC (Green)

ON - Indicates that AC is present at the keypad.

Содержание DSC HS2LCDWF

Страница 1: ...a responsabilité du fabricant ADVERTENCIA Consulte el Manual de referencia de PowerSeries Neo para obtener información sobre las limitaciones con respecto al uso y función del producto así como información sobre las limitaciones relacionadas con la responsabilidad civil del fabricante AVISO Consulte o manual de Referência PowerSeries Neo para informação sobre as limitações referentes a uso e funci...

Страница 2: ...nd 5 To fasten the keypad securely onto the desk stand locate the hole in the center of the bottom of the desk stand Using the screws provided screw the keypad to the desk stand Installation Instructions Temperature range 10 C to 55 C 14 F to 131 F UL ULC 0 C to 49 C 32 F to 120 F Humidity MAX 93 R H non condensing Plastic enclosure protection degree IP30 IK04 Power adaptor output voltage 9 0VDC 1...

Страница 3: ...rolled When the alarm system is powered up for the first time the first keypad or the HSM2HOST if using a wireless keypad as the first keypad can be enrolled To do this 1 Once the HSM2HOST is wired to the alarm panel and power has been applied power up a wireless keypad 2 Press any button on the keypad to enroll it on the HSM2HOST The HSM2HOST is then automati cally enrolled on the alarm panel Enr...

Страница 4: ... 00 turns off voice chime Change Brightness Contrast Buzzer LCD Keypads 1 Press 6 Master Code 2 Use the keys to scroll to either Bright Control Contrast Control Buzzer Control 3 Press to select the setting you want to adjust 4 a Brightness LED Bar Control There are 15 backlighting levels Use the keys to scroll to the desired level Changing this level adjusts the LED bar accordingly b Contrast Cont...

Страница 5: ...ad as global Valid entries are 00 08 The default is 01 001 005 Function Key 1 5 Assignment 011 Keypad Input Output Programming 012 Local PGM Output Pulse Activation Time 021 First Keypad Options Section Function Key Button Valid Range Default Function 001 1 00 68 03 Stay Arm I_______I_______I 002 2 00 68 04 Away Arm I_______I_______I 003 3 00 68 06 Chime ON OFF I_______I_______I 004 4 00 68 22 Com...

Страница 6: ...ayed While Armed OFF I______I 8 Auto Scroll Open Zones ON Auto Scroll Open Zones OFF Default Opt ON OFF OFF I______I 1 Armed LED On in Sleep Mode Armed LED Off in Sleep Mode ON I______I 2 Keypad Status Shows Stay Arm Keypad Status Shows Stay Away Arm OFF I______I 7 Temperature Display Enabled Temperature Display Dis abled NOTE Programming options indicated in GREY are required for systems com plia...

Страница 7: ...41 Please 182 Test 223 U 019 Basement 060 East 101 Key 142 PM 183 Time 224 V 020 Bathroom 061 Energy 102 Kids 143 Police 184 To 225 W 021 Battery 062 Enter 103 Kitchen 144 Pool 185 Touchpad 226 X 022 Bedroom 063 Entry 104 Latchkey 145 Porch 186 Trouble 227 Y 023 Bonus 064 Error 105 Laundry 146 Power 187 Unbypass 228 Z 024 Bottom 065 Exercise 106 Left 147 Press 188 Unit 229 Space 025 Breezeway 066 ...

Страница 8: ...ot export or re export the SOFTWARE PRODUCT to any country person or entity subject to Canadian export restrictions 5 CHOICE OF LAW This Software License Agreement is governed by the laws of the Province of Ontario Canada 6 ARBITRATION All disputes arising in connection with this Agreement shall be determined by final and binding arbitration in accordance with the Arbitration Act and the parties a...

Страница 9: ... MAX 93 du taux d humidité relative sans condensation Degré de protection du boîtier plastique IP30 IK04 Tension de sortie de l adaptateur d alimentation 9 0 VCC à 1 25 A Modèle États Unis Amérique Latine HK XX11 U09N UL Canada HK XX11 U09NC ULC Union Européenne HK XX11 U09EU Royaume Uni HK XX11 U09NGB Australie Nouvelle Zélande Chine HK XX11 U09NAU à alimentation limitée acceptable pour l autorit...

Страница 10: ...ue limitée pour les modèles HK XX11 U09N UL et HK XX11 U09NC ULC fourni avec le kit Programmation du pavé numérique Plusieurs options de programmation sont disponibles sur le pavé numérique voir le tableau ci dessous La programmation du pavé numérique est identique à la programmation du reste du système Le menu de l installateur est à défilement de texte Pour plus d informations sur la programmati...

Страница 11: ... utilisant la bibliothèque de mots 1 Saisissez 8 Code de l installateur 000 001 pour programmer l étiquette de zone 01 2 Appuyez sur pour ouvrir le menu 3 Appuyez à nouveau sur pour sélectionner l option Saisie de mot 4 Saisissez le numéro à 3 chiffres correspondant à un mot voir Bibliothèque de mots ou utilisez les touche de défilement pour visualiser les mots dans la bibliothèque 5 Appuyez sur p...

Страница 12: ...seul utilisateur à la fois 5 Si l attribution est réussie des bips sonores de confirmation sont émis et le pavé numérique ACL indique Balise attribuée avec succès Si l attribution échoue un son d erreur est émis et le pavé numérique indique Balise invalide non attribuée Si l attribution de la balise a été précédemment réalisée un son d erreur est émis et le pavé numérique indique Balise double non...

Страница 13: ...instantané 21 Sortie de commande 1 40 Mémoire d alarme 03 Armer en mode à domicile 22 Sortie de commande 2 61 Partition Select 1 04 Armer en mode absence 23 Sortie de commande 3 62 Partition Select 2 05 9 Armer sans entrée 24 Sortie de commande 4 63 Partition Select 3 06 Carillon de porte activé désactivé 29 Rappel de groupe de suspension 64 Sélection 4 de partition 07 Test du système 31 Activer P...

Страница 14: ...e la présence du secteur Option désactivée Activé _____ 7 Alarmes affichées en cas d armement Alarmes non affichées en cas d armement Désactivé _____ 8 Défilement automatique des zones ouvertes activé Défilement automatique des zones ouvertes désactivé Défaut Option Activé Désactivé Désactivé ____ 1 Voyant Armé activé en mode veille Voyant Armé désactivé en mode veille Activé ____ 2 L état du pavé...

Страница 15: ...t 146 Récepteur 173 Veuillez 200 N 227 012 Armement 039 Chargement 066 Droite 093 Garage 120 Niveau 147 RF 174 Voie 201 O 228 013 Armer 040 Clavier 067 Du 094 Gauche 121 Non 148 Salle 175 Voiture 202 P 014 Armoire 041 Clé 068 Durée 095 Gaz 122 Nord 149 Salon 176 Voyant 203 Q 015 Arrière 042 Clôture 069 économie 096 Gel 123 Numéro 150 Saisie 177 Zone 204 R 016 Au revoir 043 Code 070 Écran 097 Greni...

Страница 16: ...DUIT INTÉGRÉ unique Si vous avec acquis ce LOGICIEL avec du MATÉRIEL le PRODUIT LOGICIEL est autorisé à être utilisé avec le MA TÉRIEL en tant que produit intégré unique Dans ce cas le PRODUIT LOGI CIEL ne peut être utilisé qu avec le MATÉRIEL conformément à ce CLU d Location Vous n avez pas le droit de louer de mettre en bail ou de prêter le PRODUIT LOGICIEL Vous n avez pas le droit de le mettre ...

Страница 17: ... el teclado hacia arriba y hacia fuera de la placa de montaje soporte de escritorio quite los tornillos primero si es necesario La bahía para las cuatro baterías AA es abierta y visible en la parte posterior del teclado 2 Insertar las baterías según lo indicado en la parte posterior del teclado Asegurarse de observar la polaridad correcta 3 Substituir el teclado en la placa de montaje soporte de e...

Страница 18: ...de alarma y se ha aplicado la alimentación encienda un teclado inalámbrico 2 Presione cualquier botón en el teclado para asociarlo al HSM2HOST El HSM2HOST se asocia automáticamente al panel de alarma Asociación del teclado 1 Pulse 8 Código del instalador y después 804 000 2 Cuando se le solicite active el dispositivo a asociar inmediatamente o ingrese un número de serie del dispositivo Haga esto ú...

Страница 19: ...men de timbre de voz o ingrese un valor entre 00 y 15 Si selecciona 00 apaga el timbre de voz Cambio de brillo contraste zumbador Teclados LCD 1 Oprima 6 Código maestro 2 Use las teclas para desplazarse al Control de brillo Control de contraste o al Control de zumbador 3 Oprima para seleccionar la definición que se desea ajustar 4 a Control de brillo barra LED Hay 15 niveles de luz posterior Utili...

Страница 20: ...plica a los teclados 1 16 860 Número de ranura de teclado Esto no es para programación el número de ranura de dos dígitos se visualiza para información solamente 861 876 Secciones de programación del teclado 000 Dirección de la partición Al seleccionar 000 se requiere una entrada de 2 dígitos para asignar el teclado a una partición Ingresar 00 asigna el teclado como global Las entradas válidas son...

Страница 21: ... alarma automático APAGADO Desactivado _____ 4 Para uso futuro Para uso futuro Desactivado _____ 5 LED de alimentación habilitado LED de alimentación deshabilitado Activado _____ 6 LED de alimentación Indica presencia de CA Activado LED de alimentación Indica presencia de CA Desactivado Activado _____ 7 Alarmas mostradas en estado Armado Alarmas no mostradas en estado Armado Desactivado _____ 8 De...

Страница 22: ... 097 Fecha 125 Luces 153 Piso 181 Sistema 209 A 237 á 014 Anulado 042 Cancelado 070 Derecha 098 Fondo 126 Luz 154 Planificar 182 Sol 210 B 238 ñ 015 Apagado 043 Característica 071 Desarmado 099 Frente 127 Madre 155 PM 183 Sonido 211 C 239 é 016 Apertura 044 Carbono 072 Desarmado 100 Fuerza 128 Mas 156 Policía 184 Sótano 212 D 240 ú 017 Área 045 Carga 073 Deslizar 101 Galería 129 Mascota 157 Por fa...

Страница 23: ...Nota ...

Страница 24: ...TWARE con HARDWARE entonces el PRODUCTO DE SOFTWARE está licenciado con el HARDWARE como un producto único integrado En este caso el PRO DUCTO DE SOFTWARE puede ser usado solamente con el HARDWARE tal y como se establece más adelante en este EULA d Alquiler Usted no puede alquilar prestar o arrendar el PRODUCTO DE SOFTWARE No puede disponibilizarlo a terceros ni colgarlo en un servidor o una págin...

Страница 25: ...suporte de plataforma Alimentação a pilha 1 Se necessário deslize o teclado para cima e para fora da placa de montagem suporte de plataforma remover primeiramente os parafusos se necessário O compartimento para as pilhas AA está aberto e visível na traseira do teclado Instruções de instalação Limite de temperatura 10 C a 55 C 14 F a 131 F UL ULC 0 C a 49 C 32 F a 120 F Umidade MÁX 93 U R não conde...

Страница 26: ...ispositivos sem fio possam ser registrados Sempre que o sistema de alarme é ativado pela primeira vez o primeiro teclado ou o HSM2HOST se estiver usando um teclado sem fio como primeiro teclado pode ser registrado Para fazer isso 1 Depois do HSM2HOST estar ligado ao painel de alarme e estar com alimentação é ativado um teclado sem fio 2 Pressione qualquer botão no teclado para registrá lo no HSM2H...

Страница 27: ...ona programadas para abertura fechos de zona Use a teclas de rolagem LCD teclados sensível ao toque ou a tecla teclados LED ICON para aumentar ou reduzir o volume ou inserir um valor de 00 a 15 Selecionando 00 desativa os pedidos de voz do teclado Controle de campainha de voz Menu 6 código de acesso Controle de voz Controle campainha Teclado 6 código acesso Esta função é usada para modificar o nív...

Страница 28: ...e ser registrado de novo antes de poder ser usado Funcionamento do Teclado Programação da Tecla 2 Para programar uma tecla de função 1 Pressione 8 Código Instalador 2 861 para programar o teclado Seção 860 é apenas de leitura e mostra o número da ranhura do teclado que está sendo acessada 3 Insira 001 005 para teclas de função 1 5 4 Insira um número de dois dígitos para atribuir um funcionamento a...

Страница 29: ...a DESLIGAR _____ 7 Para utilização futura Para utilização futura DESLIGAR _____ 8 Para utilização futura Para utilização futura Predefinição Opç LIGAR DESLIGAR LIGAR _____ 1 Apresentação de relógio local LIGADO Apresentação de relógio local DESLIGADO DESLIGAR _____ 2 Relógio local apresenta formato 24h Relógio local apresenta formato AM PM LIGAR _____ 3 Rolar Alarme automático LIGADO Rolar Alarme ...

Страница 30: ... Instalador 2 Insira 991 3 Use as teclas 4 Pressione para selecionar teclado 5 Insira Código Instalador 6 Pressione para reiniciar NOTA 041 Atribuição de zona de temperatura interior Predefinição 000 _____ ____ _____ Entradas válidas são 000 128 042 Atribuição de zona de temperatura exterior Predefinição 000 _____ ____ _____ Entradas válidas são 000 128 O teclado pode ser programado para fornecer ...

Страница 31: ...olação 218 R 019 Porão 059 Coação 099 Inválido 139 Telefone 179 Temperatura 219 S 020 Banheiro 060 Leste 100 Está 140 Por favor 180 Teste 220 T 021 Bateria 061 Economia de energia 101 Chave 141 PM 181 Hora 221 U 022 Quarto 062 Entrar 102 Crianças 142 Polícia 182 Para 222 V 023 Bônus 063 Entrada 103 Cozinha 143 Piscina 183 Teclado tátil 223 W 024 Fundo 064 Erro 104 Corta corrente 144 Varanda 184 Pr...

Страница 32: ...omponentes O PROGRAMA é licenciado como um produto único As partes que o constituem não podem ser separadas para utilização em mais do que uma unidade de HARDWARE c PRODUTO ÚNICO INTEGRADO Se V Exa adquiriu este SOFT WARE com HARDWARE então o PROGRAMA é licenciado com o HARDWARE como um produto único integrado Neste caso o PRO GRAMA só pode ser utilizado com o HARDWARE como determinado neste CLUF ...

Отзывы: