background image

INSTALLATION · RADIO ASSEMBLY

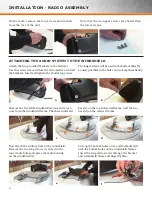
On the radio, remove the four screws and washers 
from the rear of the unit.  

Attach the two provided brackets to the radio(a).  
Use the screws removed from the radio earlier to install 
the brackets. Insert and tighten the shorter top screws. 

Remove the five OEM windshield screws and acorn 
nuts from the windshield frame. The three indicated 

here (c) on the top horizontal frame. And the two 
here (d) on the vertical frames.

The longer screws will be used in the bottom holes (b). 
Loosely put them in the holes now to keep them handy.

Now attach the audio system to the windshield.  
Remove the two long screws we stored in the  
lower radio holes and place the radio housing  
on the windshield (e).  

Line up the bottom holes on the radio brackets (f)  
with the bottom holes on the windshield frames.  
Insert the long radio screws through the bracket  
and windshield frame and finger tighten.

ATTACHING THE AUDIO SYSTEM TO THE WINDSHIELD

4

Note that the two upper screws are shorter than 
the lower screws.  

 a

 b

 c

 e

 d

 f

Содержание TAWAS100-HT

Страница 1: ...twisted Audio INSTALLATION MANUAL MODELS TAWAS100 HT TAWAS100 DLX 80 WATT Windshield Mount Audio System For Harley Davidson Heritage Softail and Deluxe Motorcycles ...

Страница 2: ...Power Disconnected Windshield Lock Optional WARNINGS INSTALLATION The motorcycle s battery must be disconnected before installation and not reconnected until the installation is complete OPERATION Riding a motorcycle requires your full attention at all times Do not attempt to operate or adjust the audio system while riding WATER MOISTURE EXPOSURE The components and overall product design are weath...

Страница 3: ... the windshield from your motorcycle and work on a bench or other flat surface NOTE You may want to use some type of soft surface to avoid scratches to the windshield 3 FIRST STEP MODEL COMPATIBILITY Harley Davidson non fairing touring and Softail Models with windshields as follows Radio Model Applications TAWAS100 HT Heritage Softail TAWAS100 DLX Softail Deluxe ...

Страница 4: ... two here d on the vertical frames The longer screws will be used in the bottom holes b Loosely put them in the holes now to keep them handy Now attach the audio system to the windshield Remove the two long screws we stored in the lower radio holes and place the radio housing on the windshield e Line up the bottom holes on the radio brackets f with the bottom holes on the windshield frames Insert ...

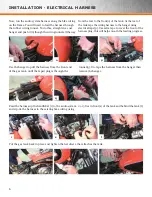
Страница 5: ... wiring harness supplied with your audio system i First you must remove the seat and completely disconnect the battery On these motorcycle models you need to lift the gas tank up to install the harness underneath along the frame Start by removing the hardware that holds the tank the long bolt at the front of the tank j and the screw at the rear of the tank k 5 STAGE THREE INSTALL RADIO ELECTRIC HA...

Страница 6: ... tape to cover the front of the harness plug this will help smooth the feeding progress INSTALLATION ELECTRICAL HARNESS 6 Use the hanger to pull the harness from the front end of the gas tank until the taped plug is through the tunnel q Un tape the harness from the hanger then remove the hanger Feed the harness up the handlebar r to the audio system and zip tie the harness to the existing bike wir...

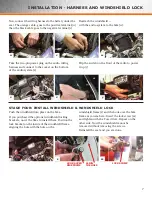
Страница 7: ... radio to power it up y Push the windshield into place on the bike If you purchased the optional windshield locking brackets now s the time to install them Position the lock bracket on the inside of the windshield frame aligning the hole with the hole on the STAGE FOUR INSTALL WINDSHIELD WINDSHIELD LOCK windshield frame z and the hook over the bike frame as you see here Insert the lock screw zz an...

Страница 8: ...RY IMPORTANT NOTES The audio system is weather resistant However don t expose the system to high pressure hose nozzel water spray Detach windshield audio system when washing the motorcycle Evidence of excessive water exposure will void the warranty ALWAYS PAY FULL ATTENTION WHEN RIDING YOUR MOTORCYCLE DO NOT OPERATE OR ADJUST YOUR SYSTEM WHEN RIDING ...

Отзывы: