background image

3

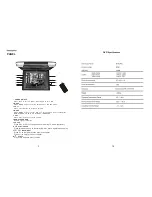
PANEL

16

1

1

 . POWER ON / OFF

   Press  once  to  turn  on power, press  again  to  turn  offf.
2

. MODE

   Press  MODE  button  to  switch  between  Av1  and AV2 mode. 
3

. VOL +


   Press  VOL+  button  to  increase  volume.
4

. MENU

   Press  MENU  button  to  enter  into  TFT  screen  menu, User  could  adjust
   BRIGHTNESS , COLOR ,  CONTRAST , LANGUAGE.  
5

.  VOL -

   Press  VOL-  button  to  reduce  volume.
6

. REMOTE SENSOR

   Remote  signal  reception.
7

. CH+/CH-


Press CH+ or CH- to change channels during TV mode (optional).

8.           PLAY/PAUSE
   

9.        /         BACK/NEXT  


10.       EJECT
    

Press this button once to start playing disc, press again to pause play.

Press |<< to jump back to the previous chapter. 

   Press >>| to skip to the next chapter.

Press this button to eject the disc.

2

3

4

5

6

7

8

9

10

DVD

PO

W

ER

PO

W

ER

EJ

EC

T

EJ

EC

T

NE

XT

NE

XT

FF

FF

ST

OP


ST

OP


PL

AY

/

PL

AY

/ P

AU

SE

PA

US

E

SE

TU

P

SE

TU

P

BA

CK

BA

CK

TF

T

M

EN

U

TF

T

M

EN

U

TI

TL

E

TI

TL

E

FR

FR

ZO

OM

ZO

OM

SL

OW

SL

OW

DI

SP

DI

SP

M

OD

E

M

OD

E

10

+

10

+

11

22

33

44

55

66

77

88

99

00

SU

BT

ITL

E

SU

BT

ITL

E

RE

TU

RN

RE

TU

RN

DV

D

 M

EN

U

DV

D

 M

EN

U

PR

OG

RA

M

PR

OG

RA

M

AU

DI

O

AU

DI

O

RE

PE

AT

RE

PE

AT

GO

TO

GO

TO

EN

TE

R

EN

TE

R

AN

GL

E

AN

GL

E

MU

TE

MU

TE

CH

+

CH

+

CH

-

CH

-

A

-B

A

-B

-

-

++

T1048DVFD

Содержание T1048DVFD

Страница 1: ... PLAY PAUS E PAUS E SETU P SETU P BAC K BAC K TFT MEN U TFT MEN U TITL E TITL E FR FR ZOO M ZOO M SLO W SLO W DISP DISP MOD E MOD E 10 10 1 1 2 2 3 3 4 4 5 5 6 6 7 7 8 8 9 9 0 0 SUBTI TLE SUBTI TLE RETU RN RETU RN DVD MENU DVD MENU PROG RAM PROG RAM AUD IO AUD IO REPE AT REPE AT GOT O GOT O ENTE R ENTE R ANG LE ANG LE MUT E MUT E CH CH CH CH A B A B T1048DVFD T1048DVFD ...

Страница 2: ...CONTENTS Cautions 1 Care of Discs 2 Front Panel 3 Wiring Configuration 4 Remote Control 5 Remote Control Description 6 Basic Operation 8 15 Specifications 16 Troubleshooting 17 18 ...

Страница 3: ...e higher temperature in the car So start the car first to cool down the internal temp and then open the AV system Preset Memory After cut off power supply preset memory will disappear and the whole system will return to the prescribed state when delivering from the factory Installation The unit should be installed horizontal with front side up less than 15 Video system of a connected component Thi...

Страница 4: ...iscs Do not leave the disc in following places Direct sunlight Near car heaters Dirty dust and damp areas Seats and dashboards Disc cleaning Use a dry and soft cloth to wipe from center to outward Cautions on new discs Remove the inner and outer rough edges on new discs with a pencil which may cause malfunctions Care of discs COARSE EDGE COARSE EDGE DON T USED ABNORMITY DISC 17 ...

Страница 5: ...9 BACK NEXT 10 EJECT Press this button once to start playing disc press again to pause play Press to jump back to the previous chapter Press to skip to the next chapter Press this button to eject the disc 2 3 4 5 6 7 8 9 10 DVD POW ER POW ER EJE CT EJE CT NEX T NEX T FF FF STO P STO P PLAY PLAY PAUS E PAUS E SETU P SETU P BAC K BAC K TFT MEN U TFT MEN U TITL E TITL E FR FR ZOO M ZOO M SLO W SLO W ...

Страница 6: ... Resolution HXV 640 x 840 Back light Cold Cathode Filament Tube Monitor dimension 345 x 355 x 45 Installation Diagram 15 Red to right audio input of source unit White to left audio input of source unit Yellow video input from source unit Black wire to electrical ground Red wire to 12V DC battery BOX Red to right audio output of source unit White to left audio output of source unit Yellow video out...

Страница 7: ...1 23 25 27 14 16 18 22 24 26 29 30 POWER EJECT NEXT FF STOP PLAY PAUSE SETUP BACK TFT MENU TITLE FR ZOOM SLOW DISP MODE 10 1 2 3 4 5 6 7 8 9 0 SUBTITLE RETURN DVD MENU PROGRAM AUDIO REPEAT GOTO ENTER ANGLE MUTE DVD LCD Remote Control CH CH 14 A B 5 ...

Страница 8: ...6 13 GOTO A B Press this button to jump to the desired location of the disc ...

Страница 9: ...EXIT SETUP LANGUAGE SETUP SYSTEM SETUP LANGUAGE SETUP OSD LANGUAGE AUDO LANG SUBTITLE LANG MENU LANG EXIT SETUP SYSTEM SETUP ENGLISH GERMAN SPANISH FRENCH PORTUGUESE LANGUAGE SETUP OSD LANGUAGE AUDO LANG SUBTITLE LANG MENU LANG EXIT SETUP SYSTEM SETUP CHINESE ENGLISH JAPAN FRENCH SPANISH PORTUGUESE LATIN GERMAN SYSTEM SETUP PORTUGUESE CHINESE ENGLISH FRENCH SPANISH GERMAN JAPAN OFF LANGUAGE SETUP ...

Страница 10: ...creen 3 16 9 Select when a wide screen TV set is connected TV Screen 4 3 Wide 16 9 Video Material Normal Pan Scan Letter box 4 3 16 9 e PASSWORD Select the change and press ENTER button Type the old password The initial factory code is 0000 and key in 4 characters password now you want to use and type again to confirm key in correctly Select suitable guidance rating by the cursor button and confir...

Страница 11: ... MENU A SYSTEM SETUP a TV SYSTEM This player can play discs recorded in either PAL or NTSC format Select NTSC format When you connected to NTSC TV Select PAL form at when you connected to PAL TV If you select AUTO the unit will auto select the format PAL NTSC according to your TV System Select the AUTO PLAY ON OFF TV SYSTEM AUTO PLAY TV TYPE SPIDIF OUT PASSWORD SYSTEM SETUP RATING DEFAULT EXIT SET...

Отзывы: