background image

11

12

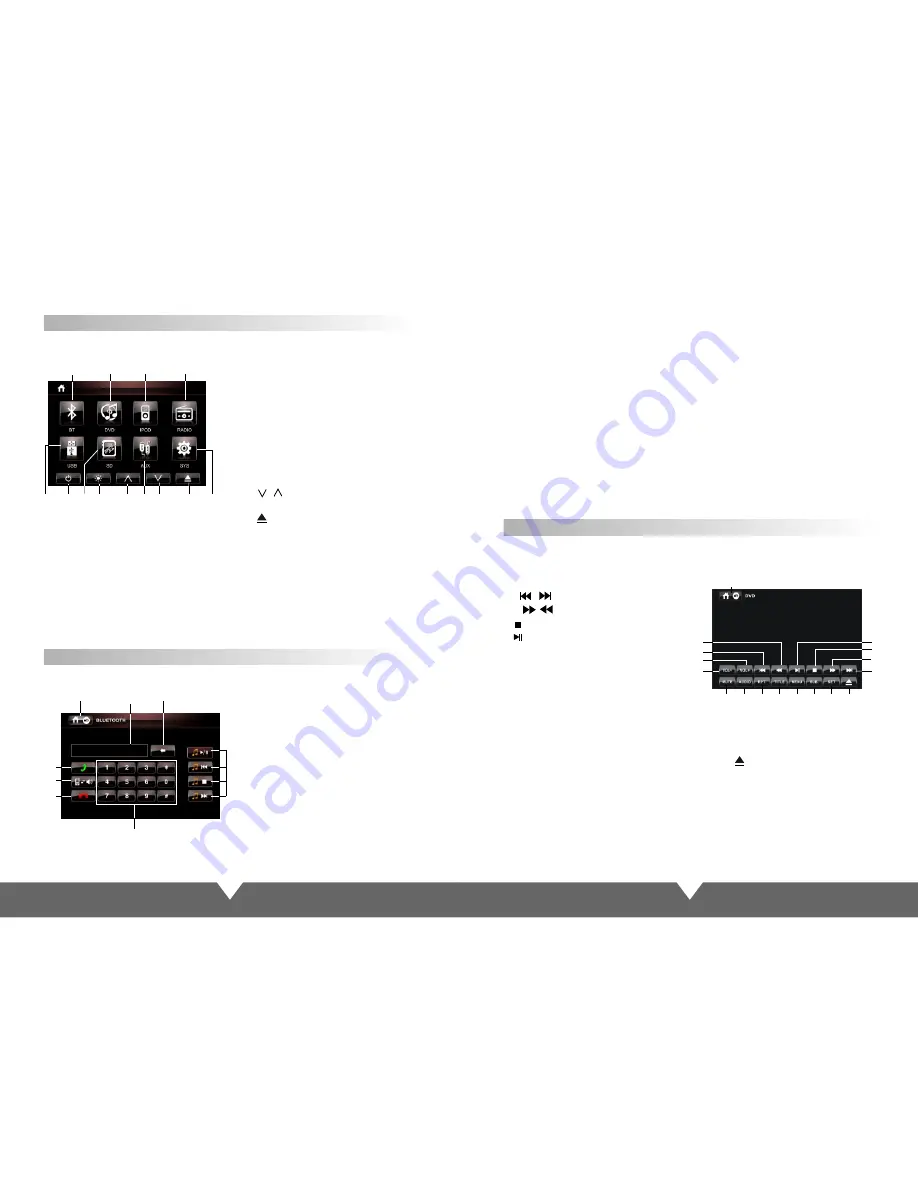
Touch Screen Menu And Operation

Main Interface

Once opening the unit, it can automatically enter into the main interface, As shown

3. IPOD function mode

.

4.


RADIO

:

 radio mode

5/7. USB/SD: Memory signal input mode,

Connect the usb/sd can be to enter

6

.

POWER: Off key 

8

.

Close the screen display, and then click on

 the scree nback to normal.
9

/

11

.  

/


Adjust panel angle upward/down

(This function hasn’t developed)

AUX AUX

.      

10. 

 signal input mode.

12  

: press this button can slip in/out disc

13. SETUP: setup menu.

   Touch corresponding center icon on the screen, then can enter into the interface what
   function you choose

Touch screen “1,2,3,4,5,7,10,13” the center of the corresponding function, the screen immediately
enter to interface of your chosen functions mode. If have connected signal source, there are 
clear picture for you to enjoy. Touch the screen "6" off; touch "13" point can enter the setup menu
to set product function and display; specific instructions, please refer to the corresponding menu
 interface. Touch screen "9,11" points to adjust the panel angle up or down to meet your visual
 requirements. 

Bluetooth system settings

3

.


4

.

5

.


.

7

.
.

When play songs by bluetooth, they act 

as respectively pause/play, previous song, 
stop playing and next song

Delete button: touch the button can 

delete the already input number.

Dialing button: answer and make the

 phone.

Press the call state, phone call mode 

conversion mode with the external call

Hang up button: end the call or refuse the

 call.

Number buttons

6

8

Operating instructions

Cautions: 

This unit can only match with one mobile phone equipment which has bluetooth 

function. The bluetooth function of this unit can only receive audio frequency information.

DVD Mode Menu Interface

Panel or by remote control "MODE" ; Or on main menu to touch MEDIA icon enter to DVD 
mode(touch screen the menu toolbar appears when the menu toolbar Hide):
1.


2

/

3

.

VOL

-/

VOL

+:

4

/

6

.

    /    


5

/

7

:   /     


8

.    :

9

.    :

10

.

MUTE

11

.

I

Back to the main interface

Volume control button

AUDIO:  n DVD playback, press 

this button, Press it to select the 
channel when the main unit is in play 
mode for DVD disc
12

.

RPT

13

.

TITLE

14

.

MENU

15

.

SUB

:

Subtitle selection(need the 

disc support)

previous /Next

Fast forward / Fast back

Stop
Play/Pause

1

5

8

4

3
2

14

12

11

10

13

9

15

6

7

16 17

1

2

3

4

6

8

9

11

12

5

7

10

13

7

1

3

2

4

5

6

8

Press the remote control "mode", select display picture, or icon on the touch screen to 
enter the BT Bluetooth mode: see the picture below.

Note:In any mode, once placed the DVD disc, it will automatically switch back to DVD mode.

1. Back to the main interface.

Status Information shows column.

2

.

16

.

SET

:

(

)

17

.    :

Tools, Touch it enter to AUDIO/

VIDEO menu Please refer to audio / 
video menu description

Disc out of the warehouse

1.  TPHONE

luetooth

2. DVD mode 

B

: B

 function.

1. Starting up and enter into the bluetooth system picture.
2. Open up the bluetooth equipment of the mobile phone can search this unit's bluetooth 
    equipment “CAR KIT”.Then match the bluetooth by presentation.
3. Input 4 figures pass code“0000”,this unit's bluetooth will be set up to the authorized 
    equipment of the mobile phone. If the match is successful the status of the bluetooth 
    picture will show “LINK OK”

Tips

: If it unable to match please starting up again. After setting up the unit to authorized 

    equipment, the bluetooth will connect or enter into mobile phone bluetooth system 
    automatically. Select “CAT KIT”to connect it.
4. After you match successfully you can make and answer the phone comfortably. 
    Within the effective limits, this unit can also transmit the music which is playing in the 
    mobile phone. And can adjust the voice through mobile phone. 
    (Within the effective limits of 10 meters).

Содержание D74TS

Страница 1: ...rial QUALITY 100g wood free printed paper Size A6 D74TS 7 Widescreen Color LCD Monitor With DVD Player Please read the manual in detail before using this product This product is made of precision components keep it away from moisture ...

Страница 2: ...sories 7 Touch Screen Menu And Operation 11 DVD Mode Menu Interface Radio Function Interface Function Index Sign User Introduction 5 Wiring Diagram 5 Unit Rear Side Connection 6 Remote Control Operation 8 Bluetooth System Settings 11 12 13 Audio Video Menu Setup 14 Warning 17 Trouble Shooting 18 USB SD Operation 13 SYS System Settings 15 System Settings 15 17 ...

Страница 3: ...ic shell debase the display quality and products quality Installation should be very tight and secured to prevent the fallen unit hurt people and damage the unit when moving on or a sudden brake Please install carefully to avoid damaging working platform Please clean the internal working platform and ensure sufficient space for installation Inner shell will be installed on the working platform The...

Страница 4: ...move the hooks on both sides 2 Select a position where the screw holes of the mounting bracket supplied with the car and the screw holes of the main unit become aligned tighten the screws on each side and re mount the brackets with the factory hardware in the original location NOTE 1 and 10 are not used for installation method2 Tighten the screws to your car UNIT REMOVAL when installed using the s...

Страница 5: ...t left audio output positive pole 11 PURPLE RL Rear left audio output positive pole 12 BROWN BACK CON Car reversing cable 13 BLUE ANT CON Antenna amplifier output control 14 BLACK GND connect to ground 7 6 5 4 3 2 8 9 10 11 12 13 14 WHITE BLACK FL GREY BLACK RR GREY RR PINK BRAKE CON GREEN BLACK FR GREEN FR PURPLE BLACK RL BLUE ANT CON YELLOW BATT Memory backup WHITE FL RED ACC PURPLE RL BROWN BAC...

Страница 6: ...picture displayed 26 Eject button press this button to eject or slot in the disc 27 Display panel slip out 28 Display panel retract 29 CLOSE press it the monitor will auto extend or return 1 PWR Power on off press for long time to turn off short press it for panel slip in and out 2 SRC Signal mode select 3 4 On FM mode to select brand of radio FM1 FM2 FM3 AM1 AM2 13 5 In DVD mode short press for p...

Страница 7: ...ss Sub T to select different subtitles inherent in DVD disc 12 Press ZOOM key for times the picture will change in order of of normal size Note 13 Press SLOW on the remote control to slow playing Change the playing speed to 1 2 1 4 1 8 and 1 16 through pressing SLOW button 14 During playback press the AUDIO voice key can be included on the DVD disc in a variety of audio languages to choose 15 GOTO...

Страница 8: ...or by remote control MODE Or on main menu to touch MEDIA icon enter to DVD mode touch screen the menu toolbar appears when the menu toolbar Hide 1 2 3 VOL VOL 4 6 5 7 8 9 10 MUTE 11 I Back to the main interface Volume control button AUDIO n DVD playback press this button Press it to select the channel when the main unit is in play mode for DVD disc 12 RPT 13 TITLE 14 MENU 15 SUB Subtitle selection...

Страница 9: ... adjustment Touch the icon on the screen the alt volume will change BAS Bourdon volume adjust Touch the icon on the screen the bourdon volume will change FAD Front and Rear volume adjustment Touch the icon on the screen the front and Rear volume will change BAL Left and right track adjustment Touch the icon on the screen the left right track volume will change 9 JAZZ 10 POP 11 12 13 COL Color 14 1...

Страница 10: ...tem Settings Language settings 1 2 Touch efficiency adjustment Touch efficiency adjustment follow the prompts to click on the center of sign if successfully adjust it will auto exit prompt Set the audio video and DVD menu when audio video mode operation the same 1 2 Back to the main interface English Portuguese After opening the machine Under the main menu screen on the touch screen SYS key to ent...

Страница 11: ...effect of moisture dust or oil smoke avoid this machine from dropping or impacting never extrude or chafe this machine with sharp objects 9 Dangerous high voltages are present inside the enclosure Do not open the cabinet non professionals can not disassemble unit 10 Installation should be very tight and secure Preventing the fallen unit hurt people when moving on or a sudden brake Trouble Shooting...

Отзывы: