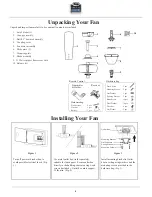
Turn of the century Nevis 355-1857 Скачать руководство пользователя страница 4

Unpacking Your Fan

Unpack and inspect fan carefully to be certain all contents are included. 

Remote Control

Hardware bag 

Transmitter 
& Holder

Receiver 

Hardwarebag

Wood screws

Wire nut

Battery

2 pcs

6 pcs

1 pcs

Blade Screw

16 pcs

Wood Screw

2 pcs

Star Washer

2 pcs

Sprining Washer

2 pcs

16 pcs

Fiber Washer

4 pcs

Wire nut 

2 pcs

Flat Washer

Turn off power at breaker box to 
avoid possible electrical shock. (Fig. 
1)

Use metal outlet box (sold separately) 
suitable for fan support.  Secure outlet box 
directly to the building structure using wood 
screws (included).  Outlet box must support 
35 lbs min. (Fig. 2)

Install mounting bracket to Outlet 
box in ceiling using washers and the 
mounting screws provided in the 
hardware bag. (Fig. 3)

Mounting Bracket

Outlet Box

Spring Washers
Mounting Screws

Flat Washers

Mounting Screws

2 pcs

1.   Set of blades (5)

2.   Canopy assembly

3.   Ball/4.5" downrod assembly

4.   Coupling cover

5.   Fan motor assembly

6.   Blade arms (5)

7.   Mounting plate

8.   Shade assembly

9.  13 Watt compact fluorescent bulb

10. Balance kit

1

2

3

4

5

7

8

9

10

6

Installing Your Fan

Figure 1

Figure 2

Figure 3

4

Содержание Nevis 355-1857

Страница 1: ...READ AND SAVE THESE INSTRUCTIONS Menards SKU 355 1857 Nevis 52in 1 32m Ceiling Fan Owner s Manual ...

Страница 2: ...ing a minimum of 35 pounds Use only UL Listed outlet boxes marked FOR FAN SUPPORT 6 The fan must be mounted with a minimum of 7 feet clearance from the trailing edge of the blades to the floor 7 Avoid placing objects in path of the blades 8 To avoid personal injury or damage to the fan and other items be cautious when working around or cleaning the fan 9 Do not use water or detergents when cleanin...

Страница 3: ...Required Helpful Flathead Screwdriver Phillips Screwdriver Safety Glasses Pliers Step Ladder Wire Strippers Wire Cutters Soft Cloth Electrical Tape To Begin Tools Needed Not Supplied 3 ...

Страница 4: ...ately suitable for fan support Secure outlet box directly to the building structure using wood screws included Outlet box must support 35 lbs min Fig 2 Install mounting bracket to Outlet box in ceiling using washers and the mounting screws provided in the hardware bag Fig 3 Mounting Bracket Outlet Box Spring Washers Mounting Screws Flat Washers Mounting Screws 2 pcs 1 Set of blades 5 2 Canopy asse...

Страница 5: ...ough the holes in the collar and downrod Be careful not to jam the clevis pin against the wiring inside the downrod Insert the cotter pin through the hole near the end of the clevis pin until it snaps into its locked position as noted in the circle inset of Fig 5 4 Tighten two set screws at top of the fan motor collar firmly and evenly Fig 5 5 Carefully lift the fan assembly up to the ceiling moun...

Страница 6: ... black wire marked AC in L from he receiver Connect the white neutral wire from the ceiling to the white wire marked AC in N from the receiver Secure the wire connections with the plastic wire connecting nuts provided Fig 9 5 If your outlet box has a ground wire green or bare copper connect it to the fan ground wires otherwise connect the hanging bracket ground wire to the mounting bracket Secure ...

Страница 7: ...ly starting with the center screw Make sure the blade is straight Repeat steps for the remaining blades 3 Fasten the assembled blades to the motor by lining up the slots of the blade arms with the tabs on the motor then tighten the two screws and washers already installed in the blade arms Fig 11 4 Repeat procedure with remaining blade arms Finishing the Fan Installation Attaching the Fan Blades F...

Страница 8: ...asurement Repeat for each blade Measurements deviation should be within 1 8 Run the fan for 10 Minutes 3 Use the enclosed Blade Balancing Kit if the blade wobble is still noticeable 1 Remove 1 of 3 screws from the mounting ring and loosen the other 2 screws Do not remove 2 Place the key holes on the mounting plate over the 2 screws previously loosened from the mounting ring turn mounting plate unt...

Страница 9: ... notches on the mounting plate DO NOT OVER TIGHTEN Fig 14 3 Restore power and your light kit is ready for operation Installing the Shade Assembly Figure 14 Note Before starting installation disconnect the power by turning off the circuit breaker or removing the fuse at fuse box Turning power off using the fan switch is not sufficient to prevent electric shock Note Light bulbs have no warranty 9 Sh...

Страница 10: ...peration Slide the switch to the Right for cool weather operation Speed settings for warm or cool weather depend on factors such as the room size ceiling height number of fans and so on Warm weather Counter Clockwise direction A downward air flow creates a cooling effect as shown in Figure 17 This allows you to set your air conditioner on a higher setting without affecting your comfort Cool weathe...

Страница 11: ...frequency Make sure all motor housing screws are snug Make sure the screws that attach the fan blade bracket to the motor hub is tight Make sure wire nut connections are not rattling against each other or the interior wall of the switch housing Allow a 24 hour breaking in period Most noises associated with a new fan disappear during this time If using ceiling fan light kit make sure the screws sec...

Отзывы: