


7
Turn of the Century
TM
Blade Screw
Blade
Washer
Blade Arm
Blade
ASSEMBLY INSTRUCTIONS
11
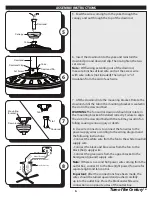
9. Raise the canopy, ensure the two mounting bracket
screws are aligned with the L-shaped slots in the canopy.
Then turn the canopy counter clockwise until the
mounting bracket screws are completely engaged in
the L-shaped slots. Install the two previously removed
mounting bracket screws and star washers in the round
holes. Securely tighten all four mounting bracket screws.
10. Remove the five motor blocks and ten motor screws
from the underside of the motor. Discard the motor
blocks, but keep the motor screws for installation of the
blade arms.
10
9
Canopy
Round
Hole
Motor
Block
Motor
Motor Screw
Switch Housing
Mounting
Bracket Screw
L-shaped Slot
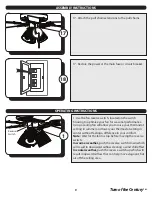
11. Partially insert three blade screws, along with the
blade washers, through the blade and into the blade arm.
Tighten each blade screw, starting with the one in the
middle. Repeat this step for the remaining blades and
blade arms.
Motor
Screw
Blade Arm
Motor
Switch Housing
12
12. Secure the blade arm to the underside of the motor
using motor screws removed in Step 10. Secure each blade
arm to motor before moving to the next.
To install the fan without the light kit, skip to step 16
.


