


- 5 -
Installing Barbecue Components
9.
This Gas Grill must be connected to an appropriate
REGULATED gas supply - refer to Safety Information.
10.
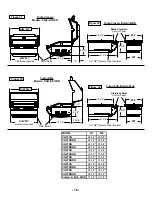
Install Heat Shields
between burners
as shown in
Figures 6a & 6b
.
There are 2 shields
required for the 3
burner barbecue,
3 shields for the 4
burner model and
4 shields for the 5
burner model.
We recommend that you fill the drip tray with
Ultrasorb
approximately 1/4" deep. This will help absorb any grease or
residues from the barbecuing process. Change the
Ultrasorb on a regular basis. A fire may occur if the grease
level rises to the top of the
Ultrasorb
. Sand can be used as
an alternative to
Ultrasorb
.
11.
Remove the porcelain coated cast iron or Stainless Steel
burners (depending on model) from packaging and place
into Barbecue. The open end of the burner has to be
installed over brass stem of valve and then the rear of
the burner is lowered down onto the back bracket locat-
ing the cast peg into the appropriate hole (
Figure 7
).
Note:
Air Adjustment
- The bolt on the side of each burner
should be screwed half way in and secured with the locking
nut prior to installation.
Figure 6a
Lip rests on
rear ledge
between burner
mounting holes.
Burner
Heat Shield
Fit into Brass
Stem on Valve
Cast Peg on burner
rests in hole
Figure 7
Figure 6b
Place Burner Heat
Shield as shown
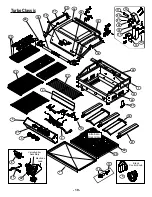
12.
Remove the Stainless Flame Tamers from carton and
install them into the barbecue above the Burners
(
Figure 8
). Place the ceramic briquettes in position as
shown in (
Figure 9
). The Flame Tamers must sit level
if correctly installed.
Note:
If installing the alternate Lava Rock Grate (Turbo
Classic models only), layer the lava rocks evenly - DO NOT
PILE (
Figure 10
).
13.
Place the Porcelain Cast Iron or Stainless Steel
Cooking Grids in place.
Tip:
- A light coating of vegetable oil will prevent food from
sticking to the grills.
Figure 8
position Flame Tamers
against vertical wall of BBQ
rest on rear tab
Figure 9
Stainless Flame
Tamers with
Ceramic Rocks
Figure 10
Содержание CG3TCBN
Страница 2: ......
Страница 23: ......
Страница 24: ...Barbeques Galore z 949 597 2400 z 10 Orchard Road Suite 200 z Lake Forest CA 92630...


