Turbo CG3TCBN Скачать руководство пользователя страница 14

- 12 -

IMPORTANT SAFEGUARDS:

When using electrical appliances, basic safety precautions should always be followed, including the following:
1. READ ALL INSTRUCTIONS BEFORE INITIAL USE!
2.

Always attach the assembled Rotisserie to your grill first, then plug the Cord into an outlet.
To disconnect, turn the Rotisserie “OFF” then remove the Plug from outlet.

3.

Most grill surfaces and Rotisserie parts are hot during and after cooking, so use reasonable care around your grill and
wear protective mitts. Only maneuver the Rotisserie by its handle.

4.

To protect against electrical shock, do not immerse Electrical Cord, Plug or Motor in water or expose to rain. Protect
electrical cord from burners, hot grill surfaces and grease

5.

Do not operate Rotisserie if the cord or plug becomes damaged, or if the Rotisserie malfunctions or has been damaged
in any manner.

6.

Do not let children operate your grill or Rotisserie, and do not let children play nearby.

7.

Unplug the Rotisserie from electrical outlet when not in use and before cleaning. Allow to cool before adding or remov-
ing parts. When Rotisserie is not in use, store indoors in a dry place.

8.

The use of accessory attachments is not recommended by the manufacturer and may cause injuries. Do not use this
Rotisserie for other than its’ intended use.

9.

When Rotisserie cooking, place a Cooking Pan under the food to be cooked. This will capture the drippings and keep
your grill clean from excess grease which could cause a fire. Use caution when moving a Cooking Pan containing hot
oils.

10.

Should a grease fire occur, turn the burners and gas off and leave the grill CLOSED until the fire is out.

11.

The Rotisserie Motor is set for 110/120V, 60Hz AC current.

12.

This Rotisserie is for outdoor use only.

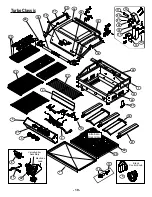
Stainless Steel Turbo Rotisserie

Assembly Instructions

Turbo Rotisserie Parts List

Item

Description

Part#

Qty

1a

Spit Rod 3 Burner

P05508065A

1

1b

Spit Rod 4 Burner

P05508066A

1

1c

Spit Rod 5 Burner

P05508067A

1

2

Holding Fork

P05508077A

2

3

Thumbscrew 1/4” X 1/2”

S196G04081

3

4

Shaft Collar

P05508061A

1

5

Shaft Bracket

P03308003C

1

6

Key Washer

P05508064A

1

7

Counter-balance Ring

P05508062A

1

8

Counter-balance

P05508063A

1

9

Handle

P05508068E

1

10

AC Motor

P07101016B

1

11

Motor Support Bracket

P03308004C

1

12

Motor Bracket

P03308005C

1

13

1/4-20 x 1/2” Phillips Head Screw S112G04081

4

14

1/4-20  Flange Nut

S

4

15

#10 24 x 1/4” Phillips Head Screw S223G03041

4

Figure 21

26” - SKU# 287904
31” - SKU# 287912
39” - SKU# 287920

12

14

10

11

15

13

1a

1b

1c

2

14

5

13

3

4

8

6

7

9

Содержание CG3TCBN

Страница 1: ...n use which will prolong the life of the barbecue and protect it from the elements FOR YOUR SAFETY IF YOU SMELL GAS nWARNING Failure to comply with these instructions could result in a fire or explosi...

Страница 2: ......

Страница 3: ...must also be equipped with A A collar to protect the Propane gas valve B A shutoff valve terminating a Propane gas cylinder valve outlet QCC 1 Quick Connect Coupling Type 1 as spec ified in the Americ...

Страница 4: ...lls Steel and Wood Carts 2 years Porcelainized Steel Frame Housing Solid Porcelain Coated Cast Iron Burners 5 years Solid Cast Stainless Steel Burners 15 years All Stainless Steel exterior parts 15 ye...

Страница 5: ...th heat control knobs still at OFF position turn on Cylinder valve USING SOAP SOLUTION TEST THE GAS CONNECTION FOR LEAKS See Page 2 for information on mixing and applying soap solution If bubbles appe...

Страница 6: ...MBLING HOOD TO BBQ FRAME TO MAKE CART ASSEMBLY EASIER 6 Place the hood section onto the barbecue in the closed position Align holes on Top and Bottom Hinges and insert Hinge Pivot Pins into position y...

Страница 7: ...ed down onto the back bracket locat ing the cast peg into the appropriate hole Figure 7 Note Air Adjustment The bolt on the side of each burner should be screwed half way in and secured with the locki...

Страница 8: ...ptible to winds that will decrease the performance of your rotisserie cooking For this reason you should not operate the back burner during windy weather conditions 1 Open the Grill Lid Failure to do...

Страница 9: ...ps and the resulting smoke are what give meat cooked over an open flame the delicious outdoor flavor so expect and encourage some flare up However excessive flare ups can be caused by cooking extra fa...

Страница 10: ...e meat or poultry causing it to lose it s natural juices 3 If you use a tomato or sugar base sauce for basting do not apply until the last five or ten minutes of cooking period Use over a longer perio...

Страница 11: ...tense heat sears in the natural juices and nutrients found in quality cuts of meat The cooking times on a rotisserie will be approximately the same as for oven cooking Balancing the Food In rotisserie...

Страница 12: ...rner gently on a hard surface to dislodge any rust etc inside To visually check that the burner is operating look at the burner flame between the tray and BBQ frame The flame should be approximately 1...

Страница 13: ...nt of the regulator it has been preset and tested Allow the LP tank to lie on its side Keep in an upright position Turn a control knob on until a lighted match is inserted in the lighting hole Use pla...

Страница 14: ...attachments is not recommended by the manufacturer and may cause injuries Do not use this Rotisserie for other than its intended use 9 When Rotisserie cooking place a Cooking Pan under the food to be...

Страница 15: ...t Collar 4 with long end towards handle as shown in Figure 24 6 Slide Holding Forks 2 onto Spit Rod 1 Place food onto Spit and secure with Holding Forks Secure with Thumbscrews 3 Place Spit assembly o...

Страница 16: ...lso cause pinholes if they come in contact with these connectors and MUST be washed off immediately with water NOTE When installing a barbecue equipped for liquid propane in an island the propane tank...

Страница 17: ...lied CSA approved Natural Gas Regulator included Figure 29 Stainless Steel Flex line not included Teflon Pipe Thread Sealant is recommended for use on all threaded connections Gas Inlet Natural Gas Bu...

Страница 18: ...ic Built in WOK 21 3 4 Figure 34 1 2 NPT Female Pipe Gas Inlet 8 3 8 W1 W2 19 1 2 Turbo Elite Built in Wok 21 3 4 Black Porcelain Control Panel Stainless Steel Control Panel 16 MODEL W1 W2 CG3TCN 24 1...

Страница 19: ...1 269738 Manifold Tube Turbo 5NG 1 1 1 1 1 1 269613 Flame Thrower Tube Turbo 150mm 1 1 1 1 1 1 269621 Flame Thrower Tube Turbo 210mm 1 1 1 1 1 1 269639 Flame Thrower Tube Turbo 310mm 1 1 1 1 269647 Fl...

Страница 20: ...elain Enamel 1 269787 26 Warming Rack Stainless Steel 1 269795 31 Warming Rack Stainless Steel 1 269803 39 Warming Rack Stainless Steel 46 2 2 2 269811 Handle Brackets for S Steel Hood 1 269829 Handle...

Страница 21: ...o Classic Alternate Rock Grate 14 17 15 20 21 22 18 16 19 5 10 31 32 33 35 36 49 39 44 34 1 40 43 63 2 27 29 23 3 37 5 24 7 50 9 25 41 12 13 48 11 8 Valve Igniter Assembly Electrode Lead Black Control...

Страница 22: ...15 20 21 22 18 16 19 1 40 41 43 63 26 7 50 37 6 9 10 2 28 23 47 46 42 30 38 51 52 45 53 61 6 12 13 48 11 8 Valve Igniter Assembly Electrode Lead Chrome Control Knob 20 4 59 54 56 60 55 62 59 58 57 Sa...

Страница 23: ......

Страница 24: ...Barbeques Galore z 949 597 2400 z 10 Orchard Road Suite 200 z Lake Forest CA 92630...

Отзывы: