

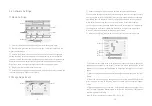
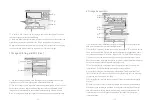


4. Right-click to enter the calibration and measurement module.
(1)
(2)
(3)
(4)
(5)
(6)
(7)
(8)
(9)
(10)
(11)
(12)
(13)
(14)
(15)
-16-
-15-
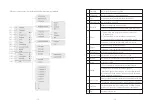
1 Scale
Bar
On
/
off the scale bar
on
the picture.
2 Coordinate
Get the coordinates
of the
selected
points.
3 Line
Arbitrary,
horizontal and
vertical
line
measurement.
4 Freehand Line
Get a freehand line length.
Measure rectangle
perimeter
and area.
Selectable
to
have
the
data
of
height,
width,
perimeter
or
area.
1) Center Point:
Use
center
point and
point
on
the
circle
2) Two
Point:
Draw a circle according to
the
diameter;
3) Three
Point:
Use
3 points
on
the
circle
to
draw a circle.
Selectable
to
have
the
data
of
radius,
perimeter
or
area.
Measure polygon
perimeter
and
area.
Selectable
to
have
the
data
of
perimeter
or
area.
8 Perpendicular
Measure the perpendicular
length.
9 Concentric circles Get the diameters
of the
two concentric circles.
10 Bicircle
Get the distance
between
two
circles’
center
points.
11 Angle
Measure the angle.
1) Set the
measurement
line
width, color
and font
color.
2) Magnifier On
/
off: Switch on
/
off
the
magnifier.
(When
the magnifier is switched on,
the
cursor
located
area
will be zoomed in
and
placed
at
the corner
to help
accurately
Select
to
export
the
measurement
results
to
an
excel
or
text
file.
The
exported
results
will be saved
in
the
SD
card
\
MEASURE
folder.
14 Set Scale
It allows to
create 10
groups
calibration files in calibration
table
,
and
the
.
user can
select
10 groups files to do measurement
15 Exit
Exit the
measurement.
12 Setting
13 Save
Results
5 Rectangle
6 Circle
7 Polygon
to
draw a circle;
locate the
measurement
point.)


