

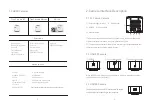
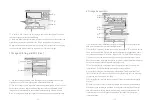


3).Image Stitching and EDF (Live)
①
Run the live image stitching, move the stage X Y axis according to the selected
stitching speed, splice the image to obtain a high resolution image.
Run the live depth of field expansion, observe the preview picture, rotate the focus
knob of the microscope, and fuse different depths of field to finally obtain a clear
image effect. Different samples have different qualities of high, medium and low.
Note: GT series cameras do not support live stitching and depth of field integration.
②
High
Speed
Start
Stitching
Image
Stitching(Live)
Stitching
:
Background
Color
:
Quality
:
High
Start EDF
EDF(Live)
②
①
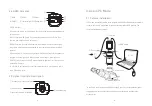
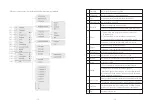
⑦
To select R, G, B channel can check grey maps in different channels and also
can adjust channel color order individually.
⑧
[Auto Min]&[Auto Max] automatically obtains the pixel values o
f the darkest and
brightest intervals with even distribution. (Single channel does not support).
⑨
Appropriately adjust the gamma value, change the brightness value of the gray
tone of the image, and increase the layering of a monochrome image.
RGB
R
G
B
Auto Min
Auto
Max
0
255
Gamma
:
2.10
Line
Default
Hitogram
⑦
⑧
⑨
-11-
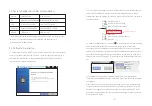
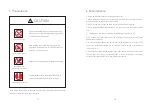
4).Image Acquisition
①
Select [Use Dialog]: the software will pop up the Dialog to set the picture save
path, picture name and format when taking pictures.
②
Select [Use File Name]: A file will be saved with the name "TS" as default, but the
name can be customized. "Customized name + time stamp" is supported. A name
can contain up to 64 bytes ; File format: Support JPG \TIF \PNG \DICOM, default to
TIF, and can be checked simultaneously, but at least one of them must be chosen.
Under default status, the image file shall be saved to a file folder specified in defined [
Path ]; user can modify the saving path through [Browse].
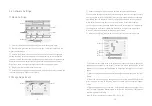
③
The video provides two encoding modes: [Compression] and [Full frame (No
compression). [Full frame (No compression)] is chosen as default.
④
Select [Auto Stop], the recording mode is available in [Total Frame] and [Total
Time]. [Total Frame] is chosen as default. Unselect [Auto Stop] ,user can manually
click to stop the current video recording.
⑤
Selecting [Delay Time], you can set a period of time after which video recording
will start.
⑥ [
Hard Disk] In the process of capturing images, the function will automatically
write the data into disk. Which is suitable for long-term shooting .
[
RAM
]
Save the
data into computer memory; after image capturing, write the data into a disc file.
Limited by the size of memory space, this mode is not suitable for a long time
capturing images .
-12-
Video
Record
Flie
Save
File
Name
:
Format
:
Path
:
Total
Frame
:
Total
Time(s)
:
Save
to
:
Hard
Disk
RAM
Video
Record
Use
Dialog
Use
File
Name
Auto
Stop
①
②
③
④
⑤
⑥
Delay Time:
DICOM
PNG
yyyymmddHHMMSS
C:/Users/tuc/Desttop/Image
Browse
Default
+
JPG
TIF
TS
√
Encoder
:
Full frame(No compression)
10
10
0
min


