background image

Eco Sweeping Machine

1

Conversion for front attachment

The safety instructions in Chapter 3.3 are  

mandatory! 
Accident hazard! 

Pay attention to a safe placement of the Eco 

sweeping machine. If necessary, secure the 

sweeping machine in additional ways.

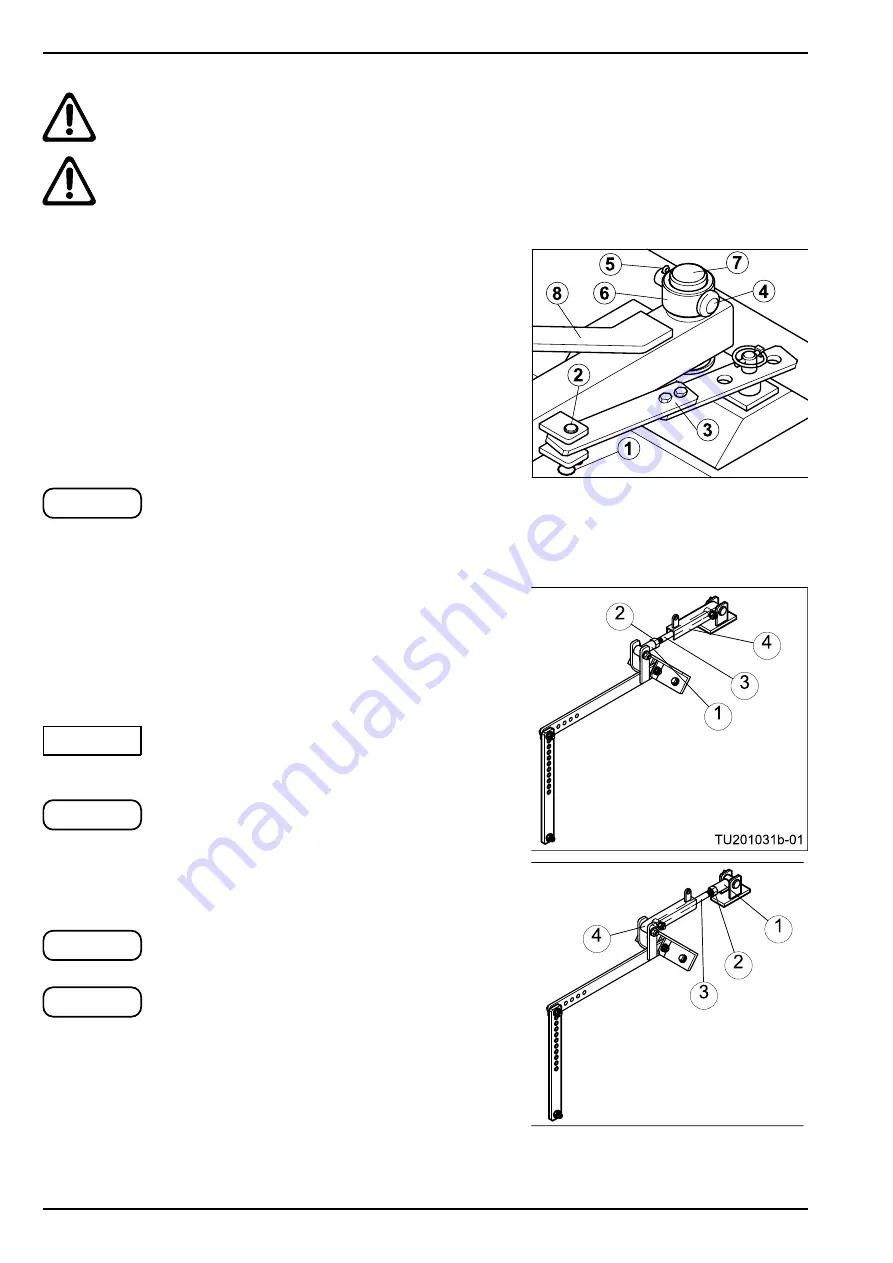
•  Remove the hydraulic hoses from the loop of the 3-point 

linkage.

•  Detach the spring plug (1) and bolt (2).
•  Move the pitch rod (3) or pitch control cylinder to the 

side.

•  Unmount bolt (4) using the splint pin (5) and pull the bar-

rel (6) off the central bolt (7).

•  Lift the 3-point linkage from the central bolt and set down 

rotated by 180 degrees.

Take the 3-point linkage's own weight into 

account. If necessary, shift the support up-

wards.

•  Reinstall the barrel (6) together with the bolt (4) and the 

splint pin (5) on the central bolt.

•  Secure the pitch rod (3) or pitch control cylinder, using 

the bolt (2) and spring plug (1).

•  Hang the hydraulic hoses back into the loop of the 3-

point linkage.

The positioning of the hydraulic hoses must 

be checked, as damage occurs if they get 

entangled or squashed.
For the Eco sweeping machine with dirt coll-

ection vessel, the emptying mechanism must 

be converted.

•  Convert parts (1), (2), (3), and (4) according to the at-

tachment version and secure again (see diagram).

Replace self-locking nuts after each unscre-

wing!
The attachment sequence for the frontal at-

tachment is the same as for the rear attach-

ment (see previous page).

front attachment

rear attachment

NOTE

NOTE

NOTE

NOTE

ATTENTION

Содержание Eco 150

Страница 1: ...Eco Sweeping Machine Operating Manual ...

Страница 2: ... familiarise with the use of the machine and its service and maintenance The manual also helps you to avoid dangers and damage We wish you optimum results with your Eco sweeping machine Tuchel Maschinenbau GmbH This operating manual is current as of April 2004 Our continuous efforts towards an improvement of the Eco sweeping machine may lead to changes in detail The introduction of improvements do...

Страница 3: ...12 3 2 Storage 13 Take the ground pressure off the sweeping drum13 Sweeping machine without collector vessel 13 General storage 13 3 3 Attachment 14 Mounting before initial attachment 15 3 3 1 3 point linkage rear attachment 15 Conversion for front attachment 16 3 3 2 Yard loader Attachment 17 3 3 4 Fork arm Attachment 17 3 3 3 Front attachment coupling triangle 18 3 4 Operation 18 3 4 1 Transport...

Страница 4: ... equipment consists of hydraulic side adjustment for easier working In open sweeping the Eco sweeping machine is placed at an angle to the surface to be cleaned the dirt collection vessel optionally with Vulkollan rail for sweeping with dirt collection The dirt tray is opened and locked from the driver s seat via bowden control and levers Optionally the collector vessel can also be emptied hydraul...

Страница 5: ...ed European standards DIN EN 292 1 2 DIN EN 982 DIN pr EN 1553 and DIN EN 474 1 2 were also applied This is documented in the EU declaration of conformity 1 2 6 Specifications for enquiries and orders When ordering spare parts or accessories please specify the model name serial number and the year of construction of the Eco sweeping machine for which the spare part is intended Original spare parts...

Страница 6: ...ption Type of drive hydraulic Required oil quantity 25 l min Eco 150 and 180 30 l min Eco 230 Oil pressure required 160 bar Type of oil hydraulic oil according to ISO VG 68 DIN 51524 e g Vitam GF 46 by Aral 1 2 10 Intended usage The Eco sweeping machine is a machine that is set in motion via a hydraulic circuit and through the attachment to a suitable carrier vehicle Used for cleaning sealed surfa...

Страница 7: ...le of 20 mm 1410 1690 2160 Total width total width at 20 with collector vessel mm 1852 1947 2152 2229 2602 2652 Volume of collector vessel litres kg 135 202 161 241 200 299 Weight of Eco sweeping machine with collector vessel and 3 point linkage kg 220 245 273 required oil quantity l min 25 30 25 30 30 40 Sweeping capacity at 6 km h m h 9000 10800 13800 Diameter of main sweeping drum 520mm Maximum...

Страница 8: ...state 2 2 Qualification and training of personnel The Eco sweeping machine must only be used serviced and maintained by persons that are familiar with the machine and are informed about its dangers The area of responsibility competence and the supervision of the personnel must be directed in detail by the operator If the personnel does not have the necessary knowledge it must be trained and instru...

Страница 9: ...must be put into their respective position Observe permitted axle load gross weight and transport dimensions Check the immediate area before starting to drive and before start up children Ensure that there is sufficient visibility Transport transport trips Check and attach transport equipment such as e g illumination and warning equipment e g reflective tape If lighting that is part of the standar...

Страница 10: ...carrier vehicle lower the sweeping machine to the ground Pull the ignition key and secure the carrier vehicle against unintended restart and movement 2 6 Safety notices for carrying out service inspection and installation work The operator must ensure that all service inspection and assembly work is carried out by authorised and qualified personnel that has sufficiently informed itself through det...

Страница 11: ...e start up Never reach into the squashing hazard area as long as parts may move Do not touch any moving machine parts Wait until they have come to a complete standstill When lowering the sweeping machine keep sufficient distance Do not stand in the rotation area during operation Danger of parts flinging away while engine is running keep a safe distance The notice signs attached to the Eco sweeping...

Страница 12: ...tor vessel is guided evenly and without damage across the ground The opening and closing of the dirt collection vessel is ac complished from the carrier vehicle It is operated via a bowden control or by operating a hydraulic cylinder The Eco sweeping machine is equipped with a direct at tachment option that matches the carrier vehicle The re spective attachment type is connected to the machine fra...

Страница 13: ... wheels out and secure them again using the bolt 3 Carry out the setting evenly on both sides Fully extend the support 5 of the 3 point linkage if pre sent Bristles of the sweeping drum must no longer touch the ground Sweeping machine without collector vessel For the open sweeping Eco sweeping machine shift the supports 6 downwards and secure them General storage Accident hazard Hydraulic hoses an...

Страница 14: ...eping machine During attachment or coupling special caution must be exercised Carry out maintenance and modifications on the Eco sweeping machine only if the hydraulic drive is switched off Pull the ignition key and secure the carrier vehicle against unintended restart and mo vement During the attachment follow the operating manual of the carrier vehicle Only one exa mple is described and shown he...

Страница 15: ...g Clean if necessary Drive the carrier vehicle towards the sweeping machine Select the bolt diameter 1 according to the attachment category hook and lock the draft link hook rods Use upper hook bolts 2 according to the attachment category and lock with upper hook Adjust the upper hook so that the attachment receptacle is perpendicular to the ground See also operating manual of the carrier ve hicle...

Страница 16: ...account If necessary shift the support up wards Reinstall the barrel 6 together with the bolt 4 and the splint pin 5 on the central bolt Secure the pitch rod 3 or pitch control cylinder using the bolt 2 and spring plug 1 Hang the hydraulic hoses back into the loop of the 3 point linkage The positioning of the hydraulic hoses must be checked as damage occurs if they get entangled or squashed For th...

Страница 17: ...k 3 3 4 Fork arm Attachment The safety instructions in Chapter 3 3 are mandatory Check fork arm receptacle and fork arms for soiling and clean if necessary The distance between the fork arms must be adjusted on the carrier vehicle before they are driven into the receptacles Drive the fork arms fully into the receptacle The fork arm receptacle must be secured with a chain The chain must be pulled t...

Страница 18: ...t screw 4 see also operating manual of the carrier ve hicle You must move the locking handle 2 upwards until the locking tongue securely connects the opposing triangle 5 again Tightly turn the check nut 3 against the barrel 6 Tighten the countersunk screw 1 at the locking handle 2 Insert the receptacle triangle into the device triangle and lock it Verify the correct seating and the lock of the att...

Страница 19: ... operating the sweeping machine a sweeping profile of 6 10 cm appears for adjustment of the sweeping profile see Chapter 3 4 8 Hydraulic hoses must be positioned without danger of getting squashed see initial attachment in Chapter 3 3 Sweeping machine Position in front of the carrier vehicle Lower the sweeping machine until the two or three cas tor wheels touch the ground Place the receptacle stru...

Страница 20: ...e respective control lever for the sweeping machi ne hydraulics in the carrier vehicle The flow direction of the working hydraulics changes and the collector vessel opens Close collector vessel by flipping back the previously mentioned control lever flow direction changed again Lower the sweeping machine 3 4 5 Conversion to the open sweeping Eco sweeping machine The safety instructions in Chapter ...

Страница 21: ...eping machine up or out but keep it close to the ground Mechanic operation Remove linchpin 1 Pull the pitch rod 3 upwards Tilt the sweeping machine towards the desired angle of the sweeping direction material to be swept up to the left or to the right and put the pitch rod onto the approp riate hole 2 Insert and secure the linchpin 1 Hydraulic operation The tilting of the Eco sweeping machine is c...

Страница 22: ...0 cm width appears Given the arrangement of the perforated rails 2 and 1 the height of the support wheels 3 can be adjusted in 2 cm steps Evenly adjust the two wheels and the third support wheel if they exist Carry out modifications on the sweeping machi ne only the hydraulic drive is switched off Pull the ignition key and secure the carrier vehicle against unintended restart and movement Take the...

Страница 23: ...ne together with the bowden control Accident hazard Hydraulic hoses and bowden con trol are a tripping hazard on the ground Put the hy draulic hoses and the bowden control across the sweeping machine Seal hydraulic connector barrels with dust caps Soiling leads to damage on the hydraulic system Lower the Eco sweeping machine until all castor wheels touch the ground For open sweeping machines place...

Страница 24: ...triangle Detachment The safety instructions in Chapter 3 5 are mandatory Undo the lock and lower the coupling triangle from the carrier vehicle Drive vehicle backwards 3 5 4 Fork arm receptacle Detachment The safety instructions in Chapter 3 5 are mandatory Disconnect the safety chain from the carrier vehicle and place across the machine s cover Move the fork arms out of the receptacle openings of...

Страница 25: ...lues by various screw manufactur ers We do not accept liability for their application Regularly check the hydraulic hoses Hydraulic hoses must be replaced no later than after 6 years of usage including storage time of at most 2 years Replace hydraulic hoses that are damaged or aged The replacement hoses must meet the technical require ments of the manufacturer A 3 6 5 6 6 8 8 8 10 9 12 9 ø MA Nm M...

Страница 26: ...ed Unscrew attachment screws 1 Remove bearing shell I 2 with bearing protection 3 Unscrew attachment screws 4 Loosen threaded bolt 5 and unmount with bearing 6 Unmount bearing shell II 7 Lift sweeping machine out Do not walk move or work underneath the lifted sweeping machine Secure sweeping machine and carrier vehicle against unintended restart sagging and movement Roll sweeping drum away Remove ...

Страница 27: ...pposite order 4 7 Malfunctions causes and rectification Malfunction Cause Rectification 1 Sweeping drum does not turn Hydraulic connections not correct Pressure or volume flow too low Hydraulic motor defective Check connections Ask a qualified workshop Ask a qualified workshop 2 Dirt collection vessel does not pivot upwards mechanically Rope at the emptying mechanism is attached incorrectly Attach...

Страница 28: ...vice and maintenance 28 4 8 Hydraulic circuit diagrams Hydraulic circuit diagram for Eco Hydraulic circuit diagram for Eco with hydraulic vessel emptying Hydraulic circuit diagram for Eco hydraulic tilting ...

Страница 29: ...Manufacturing Address 4 Maximum load specifications 5 Mechanic operation 20 Mechanic operation 21 Modes of operation that are not permitted 11 Mounting before initial attachment 15 N Notice signs on the machine 11 Notizen 30 O Operation 18 Operation 9 Overload protection 22 P Preface 2 Product Specifications 4 Purpose 4 Q Qualification and training of personnel 8 R Readjustment of the sweeping pro...

Страница 30: ...__________________________________ __________________________________________________________________________ __________________________________________________________________________ __________________________________________________________________________ __________________________________________________________________________ _________________________________________________________________...

Страница 31: ...__________________________________ __________________________________________________________________________ __________________________________________________________________________ __________________________________________________________________________ __________________________________________________________________________ _________________________________________________________________...

Страница 32: ...Seite 32 Holsterfeld 15 48499 Salzbergen Tel 49 0 59719675 0 Fax9675 30 Internet http www tuchel com E Mail service tuchel com ...

Отзывы: