background image


-5- 

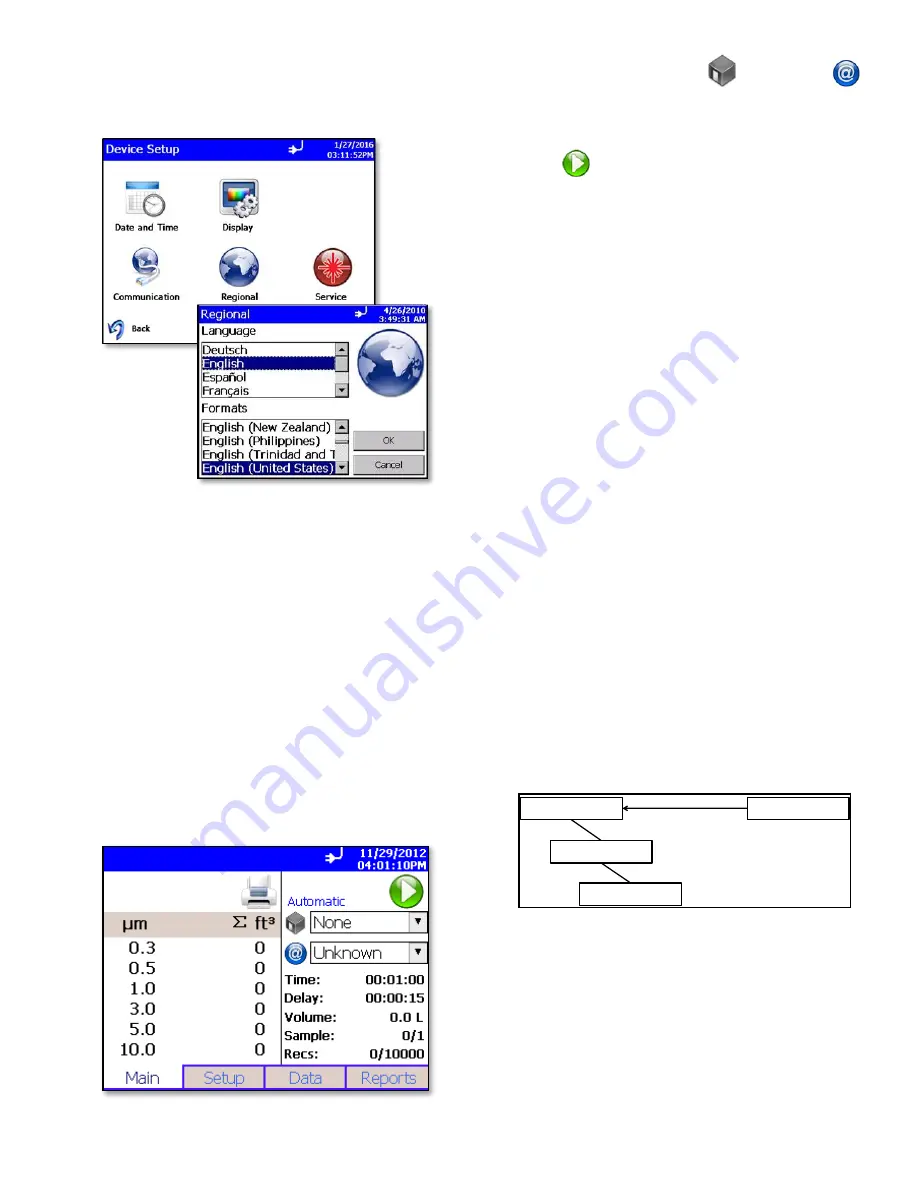
Select Language 

1.  From the Main tab, select 

Setup

 | 

Device

 | 

Regional

.  


2.  Language is selected from the Language list. 

3.  Date and number format (decimal separator) are 

selected from the 

Formats

 list. 

4.  Select 

OK

 to save the selection. The instrument will 

switch to using the selected Language and 
Formats. 

Set up Time/Date 

1.  Select the 

Setup

 | 

Device

 | 

Date

 and 

Time

 tabs. 

2.  Use this screen to set the current date and. Press 

OK

 when finished. Change values using the arrows 

or tap the fields to use the on-screen keypad. 

Collecting Samples 

1.  Sample collection is initiated from the Main screen: 


2.  Select the appropriate Zone 

 and Location 

within the Zone. Recall, the sampling setup is 
configured within the Recipe associated with that 
Zone. The sampling setup is displayed. 

3.  Press 

 to start sampling. 

4. 

When the Zone selection is set to “None” from the 
Main screen, the “Default” Recipe will be used for 
sampling. The initial settings for the Default Recipe 
provide a 60 second sample, but this Recipe can be 
edited as needed using the Recipe editor. 

5.  The Main tab is updated as samples are collected. 

Zones, Locations, and Recipes 

1.  AeroTrak data is organized by Zones and Locations 

within Zones. This is modeled after the data 
organization used by the supported classification 
standards where a zone or room is classified by 
measuring samples at various locations within that 
zone. 
 
If the instrument is not being used for standard 
classification, it is still a good practice to group 
sample data by Zone because it is easier to select 
the grouped data for printing and export and it helps 
to annotate exported sample data by relating it to 
the physical area where measurements were taken. 

2.  A Recipe consists of the sampling mode, sample 

timing, alarm thresholds, display preferences and 
other configuration settings to be used for sampling.  
 
Each Zone has one Recipe that is associated with 
it, and one Recipe can be shared by several Zones. 
When a Zone is selected from the Main screen for 
sampling, its associate Recipe is also activated. 
Recipes are associated with Zones. The data 
structure is shown schematically below: 


3.  When conducting classifications, the type of 

classification can be selected and guidance is 
provided in terms of the sampling strategy required 
to meet the regulatory requirements in terms of 
number of Locations and length of sample. 

4.  When conducting sampling, no guidance is given as 

the sampling strategy and data organization is up to 
the user. Common Recipes can be configured for 
various sampling strategies in terms of length of 
individual samples and the number of samples per 

Zones

Locations

Samples

Recipes

Содержание AeroTrak 9110 Series

Страница 1: ...AEROTRAK PORTABLE AIRBORNE PARTICLE COUNTER MODEL 9110 QUICK START GUIDE P N 6004346 REVISION K MARCH 2018 ...

Страница 2: ... controls adjustments or procedures other than those specified in this manual may result in exposure to hazardous optical radiation C A U T I O N The shipping containers and packaging provided with your particle counter are specially designed to protect the instrument Please retain the packaging for shipping the instrument for service or calibration Use of other packaging may result in damage to t...

Страница 3: ...hat is not a clean room This will prevent contaminating the optics that will then require cleaning Note For zero checking in a dirty environment two filters in series may be needed 2 Remove the battery door in the back of the instrument see picture below with the two thumb screws and install one or more batteries doesn t matter which slot 3 Connect the appropriate power cord to the universal power...

Страница 4: ... particle counter including data display system configuration device sampling and Recipes 8 Use the Data screen to review data that has been collected 9 Use the Reports screen to select various standard reports for viewing and printing 10 The screens and their options are explained in detail in the Operation Manual Using the Onscreen Keyboard 1 Throughout the setup screens a keyboard will appear o...

Страница 5: ...rganization used by the supported classification standards where a zone or room is classified by measuring samples at various locations within that zone If the instrument is not being used for standard classification it is still a good practice to group sample data by Zone because it is easier to select the grouped data for printing and export and it helps to annotate exported sample data by relat...

Страница 6: ...mber of samples for each data collection period is chosen Channels allow for channels to be enabled disabled and alarm levels to be chosen 9 Timing field details are provided below Field Description Start Delay Start Delay indicates how long it will be before the first sample is taken NOTE It takes approximately 10 seconds for the pump to reach the flow set point taking a measurement before the pu...

Страница 7: ...le Duration of the sampling period Vol Volume of air that was sampled Alarm Alarm threshold was triggered Yes or not No Inst Status of the instrument hardware OK if no issues or an error abbreviation if instrument has a possible issue Temp Temperature at the end of the time the data was collected if optional probe was connected during sampling Data Screen Labels and Controls Field Description RH H...

Страница 8: ...USB IP address and date and time format Service Screen This screen is for use when cleaning the optics of the 9110 It provides a current indication of the laser level relative to when it was measured at the factory 100 is the factory level It also allows you to turn the pump on and off Software 1 The TrakPro Lite Secure Data Transfer utility and user manuals come on a CD that was packaged with you...

Отзывы: