TruTech PVS2119 Скачать руководство пользователя страница 11

11

17)

17)

17)

17)

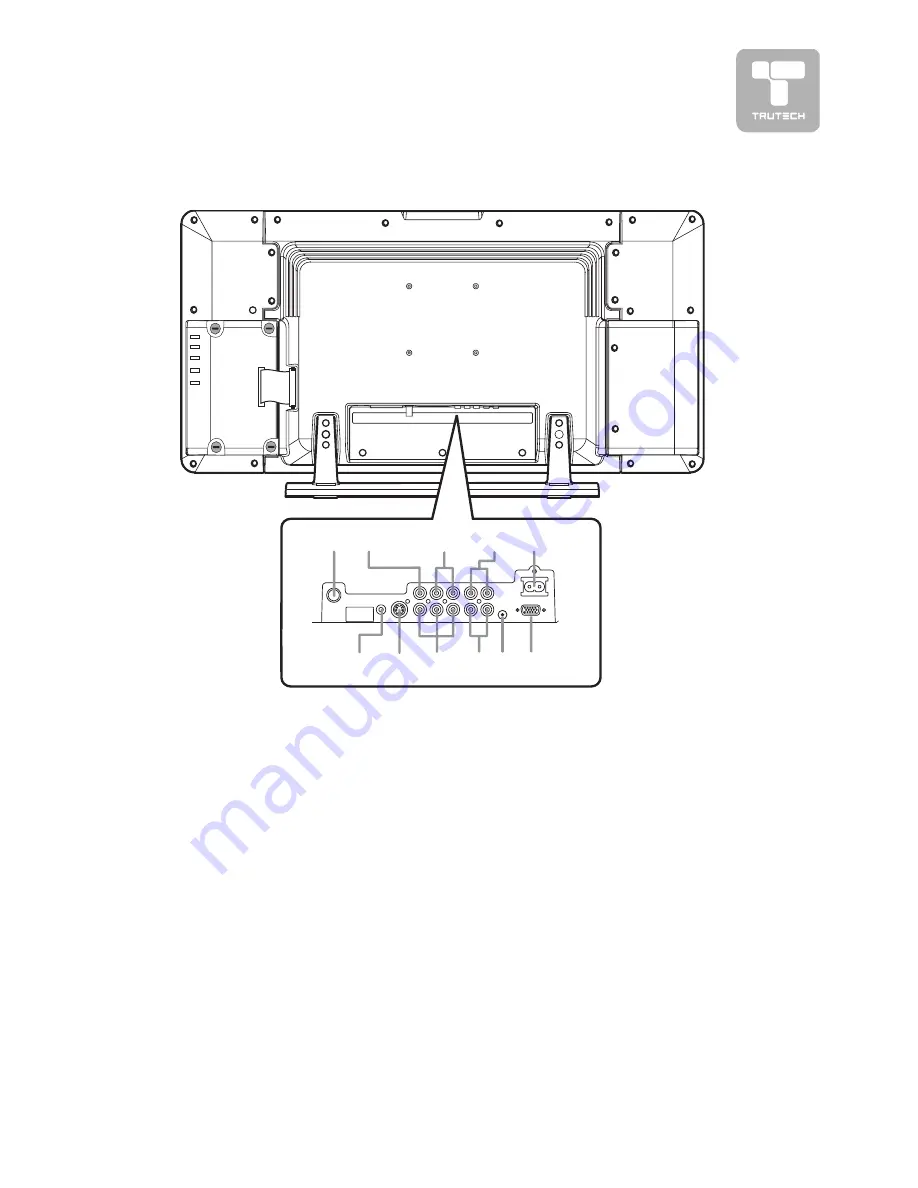
17) TV Antenna Cable terminal -

TV Antenna Cable terminal -

TV Antenna Cable terminal -

TV Antenna Cable terminal -

TV Antenna Cable terminal -
Coaxial TV antenna input

Coaxial TV antenna input

Coaxial TV antenna input

Coaxial TV antenna input

Coaxial TV antenna input

18)

18)

18)

18)

18) AV IN 1 Video Input Jack

AV IN 1 Video Input Jack

AV IN 1 Video Input Jack

AV IN 1 Video Input Jack

AV IN 1 Video Input Jack

19)

19)

19)

19)

19) AV IN 1 Audio Input Jacks

AV IN 1 Audio Input Jacks

AV IN 1 Audio Input Jacks

AV IN 1 Audio Input Jacks

AV IN 1 Audio Input Jacks
(Left / Right)

(Left / Right)

(Left / Right)

(Left / Right)

(Left / Right)

20) Audio Output Jacks (Left/

20) Audio Output Jacks (Left/

20) Audio Output Jacks (Left/

20) Audio Output Jacks (Left/

20) Audio Output Jacks (Left/

Right)

Right)

Right)

Right)

Right)

21)

21)

21)

21)

21) Power Cord

Power Cord

Power Cord

Power Cord

Power Cord

22)

22)

22)

22)

22) Headphone jack

Headphone jack

Headphone jack

Headphone jack

Headphone jack

23)

23)

23)

23)

23) AV IN 1 S-Video Input

AV IN 1 S-Video Input

AV IN 1 S-Video Input

AV IN 1 S-Video Input

AV IN 1 S-Video Input

24)

24)

24)

24)

24) AV IN 2 Component Video Inputs

AV IN 2 Component Video Inputs

AV IN 2 Component Video Inputs

AV IN 2 Component Video Inputs

AV IN 2 Component Video Inputs
(Y/PB/PR)

(Y/PB/PR)

(Y/PB/PR)

(Y/PB/PR)

(Y/PB/PR)

25)

25)

25)

25)

25) AV IN 2 Audio Input Jacks (Left/Right)

AV IN 2 Audio Input Jacks (Left/Right)

AV IN 2 Audio Input Jacks (Left/Right)

AV IN 2 Audio Input Jacks (Left/Right)

AV IN 2 Audio Input Jacks (Left/Right)

26)

26)

26)

26)

26) PC IN Audio Jack

PC IN Audio Jack

PC IN Audio Jack

PC IN Audio Jack

PC IN Audio Jack

27) PC IN MONITOR/VGA jack

27) PC IN MONITOR/VGA jack

27) PC IN MONITOR/VGA jack

27) PC IN MONITOR/VGA jack

27) PC IN MONITOR/VGA jack

BACK & BOTTOM VIEW

BACK & BOTTOM VIEW

BACK & BOTTOM VIEW

BACK & BOTTOM VIEW

BACK & BOTTOM VIEW

17

18

19

20

21

22

23

24

25 26 27

UNIT REFERENCE GUIDE

UNIT REFERENCE GUIDE

UNIT REFERENCE GUIDE

UNIT REFERENCE GUIDE

UNIT REFERENCE GUIDE

Содержание PVS2119

Страница 1: ...08 09 1341 19 LCD TV DVD 2 IN 1...

Страница 2: ...arm and damp water droplets or condensation may form inside the unit When there is condensation inside the unit the unit may not function normally Let the unit stand for 1 2 hours before turning the p...

Страница 3: ...ted and any recordings made from these discs will be distorted This product incorporates copyright protection technology that is protected by method claims of certain U S patents and other intellectua...

Страница 4: ...into your outlet consult an electrician for replacement of the obsolete outlet 10 Protect the power cord from being walked on or pinched particularly at plug convenience receptacles and the point wher...

Страница 5: ...ERA CD DVD OPERA CD DVD OPERA CD DVD OPERATION 19 20 TION 19 20 TION 19 20 TION 19 20 TION 19 20 Playing a disc 19 Pausing playback still mode 19 Stopping playback 19 To skip to a different track 19 F...

Страница 6: ...REGION MANAGEMENT INFORMA REGION MANAGEMENT INFORMATION TION TION TION TION Region Management Information This unit is designed and manufactured to respond to the Region Management Information that i...

Страница 7: ...gtheremotecontrolisabout16feet 5meters TO CHANGE THE REMOTE CONTROL BA TO CHANGE THE REMOTE CONTROL BA TO CHANGE THE REMOTE CONTROL BA TO CHANGE THE REMOTE CONTROL BA TO CHANGE THE REMOTE CONTROL BATT...

Страница 8: ...9 9 TV MENU button TV MENU button TV MENU button TV MENU button TV MENU button Press to display the on screen TV menu 10 10 10 10 10 VOLUME buttons VOLUME buttons VOLUME buttons VOLUME buttons VOLUME...

Страница 9: ...atch the type of show you are watching Standard Personal Movie Dynamic Soft 28 28 28 28 28 EXIT button EXIT button EXIT button EXIT button EXIT button Press to exit the menu and return directly to nor...

Страница 10: ...DBY Light Off The unit is turned ON 9 9 9 9 9 Remote Control Sensor Remote Control Sensor Remote Control Sensor Remote Control Sensor Remote Control Sensor Do not block this sensor or remote control w...

Страница 11: ...Headphone jack Headphone jack Headphone jack Headphone jack Headphone jack 23 23 23 23 23 AV IN 1 S Video Input AV IN 1 S Video Input AV IN 1 S Video Input AV IN 1 S Video Input AV IN 1 S Video Input...

Страница 12: ...sources An indoor or outdoor aerial antenna A cable system A satellite system Note Note Note Note Note For receiving over the air TV broadcasts we recommend that you use an external fixed antenna Shou...

Страница 13: ...R to the S VIDEO input on this unit S VIDEO cable not included Make sure you connect both audio and video from the same VCR to the same input AV1 Note Note Note Note Note Please refer to the user manu...

Страница 14: ...same input AV1 Note Note Note Note Note Please refer to the user manual for the VCR for more information CONNECTIONS CONNECTIONS CONNECTIONS CONNECTIONS CONNECTIONS Connect to a camcorder Connect to a...

Страница 15: ...and left white input on this unit Audio cable not included Make sure you connect both audio and video from the same source to AV2 Note Note Note Note Note Please refer to the user manual for your com...

Страница 16: ...wall outlet Press the STANDBY ON STANDBY ON STANDBY ON STANDBY ON STANDBY ON button on the top of unit or remote control to turn on the unit Note Be sure the AC power cord is disconnectedandallfuncti...

Страница 17: ...G THE BASE ST REMOVING THE BASE ST REMOVING THE BASE STAND AND AND AND AND WARNING The LCD Display is very fragile and must be protected at all times when removing the base stand Be sure that no hard...

Страница 18: ...YSTEM SOUND SYSTEM SOUND SYSTEM TURNING THE UNIT ON TURNING THE UNIT ON TURNING THE UNIT ON TURNING THE UNIT ON TURNING THE UNIT ON When the AC power cord is connected press the ST ST ST ST STANDBY AN...

Страница 19: ...HE FUNCTION SETTINGS page 19 to 20 before proceeding See CUSTOMIZING THE FUNCTION SETTINGS page 19 to 20 before proceeding to step 3 to step 3 to step 3 to step 3 to step 3 3 3 3 3 3 Press the OPEN CL...

Страница 20: ...edly to select the desired subtitle language Notes If only one language is recorded the language does not change About two seconds later playback continues with the new subtitle you selected The numbe...

Страница 21: ...A LOCA LOCATING A SPECIFIC TITLE DVD TING A SPECIFIC TITLE DVD TING A SPECIFIC TITLE DVD TING A SPECIFIC TITLE DVD TING A SPECIFIC TITLE DVD If a DVD disc contains title numbers you can locate a speci...

Страница 22: ...disc is playing press the REPEAT DISC REPEAT DISC REPEAT DISC REPEAT DISC REPEAT DISC button until the indicator displays on the screen REPEA REPEA REPEA REPEA REPEAT PLA T PLA T PLA T PLA T PLAYBACK...

Страница 23: ...A PICTURE FILE DISC YING A PICTURE FILE DISC 1 Open the disc door 2 Hold a Picture file disc by its edge and gently push it onto the spindle with the label side facing up until you hear a click 3 Clos...

Страница 24: ...an mode playback are automatically played in letterbox mode black bands top and bottom Letter Box When wide screen video is played in this mode on a conventional screen black bands appear at the top a...

Страница 25: ...AUL AUL AULT T T T T It takes 3 5 seconds to reset the unit to the factory default The parental lock levels are equivalent to the following ratings 1 KID SAFE 5 PG R 2 G 6 R 3 PG 7 NC 17 4 PG 13 8 AD...

Страница 26: ...picture Contrast Contrast Contrast Contrast Contrast Adjust to sharpen the picture quality The black portions of the picture become richer in darkness and the white become brighter Color Color Color...

Страница 27: ...e Balance Adjust the balance level toward the left or right speakers Mode Mode Mode Mode Mode Select from preset sound settings Personal Voice Music Theater to match the type of show you are watching...

Страница 28: ...RENT PARENTAL SETTING AL SETTING AL SETTING AL SETTING AL SETTING LOCK CODE LOCK CODE LOCK CODE LOCK CODE LOCK CODE 1 Press the MENU button 2 Use or button to select the Setup menu then press or butto...

Страница 29: ...E SUGGESTED Some material may not be suitable for children 6 14 Viewers 14 years and older 7 18 Adult Programming Can French 4 13 Not suitable for children under the age of 13 5 16 Not suitable for ch...

Страница 30: ...or button 3 3 3 3 3 Use or button to select the Channel no Channel no Channel no Channel no Channel no setting and use the or button to change from AIR over the air broadcasts to CABLE cable satellite...

Страница 31: ...TING This feature allows reception of sound other than the main audio for the program 1 1 1 1 1 Press the MENU MENU MENU MENU MENU button 2 2 2 2 2 Use or button to select the TV setting menu TV setti...

Страница 32: ...32 LANGUAGE CODE LIST...

Страница 33: ...NOTE ANT NOTE ANT NOTE ANT NOTE Before transporting the unit take out the disc from the disc compartment CLEANING DISC CLEANING DISC CLEANING DISC CLEANING DISC CLEANING DISC A defective or soiled di...

Страница 34: ...isc cannot be decoded to have speaker output This unit is too hot shut off the unit for 30 minutes to cool down The region number of the disc doesn t match the region number of this unit Clean the dis...

Страница 35: ...on Make sure that the TV mode is selected Try a new channel to check for possible station trouble Make sure the antenna is connected properly Increase the volume Make sure the antenna or audio video...

Страница 36: ...Printed in China 811 211991 012...

Отзывы: