TRUST 350FS POWERC@M FLASH
Function Description
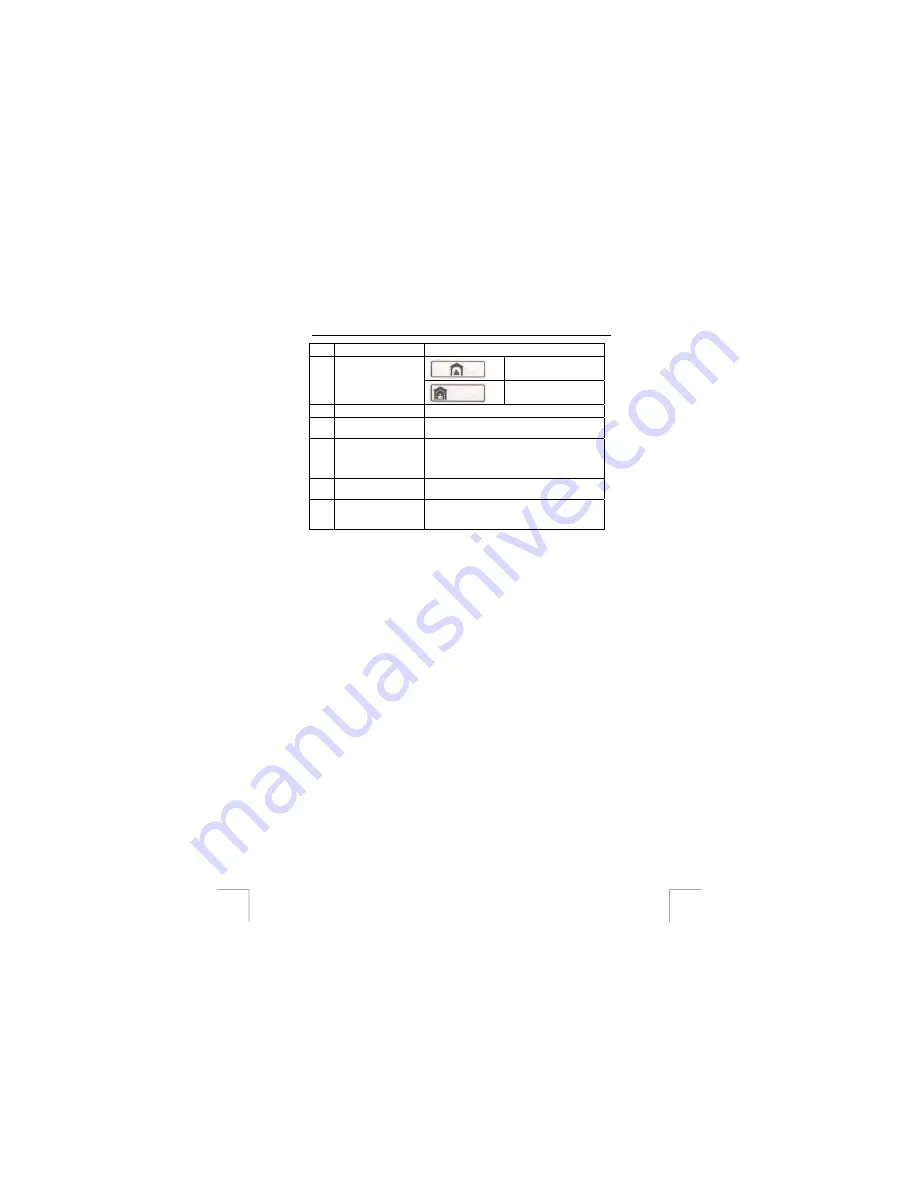
Inside (bright).
Inside (dark).
18
Memory
Appears when the camera’s memory is full.
19
Flash mode
Automatic. If this is not shown on the LCD
screen, then the flash is turned off.
20
Delete recordings
ALL = Deletes all the recordings from the
camera’s memory.
LST = Deletes the last recording from the
camera’s memory.
21
Automatic exposure
Takes photographs after a time delay of 10
seconds.
22
Battery capacity
Shows the amount of energy remaining in the
batteries. Flashes when the batteries are almost
empty.
6
Using the camera
6.1 Taking
photographs
1.
Put batteries into camera. (refer on chapter 4)
2.
Use viewfinder to locate the object you want to photograph.
3.
Push exposure button (Fig. 1, 1) and hear a beep.
You see the number on the display is increased by ‘1’ so one photograph is taken.
6.2
Setting the resolution
The Trust 350FS PowerC@m Flash can be used to take photographs in two different
resolutions, i.e. VGA (640 x 480, approx. 60 recordings) and CIF (320 x 240, approx.
190 recordings).
The default setting is the VGA (640 x 480) resolution, which can be used to take
approximately 60 photographs.
If you wish to set the camera to the low (CIF) resolution, carry out the following.
See figure 1 and figure 2 with the corresponding tables.
1.
Turn the camera on by pressing the ON/OFF button (7). A beep will be heard
when the camera is turned on.
2.
Press the MODE button (2) twice until the letters CIF start to flash on the LCD
screen (9).
A beep will be heard each time the MODE button is pressed.
3.
Press the SELECT button (8) until 2 beeps are heard.
The camera is now in the low resolution mode (CIF), which can be used to take
approximately 190 photographs.
4.
Press the EXPOSURE button (1) to take a photograph.
NOTE:
When the camera is turned off, either by using the ON/OFF button or
when it turns off automatically, the camera will return to the high
resolution when it is turned back on again. You will then have to select
the low resolution as described in chapter 6.2.
4