


1
2
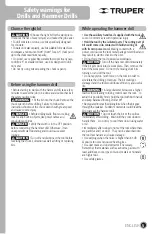
Chuck
Jaw
Bit with
SDS-PLUS Shank
Bit and Accessory Installation
• Clean and lubricate lightly the bit and / or accessory
before installing.
• Push the chuck jaw back while inserting the bit and /
or accessory until stopping.
• Release the chuck jaw to set it in the original position. This procedure
will secure the bit and / or accessory. If the chuck jaw is not back to the
original position repeat the former step.
• Try to release the bit and / or accessory from the SDS chuck to double
check the bit and / or accessory are perfectly secured. A perfectly secured
bit and / or accessory cannot be removed unless the chuck jaw slides
back simultaneously.
Do not try to install or remove bits and / or accessories unless the tool is disconnected.
7
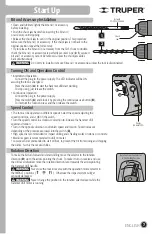
Start Up
Turning ON and Operation Control
• Intermittent Operation:
Connect the plug to the power supply. The LED indicator will be ON
assuring the tool is energized.
Press the switch (
A
) to start the hammer drill start working.
To stop using, just release the switch.
• Continuous Operation:
Connect the plug to the power supply.
Press the switch (
A
) and block it by pressing the continuous use button (
B
).
To interrupt the function press and then release the switch.
• The tool can be operated in different speeds. Select the speed adjusting the
speed control (
+
and
-
) (
C
) in the switch.
• Turn the speed control in a clockwise direction to increase the hammer drill
speed and torsion.
• Turn in the opposite direction to diminish speed and torsion. Speed increases
depending or the pressure exercised into the switch (
A
).
• High speed is recommended for impact drilling and chiseling works on stone or concrete.
• Medium speed is recommended to drill on metal.
• Low speed is recommended to start orifices, to prevent the bit from sliding and chipping
the orifice. Such is the case with tiles.
A
B
C
WARNING
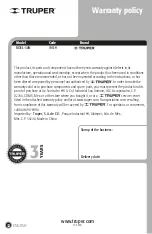
Rotation Direction Selector
in the Drilling Position
Rotation Direction
To make the bit turn forward and start drilling move the selector to the rotation
direction (
D
) up to the arrow pointing the chuck. To make it turn in reverse and use
the drill as screwdriver move the rotation direction lever towards the arrow pointing
the hammer drill handle.
Never use the tool in reverse with the operation mode selector in
the IMPACT positions ( , , ). Otherwise the impact system will get
seriously damaged.
Never change the position in the rotation selector lever while the
hammer drill motor is running.
A
D
WARNING
WARNING
Energy
Indicator LED
Speed Control
ENGLISH
Содержание ROEL-30N
Страница 10: ...Notas 10 ESPA OL...
Страница 22: ...Notes 10 ENGLISH...