background image

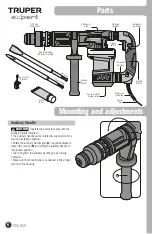
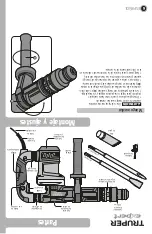
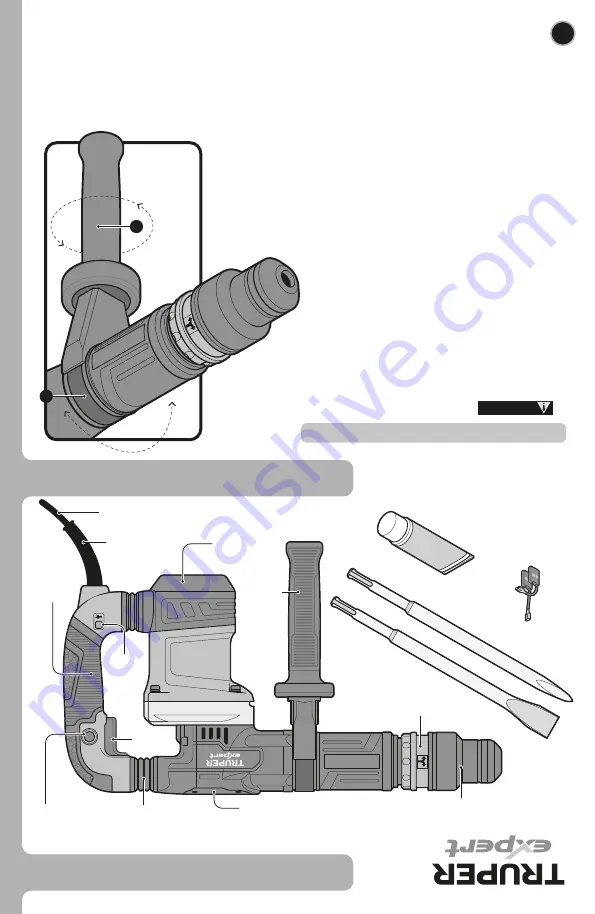
Partes

Botón de

uso contínuo

Mango

auxiliar

Gatillo

interruptor

Mango

antiderrapante

Collarín del

broquero

SD

S max

Anillo para ajustar el

ángulo del accesorio

Protector

del cabe

Cubierta

del ventilador

y carbones

Cable de

alimentación

6

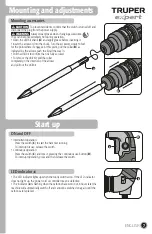
Montaje y ajustes

ESP

AÑOL

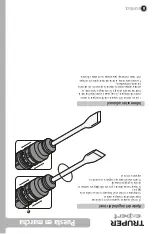
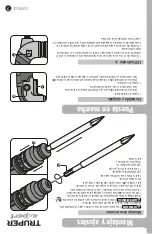
Cincel plano

Cincel de punta

Amortiguador

de vibración

Cubierta

del depósito

de aceite

LED indicador

de energía

Mango auxiliar

Carbones

de repuesto

Tubo

de grasa

                             Opere la herramienta eléctrica 

solamente con el mango auxiliar instalado.

• El mango auxiliar se puede rotar hasta cualquier 

posición, para lograr una postura segura y de baja fatiga.

• Gire la empuñadura del mango auxiliar (

A

) en dirección 

contraria a las manecillas del reloj para aflojar la montura 

(

B

) y balancee el mango auxiliar a la posición deseada.

• Entonces, vuelva a apretar la empuñadura del mango 

auxiliar girando en dirección a las manecillas del reloj.

• Asegúrese que la banda de la montura esté colocada en 

la sección adecuada de la carcasa.

ATE

NCIÓN

A

B

Содержание expert 100890

Страница 1: ...Instructivo de Demolition hammer 6 kg SDS MAX MADE 6NX Model Code MADE 6NX Applies for 100890 14Joules Impact energy CAUTION Read this manual thoroughly before using the tool ENGLISH ESPA OL...

Страница 2: ...Warranty Policy 3 3 4 5 6 6 7 9 10 11 12 MADE 6NX CAUTION Contents Keep this manual for future references The illustrations in this manual are for reference only They might be different from the real...

Страница 3: ...into a polarized outlet If the plug cannot be introduced into the outlet reverse the plug If it still doesn t fit call a qualified electrician to install for you a polarized outlet Do not alter the p...

Страница 4: ...renches or vices left attached to rotating parts of the tool may result in personal injury Do not overreach Keep proper footing and balance at all times This enables a better control on the tool durin...

Страница 5: ...ly when performing work where the cutting portion of the drill may contact hidden wiring or the tool s own power cord Contact with a live wire also makes the metal parts of the tool live and can cause...

Страница 6: ...r indicator Spare carbon brushes Grease tube A B ENGLISH Operate the power tool only with the auxiliary handle installed The auxiliary handle can be rotated to any position for a secure low fatigue po...

Страница 7: ...the collar completely in the direction of the arrows and pull out the drill bit 7 Mounting and adjustments Start up LED indicator E The LED indicator lights up when the tool is switched on If the LED...

Страница 8: ...accuracy When new the tool requires a 5 hour working time to reach maximum efficiency Additional Information The chisel can be adjusted in 12 positions Depending on the job to be done Insert the chise...

Страница 9: ...ws and make sure they are tightened properly If any of the screws are loose tighten them immediately The carbons should be checked periodically and always be replaced by a Authorized Service Center wh...

Страница 10: ...10 Notes ENGLISH...

Страница 11: ...O DE ZU IGA JAL TEL 33 3606 5285 AL 90 FIX FERRETER AS AV PASEO DE LA REP BLICA 3140 A COL EX HACIENDA DE LA HUERTA C P 58050 MORELIA MICH TEL 443 334 6858 FIX FERRETER AS CAPIT N ANZURES 95 ESQ JOS P...

Страница 12: ...dora 22 Col Centro Alc Cuauht moc CDMX C P 06060 or at the establishment where you purchased it or at any Truper Service Center listed in the annex to the warranty policy and or in www truper com Tran...

Страница 13: ...esentar el producto en Corregidora 22 Col Centro Alc Cuauht moc CDMX C P 06060 o en el establecimiento donde lo compr o en alg n Centro de Servicio Truper de los enlistados en el anexo de la p liza de...

Страница 14: ...DE SERVICIO ECLIPSE CALLE PRINCIPAL MZ 1 LT 1 COL SANTA FE C P 39010 CHILPANCINGO GRO TEL 747 478 5793 FERREPRECIOS S A DE C V LIBERTAD ORIENTE 304 LOCAL 30 INTERIOR DE PASAJE ROBLEDO COL CENTRO C P 4...

Страница 15: ...10 ESPA OL Notas...

Страница 16: ...overse libremente en el porta carb n y solicite que enciendan la herramienta durante 5 minutos para emparejar el contacto de los carbones y el conmutador S lo se deben de usar carbones de repuesto ori...

Страница 17: ...ando est nueva la herramienta requiere de un lapso de 5 horas de trabajo para alcanzar su m xima eficiencia Informaci n adicional El cincel puede ser ajustado en 12 posiciones Dependiendo del trabajo...

Страница 18: ...collar n en direcci n a las flechas y jale la broca 7 Montaje y ajustes Puesta en marcha LED indicador E El indicador LED se enciende cuando la herramienta est conectada Si el LED indicador no se enc...

Страница 19: ...auxiliar Carbones de repuesto Tubo de grasa Opere la herramienta el ctrica solamente con el mango auxiliar instalado El mango auxiliar se puede rotar hasta cualquier posici n para lograr una postura...

Страница 20: ...eados ocultos o con el propio cable de alimentaci n de la herramienta El contacto con un cable conductor de corriente hace que las piezas met licas de la herramienta tambi n tengan corriente y puedan...

Страница 21: ...tes de arrancar la herramienta el ctrica Las llaves o herramientas que quedan en las partes rotativas de la herramienta pueden causar un da o personal No sobrepase su campo de acci n Mantenga ambos pi...

Страница 22: ...se de una forma Si la clavija no cabe en el enchufe volt elo Si a n as no cabe p ngase en contacto con un electricista calificado o instale un enchufe polarizado No altere la clavija en forma alguna E...

Страница 23: ...zados P liza de Garant a 3 3 4 5 6 6 7 9 10 11 12 Guarde este Instructivo para futuras referencias Los gr ficos de este Instructivo son para referencia pueden variar del aspecto real de la herramienta...

Страница 24: ...rtillo de demolici n SDS MAX de 6 kg MADE 6NX Modelo C digo MADE 6NX Este Instructivo es para 100890 ATENCI N Lea este Instructivo por completo antes de usar la herramienta ESPA OL ENGLISH 14 Joules E...

Отзывы: