background image


TW4300 Weld Inspection


Visual Weld Inspection and Adjustments 

-


After shooting the stud, break away ferrule and visually 

inspect the weld.


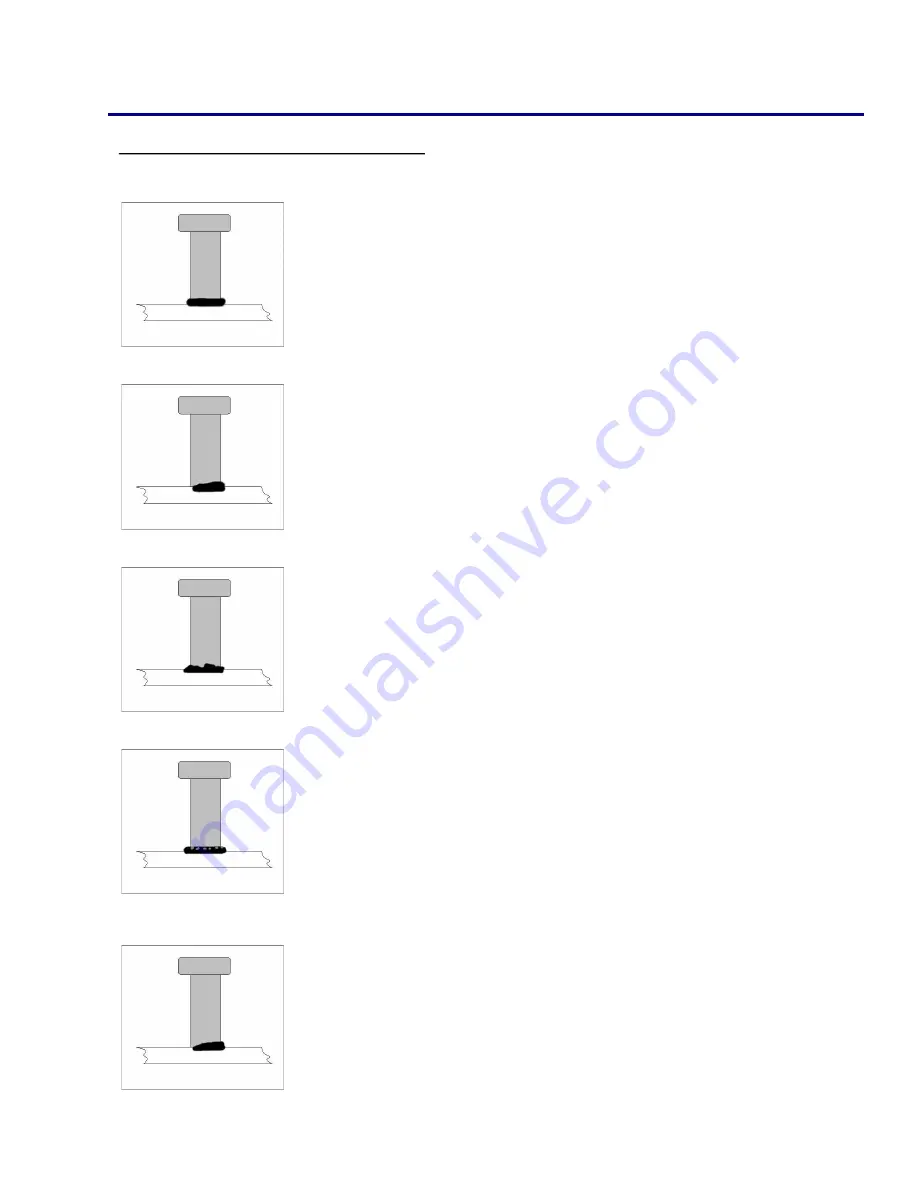
Good Weld


A good weld will have a smooth and even fillet with a blue

-

silver tint.


Partial Weld


A partial weld will result in a collar that does not extend around the entire 
diameter of the stud base. This outcome often occurs when the weld       
current is set too low.


Irregular Weld


Irregular welds normally occur when the weld time is set too high and the 
fillet will be bumpy or jagged in appearance. 


Porous Weld Collar


A porous weld fillet forms from the oxidation of the weld pool when the 
weld time is set too long and/or current is set too low. 


 Weld Collar Off

-

Center


Off

-

center weld collars have a thick fillet on one half of the stud base and 

the stud may be tilted. Typically moving the or not having the gun perpen-
dicular to the base material will result in an off

-

center collar.


22


Содержание TW4300

Страница 1: ...Operations Manual TW4300 Stud Welding System Stud Welding TRU WELD...

Страница 2: ...imary Power 9 Stud Gun Setup Initial Steps 10 Stud Gun Setup Lift Adjustment 11 Stud Gun Setup Free Travel Adjustment and Weld Preparation 12 Cable Connection Ground Cable and Weld Connections 13 Mach...

Страница 3: ...continued to be used after a defect had been found Equipment which was damaged in any way Truweld Equipment will never be liable for consequential damages loss or expense occurring directly or indirec...

Страница 4: ...growth If we can be of any further assistance to you and your company please do not hesitate to contact us Product Information The TW4300 is a fully integrated 800A stud welding system for ferrule shi...

Страница 5: ...d Every effort has been made to protect the trained operator from injury Familiarization with the information in this manual is to minimize the risk of shock or injury STUD WELDING CAN BE HAZARDOUS AL...

Страница 6: ...ne before moving a welding power source Always be sure the work cable makes a good electrical connection with the metal being welded the connection should be as close as possible to the area being wel...

Страница 7: ...hem with electrical tape when possible Never coil the work cable around any part of the body Do not stand between the work cables Connect the work cable to the work piece as close as possible to the a...

Страница 8: ...d 5 to 6 per minute 2 to 3 per minute Dimensions Height Width Length Weight 12 6 320mm 11 280mm 22 4 570mm 106 Lbs 48kg Input Voltages 230 460 VAC 3 Phase 60Hz Fusing Requirements slow acting 230 50 A...

Страница 9: ...nt is not being installed immediately store it in a clean dry well ventilated area until installation Selecting a Location The location of the power source should be carefully selected to ensure satis...

Страница 10: ...es depending on the supplied voltage The jumper setting should be checked to see if they are properly positioned for the voltage being used Remove the TW4300 top cover Plug in the appropriate voltage...

Страница 11: ...ts Primary Power Cable and Ground Connection Remove the top cover of the TW4300 Route the primary power cable through the power inlet hole in the top left corner on the backside of the welder with eno...

Страница 12: ...foot piece and slide the legs through the front cap nuts After the accessories have been mounted to the stud gun place a stud into the chuck and begin the alignment of the accessories Fully seat a stu...

Страница 13: ...ng applications and studs ranging up to 3 4 in diameter Larger diameter studs and select applications should have an 1 8 lift setting Adjusting the lift Remove the back cap of the stud gun Loosen the...

Страница 14: ...n to weld and control cable extension Actuate the stud gun without placing it on the surface to be welded to assure that the connection through the control cable is correct to complete the circuit Con...

Страница 15: ...ting the connector clockwise and then secure the C clamp to the work surface Weld Cable Connections The TW4300 has one weld and control cable connection on the front of the welder labeled gun and cont...

Страница 16: ...connection TW4300 Control Panel Brightness Switch LED brightness can be set to indoor or outdoor brightness levels Time Button Used to adjust time settings Current Button Used to adjust current setti...

Страница 17: ...er and a lifetime unit counter Menu Selection 1 Verify supervisor lock is off 2 To chose a menu depress and hold down the adjustment dial 3 Turn adjustment dial clockwise or counter clockwise to cycle...

Страница 18: ...the desired position 3 Press and hold the TIME button 4 Turn the dial to adjust the setting 5 Release the TIME button Adjusting the Current Setting 1 Verify the supervisor lock is off 2 Set the FINE C...

Страница 19: ...to the Preset Menu 3 Navigate to the desired custom preset 4 Press and hold the dial in until the menu switches back to the Weld Settings Menu Selecting a Factory Preset 1 Navigate to the Preset Menu...

Страница 20: ...Weld Counter Non resettable Is a running total of every time an arc is drawn on the machine This is programmed from the factory and can not be reset Resetting The Job Counter 1 Navigate to the Job Cou...

Страница 21: ...Full Base and Treaded Diameter Studs DIA INCH TIME SEC AMPS DC DIA DEC DIA MM 1 4 0 150 0 220 260 350 250 6 35 5 16 0 220 0 360 320 420 312 7 93 3 8 0 260 0 420 450 600 375 9 52 7 16 0 310 0 500 530 7...

Страница 22: ...ges the weld stud down into the molten pool of metal in the base material The cycle is completed in less than a second and the resulting weld bond develops the full strength of the fastener in the wel...

Страница 23: ...ered and adjust legs so that 3 16 to 1 4 of the stud protrudes beyond the ferrule Make sure work surface is relatively clean so impurities do not affect weld Remove all coatings from weld areas Test t...

Страница 24: ...when the weld current is set too low Irregular Weld Irregular welds normally occur when the weld time is set too high and the fillet will be bumpy or jagged in appearance Porous Weld Collar A porous w...

Страница 25: ...the driver LED s and report the status Unit turns on no coil test no lift from gun coil trigger is good Bad connection or faulty equipment 1 Test control cable by plugging weld tool directly into unit...

Страница 26: ...L weld current carry leads and connections including grounds 3 Test the power loop by making welds on a test piece using only the starter cable set 4 Test 3 phase power to control contactor 5 Check ta...

Страница 27: ...TRU WELD Stud Welding Equipment Division 6400 N Honeytown Road Smithville Ohio 44677 330 725 7744 Phone 330 669 2473 Fax TWE tfpcorp com http truweldstudwelding com Version 1 02 01 2019...

Отзывы: