background image

Operation

5

16

General Safety

• 

RECEIVE INSTRUCTION — Entirely read this operator’s 

manual. Learn to operate this machine SAFELY. Do not risk 

INJURY or DEATH. Allow only those who have become 

competent in its usage to operate this tractor.

• 

Before starting the engine or beginning operation, be 

familiar with the controls. The operator should be in the 

operator’s seat. The PTO switch must be in the disengaged 

position and the parking brake engaged.

• 

Keep all shields in place. Keep away from moving parts.

• 

NO RIDERS! Keep all people and pets a safe distance away. 

Look behind and down to both sides of the tractor before 

and while backing up.

• 

DO NOT direct the mower discharge at people.

• 

Avoid slopes where possible. Never operate on slopes 

greater than 15°. Slopes with a greater incline present 

dangerous operating conditions. Tractors can be rolled over.

• 

Before leaving the operator’s seat shut off the PTO and 

engage the parking brake, shut off the engine and remove 

the ignition key. Wait for all movement to stop before 

servicing or cleaning.

• 

Avoid any sudden movements of the steering wheel when 

starting and stopping. Keep a firm grip on the steering wheel.

• 

Be careful when operating near roadways. Stop the tractor 

motion and wait for vehicles to pass before operating 

along the road.

• 

Do not operate the tractor with the mower deck removed. 

Removal of the deck will change the balance of the tractor, 

and could contribute to a tractor rollover.

• 

Avoid operation on traction surfaces that are unstable; use 

extreme caution if the surface is slippery.

• 

Slow down before turning and come to a complete stop 

before any zero turn maneuver.

• 

Do not stop the tractor or park the tractor over 

combustible materials such as dry grass, leaves, debris, etc.

• 

Do not fill the fuel tank when the engine is running or 

while the engine is hot. Allow the engine several minutes 

to cool before refueling. Tighten the fuel cap securely.

Before Operating Your Tractor

• 

Before you operate the tractor, study this manual carefully 

to familiarize yourself with the operation of all the 

instruments and controls. It has been prepared to help you 

operate and maintain your tractor efficiently.

• 

This engine is certified to operate only on clean, fresh, 

unleaded regular gasoline. For best results, fill the fuel 

tank with only clean, fresh, unleaded gasoline with a pump 

sticker octane rating of 87 or higher. 

• 

Unleaded gasoline is recommended because it leaves 

less combustion chamber deposits and reduces harmful 

exhaust emissions. Leaded gasoline is not recommended 

and must not be used where exhaust emissions are 

regulated.

NOTE: 

Purchase gasoline in small quantities. Do not use 

gasoline left over from the previous season, to minimize 

gum deposits in the fuel system.

• 

Gasohol (up to 10% ethyl alcohol, 90% unleaded gasoline 

by volume) is an approved fuel. Other gasoline/alcohol 

blends are not approved.

• 

Methyl Tertiary Butyl Ether (MTBE) and unleaded gasoline 

blends (up to a maximum of 15% MTBE by volume) are 

approved fuels. Other gasoline/ether blends are not 

approved.

• 

Check the engine oil level.

• 

Clean the air cleaner element if necessary.

• 

Check the tire inflation pressures.

• 

Adjust the seat for operator’s maximum comfort, visibility 

and for maintaining complete control of the tractor.

Safety Interlock Switches

This tractor is equipped with a safety interlock system for the 

protection of the operator. If the interlock system should ever 

malfunction, do not operate the tractor. Contact your authorized 

service dealer.
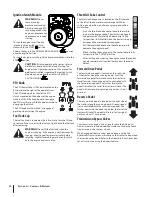
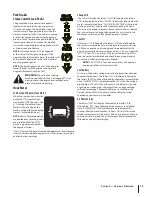
• 

The safety interlock system prevents the engine from 

cranking or starting unless the parking brake is engaged, 

and the PTO knob is in the disengaged (OFF) position.

• 

The engine will automatically shut off if the operator leaves 

the seat before engaging the parking brake.

WARNING! 

Do not operate the tractor if the 

interlock system is malfunctioning. This system was 

designed for your safety and protection. 

Содержание Pivot s

Страница 1: ...on Practices Set Up Operation Maintenance Service Troubleshooting Warranty WARNING READ AND FOLLOW ALL SAFETY RULES AND INSTRUCTIONS IN THIS MANUAL BEFORE ATTEMPTING TO OPERATE THIS MACHINE FAILURE TO COMPLY WITH THESE INSTRUCTIONS MAY RESULT IN PERSONAL INJURY Pivot S Form No 769 10262 October 6 2014 ...

Страница 2: ...erve the right to change product specifications designs and equipment without notice and without incurring obligation If applicable the power testing information used to establish the power rating of the engine equipped on this machine can be found at www opei org or the engine manufacturer s web site If you have any problems or questions concerning the machine phone a authorized Troy Bilt service...

Страница 3: ...jects which ricochet can cause serious injury to the eyes 9 Wear sturdy rough soled work shoes and close fitting slacks and shirts Loose fitting clothes and jewelry can be caught in movable parts Never operate this machine in bare feet or sandals 10 Be aware of the mower and attachment discharge direction and do not point it at anyone Do not operate the mower without the discharge cover or entire ...

Страница 4: ...s that operators age 60 years and above are involved in a large percentage of riding mower related injuries These operators should evaluate their ability to operate the riding mower safely enough to protect themselves and others from serious injury 29 If situations occur which are not covered in this manual use care and good judgment Contact your customer service representative for assistance Slop...

Страница 5: ... and allow extra distance to stop 13 Do not shift to neutral and coast downhill Service Safe Handling of Gasoline 1 To avoid personal injury or property damage use extreme care in handling gasoline Gasoline is extremely flammable and the vapors are explosive Serious personal injury can occur when gasoline is spilled on yourself or your clothes which can ignite Wash your skin and change clothes imm...

Страница 6: ...necessary 14 Observe proper disposal laws and regulations for gas oil etc to protect the environment 15 According to the Consumer Products Safety Commission CPSC and the U S Environmental Protection Agency EPA this product has an Average Useful Life of seven 7 years or 270 hours of operation At the end of the Average Useful Life have the machine inspected annually by an authorized service dealer t...

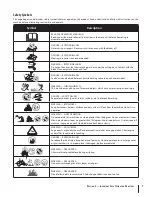
Страница 7: ...cause serious personal injury DANGER SAFETY DEVICES Keep safety devices guards shields switches etc in place and working WARNING BYSTANDERS Keep bystanders helpers children and pets at least 75 feet from the machine while it is in operation WARNING SLOPE OPERATION Do not operate this machine on a slope greater than 15 degrees Do not mow across slopes Mow up and down slopes no greater than 15 degre...

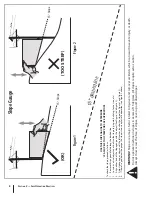
Страница 8: ...ee Figure 1 and Figure 2 4 Adjust gauge up or down until the left corner touches the slope See Figure 1 and Figure 2 5 If there is a gap below the gauge the slope is too steep for safe operation See Figure 2 above 1 5 d a s h e d l i n e Slope Gauge Figure 2 Figure 1 15 Slope 15 Slope WARNING Slopes are a major factor related to tip over and roll over accidents which can result in severe injury or...

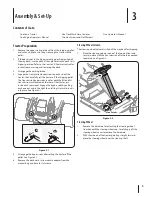
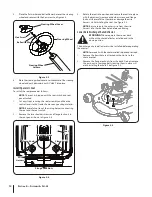
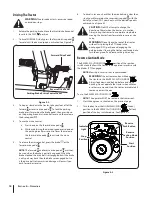
Страница 9: ...and LH transmission are located on the rear of the tractor just inside each rear wheel Engage the bypass rods by pulling each one out and to the right then letting it return to lock it into place See Figure 3 1 a a b Figure 3 1 5 Disengage the bypass rods after rolling the tractor off the pallet See Figure 3 1 6 Remove the deck wash system nozzle adapter from the manual bag and store for future us...

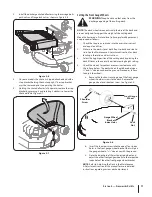
Страница 10: ...at pan as shown in Figure 3 4 Shoulder Screws Flange Lock Nuts Wire Harness Seat Pan Clamp Knob Clamp Knob Figure 3 4 3 Rotate the seat into position and secure the seat into place with the previously removed shoulder screws and flange lock nuts Be careful not to crimp or damage the wire harness while installing the seat See Figure 3 4 NOTE Be sure to push the excess wire from the wire harness int...

Страница 11: ...uring one of the front gauge wheel shoulder screws to the deck Remove the gauge wheel and shoulder screw See Figure 3 8 Lock Nut Front Gauge Wheel Shoulder Screw Gauge Wheel Bracket Index Holes Figure 3 8 b Insert the shoulder screw into the one of four index holes in the front gauge wheel bracket that will give the gauge wheel a 1 4 1 2 clearance with the ground c Note the index hole of the just ...

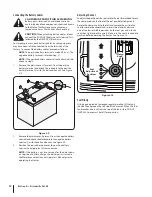
Страница 12: ...rom the negative battery terminal and attach the black cable to the negative battery terminal with the bolt and hex nut See Figure 3 9 3 Position the red rubber boot over the positive battery terminal to help protect it from corrosion NOTE If the battery is put into service after the date shown on top side of battery charge the battery as instructed in the Maintenance section your Operator s Manua...

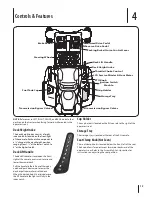
Страница 13: ... height position ranging from 1 1 2 at the lowest notch to 4 at the highest notch Deck Lift Handle The deck lift handle is located on the front right of the console and is used to raise and lower the mower deck Pull the handle to the left out of the index notch and push downward to lower the deck or pull upward to raise the deck When the desired height is attained move the lift handle to the right...

Страница 14: ... left of the hour meter indicator panel When set in a given position a uniform engine speed will be maintained Push the throttle choke control handle forward to increase the engine speed The tractor is designed to operate with the throttle choke control in the fast position full throttle when the tractor is being driven and the mower deck is engaged Pull the throttle choke control handle rearward ...

Страница 15: ...ters OIL followed by the letters SOON then finally followed by the meter s accumulated time CHG OIL SOON TIME will alternate on the display for 7 minutes after the meter reaches 50 hours This oil service minder interval will occur every 50 hours Before the interval expires change the engine oil as instructed in the Maintenance section of the Engine Operator s Manual Low Oil The letters LO followed...

Страница 16: ...ral minutes to cool before refueling Tighten the fuel cap securely Before Operating Your Tractor Before you operate the tractor study this manual carefully to familiarize yourself with the operation of all the instruments and controls It has been prepared to help you operate and maintain your tractor efficiently This engine is certified to operate only on clean fresh unleaded regular gasoline For ...

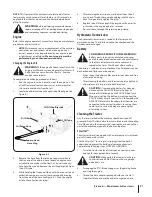
Страница 17: ... engine Have the tractor inspected by your authorized service dealer Cold Weather Starting When starting the engine at temperatures near or below freezing ensure the correct viscosity motor oil is used in the engine and the battery is fully charged Start the engine as follows 1 Be sure the battery is in good condition A warm battery has much more starting capacity than a cold battery 2 Use fresh w...

Страница 18: ...vel in reverse check that the area behind is clear then slowly push forward on the reverse drive pedal with the ball of your foot NOT your heel until the desired speed is achieved See Figure 5 2 CAUTION Do NOT attempt to change the direction of travel when the tractor is in motion Always bring the tractor to a complete stop before moving the tractor from forward to reverse or vice versa WARNING Do...

Страница 19: ...object injury keep bystanders helpers children and pets at least 75 feet from the machine while it is in operation Stop machine if anyone enters the area The following information will be helpful when using the cutting deck with your tractor WARNING Plan your mowing pattern to avoid discharge of materials toward roads sidewalks bystanders and the like Also avoid discharging material against a wall...

Страница 20: ... Check Blades Sharpen or Replace as Needed P P Check Tire Pressure P P Check Clean Underside of Deck P Grease Front Castings P Lube Front Caster Wheels and Wheel Spindles P P Inspect Lube Deck Wheels P P Check Deck Level Pitch P P Check Belts Pulleys for Damage Wear P Check That All Hardware is in Place Secure P Check Clean Under Floorboard P Check Spark Plug Condition Gap P P P Engine Break In Oi...

Страница 21: ...nd refill the engine with new oil as instructed in the engine operator s manual 7 Re insert hose through the retaining loop clamp Hydrostatic Transmission The hydrostatic transmission is sealed at the factory and is maintenance free The fluid level cannot be checked and the fluid cannot be changed Battery CALIFORNIA PROPOSITION 65 WARNING Battery posts terminals and related accessories contain lea...

Страница 22: ...2 5 Turn the water on 6 While sitting in the operator s position on the tractor start the engine and place the throttle in the FAST position 7 Engage the PTO 8 Remain in the operator s position with the cutting deck engaged for a minimum of two minutes allowing the underside of the cutting deck to thoroughly rinse 9 Disengage the PTO 10 Turn the ignition key to the STOP position to turn the tracto...

Страница 23: ...able and is used to help adjust the other hanger links 4 Using a wrench raise or lower the left side of the deck by turning the adjustment gear See Figure 6 5 5 The deck is properly leveled when both blade tip measurements are equal Retighten the hex bolt on the front left deck hanger bracket when proper adjustment is achieved Leveling the Deck Front to Rear NOTE Check the tractor s tire pressure ...

Страница 24: ...stem components serviced or replaced WARNING Drain fuel only into unapproved container outdoors away from an open flame Allow engine to cool Extinguish cigarettes cigars pipes and other sources of ignition prior to draining fuel 3 Remove the spark plugs and pour approximately one ounce of oil into each cylinder Crank the engine one or two turns to spread the oil evenly on the cylinder walls Replac...

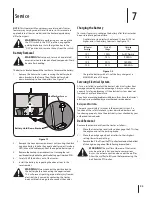
Страница 25: ... to connect the cables Charging the Battery Test and if necessary recharge the battery after the tractor has been stored for a period of time A voltmeter or load tester should read 12 6 volts DC or higher across the battery terminals See Figure 7 2 Voltmeter Reading State of Charge Charging Time 12 7 100 Full Charge 12 4 75 90 Min 12 2 50 180 Min 12 0 25 280 Min Figure 7 2 Charge the battery with ...

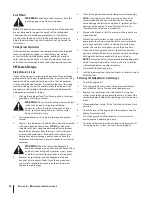
Страница 26: ...y on the bottom of the engine Rolling the Belt off the PTO Pulley 1 Using the deck lift handle raise the deck to the position that provides the most horizontal run of the belt between the deck idler pulleys and the PTO pulley on the bottom of the engine 2 Sitting behind the tractor facing forward reach beneath the tractor to grasp the belt at the front of the PTO pulley WARNING Use caution to avoi...

Страница 27: ...ward through the lift arms to secure the arms in the rear hanger bracket slots 6 Reinstall the front deck lift rod and secure in place with the cotter pin Refer to Figure 7 6 7 Make certain the V belt is in the spindle pulleys on the deck then route the belt rearward beneath the tractor frame above the transmission tube s to the PTO pulley on the bottom of the engine 8 Using the deck lift handle r...

Страница 28: ...lation Mower Blade Care WARNING Before performing any maintenance place the PTO switch in the OFF position engage the parking brake lever turn the ignition key to the OFF position and remove the key from the switch Protect your hands by using heavy gloves when handling the blades When servicing the mower deck be careful not to cut yourself on the sharpened blades The cutting blades must be kept sh...

Страница 29: ...ved and special tools used in order to change the tractor s transmission drive belt See your authorized service dealer to have the transmission drive belt replaced Tractor Creeping Creeping is the slight forward or backward movement of the mower when the throttle is on and the speed control levers are in the neutral position If your mower creeps see an authorized service dealer ...

Страница 30: ...ressure 1 Perform side to side deck adjustment 2 Sharpen or replace blade 3 Check tire pressure in all four tires Mower will not mulch grass If Equipped w Mulching Kit 1 Engine speed too low 2 Wet grass 3 Excessively high grass 4 Dull blade 1 Place throttle in FAST rabbit position 2 Do not mulch when grass is wet 3 Mow once at a high cutting height then mow again at desired height or make a narrow...

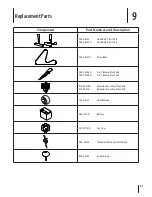
Страница 31: ...Deck Belt Pivot S54 954 04317A Drive Belt 942 04244A 2 in 1 Blade Pivot S46 942 05056A 2 in 1 Blade Pivot S54 918 05078A Spindle Assembly Pivot S46 918 06978 Spindle Assembly Pivot S54 734 04155 Deck Wheel 925 1707D Battery 951 12179B Gas Cap 946 05145 Throttle Choke Control Cable 625 05002 Ignition Key ...

Страница 32: ...hute Deflector Pivot S46 631 05168A Chute Deflector Pivot S54 634 04293 Wheel Assembly Pivot S46 634 04128 Wheel Assembly Pivot S54 634 04711 Caster Wheel Assembly KH 12 050 01 S Oil Filter KH 12 132 02 S Spark Plug KH 25 050 22 S1 Fuel Filter KH 32 883 09 S1 Air Filter Pre Cleaner ...

Страница 33: ...00 54 Mulch Kit 490 850 0005 Blade Removal Tool 490 850 0008 Oil Siphon 490 900 0045 Oil Filter Wrench 19A70025100 Hitch Kit 490 850 0005 Blade Removal Tool SPW 136 Spark Plug Wrench 490 325 0022 16 oz Tire Tube Sealant by Tire Science 490 325 0020 32 oz Tire Tube Sealant by Tire Science 490 850 0014 Deluxe Tire Plug Kit by Tire Science 22216 32 oz STA BIL ...

Страница 34: ...a period of two years The warranty period begins on the date the outdoor equipment is delivered to an ultimate purchaser or first placed into service Subject to certain conditions and exclusions as stated below the warranty on emission related parts is as follows 1 Any warranted part that is not scheduled for replacement as required maintenance in the written instructions supplied is warranted for...

Страница 35: ...t cause of the need for repair or replacement of the part That notwithstanding any adjustment of a component that has a factory installed and properly operating adjustment limiting device is still eligible for warranty coverage Further the coverage under this warranty extends only to parts that were present on the off road equipment purchased The following emission warranty parts are covered if ap...

Страница 36: ...com This limited warranty does not provide coverage in the following cases a The engine or component parts thereof These items may carry a separate manufacturer s warranty Refer to applicable manufacturer s warranty for terms and conditions b Log splitter pumps valves and cylinders have a separate one year warranty c Routine maintenance items such as lubricants filters blade sharpening tune ups br...

Страница 37: ...Funcionamiento Mantenimiento Servicio Solución de problemas Garantía ADVERTENCIA LEA Y OBSERVE TODAS LAS NORMAS E INSTRUCCIONES DE SEGURIDAD INCLUIDAS EN ESTE MANUAL ANTES DE PONER EN FUNCIONAMIENTO LA MÁQUINA SI NO SIGUE ESTAS INSTRUCCIONES PUEDE PROVOCAR LESIONES PERSONALES Pivot S Formulario No 769 10262 6 de octubre de 2014 ...

Страница 38: ...tamente con nosotros En esta página encontrará los números de teléfono dirección del sitio web y dirección postal de Atención al cliente de Troy Bilt Queremos garantizar su entera satisfacción en todo momento En este manual todas las referencias al lado derecho e izquierdo de la máquina se observan desde la posición del operador Gracias Importante Medidas importantes de seguridad 3 Ensamblado y Co...

Страница 39: ...abajo resistentes de suela fuerte y pantalones y camisas ajustados Las prendas sueltas o las alhajas pueden quedar atrapadas en las piezas móviles Nunca opere la máquina descalzo o con sandalias 10 Esté atento a la cortadora de césped y a la dirección de la descarga de los aditamentos y no apunte a nadie Nunca opere la cortadora de césped sin que estén en su lugar apropiado la cubierta de descarga...

Страница 40: ...crados en un alto porcentaje de lesiones relacionadas con la conducción de tractores corta césped Estos operadores deben evaluar su capacidad para operar el tractor cortacésped en forma suficientemente segura para protegerse ellos mismos y a los demás contra lesiones graves 29 Si se presentan situaciones que no están previstas en este manual tenga cuidado y use el sentido común Póngase en contacto...

Страница 41: ...na La gasolina es sumamente inflamable y sus vapores pueden causar explosiones Se puede lesionar gravemente si derrama gasolina sobre usted o sobre la ropa ya que ésta se puede incendiar Lávese la piel y cámbiese de ropa de inmediato a Utilice sólo los recipientes para gasolina autorizados b Nunca llene los recipientes en el interior de un vehículo o camión o caja de remolque con un recubrimiento ...

Страница 42: ...s de seguridad e instrucciones según sea necesario 14 Respete las normas referentes a la disposición correcta y las reglamentaciones sobre gasolina aceite etc para proteger el medio ambiente 15 Según la Comisión de Seguridad de Productos para el Consumidor de los Estados Unidos CPSC y la Agencia de Protección Ambiental de los Estados Unidos EPA este producto tiene una vida útil media de siete 7 añ...

Страница 43: ...Mantenga los dispositivos de seguridad guardas pantallas interruptores etc en su lugar y funcionando ADVERTENCIA OBSERVADORES Mantenga a los observadores ayudantes mascotas y niños por lo menos a 75 pies 23 m de la máquina mientras está en funcionamiento ADVERTENCIA ENPENDIENTES Noopereestamáquinaenunapendientemayorde15grados Nocorteelcéspedenpendientes Cortarhaciaarribayabajodelaspendientesnomayo...

Страница 44: ...hasta los toques esquina izquierda el pendiente consultar Figura 1 and Figura 2 5 Si hay un espacio por debajo de la pendiente de calibre el pendiente es demasiado escarpa por operación segura consultar Figura 2 above 1 5 l í n e a d i s c o n t i n u a Pendiente de Calibre Figura 2 Figura 1 15 Pendiente 15 Pendiente ADVERTENCIA Las pendientes son un factor importante relacionado con un vuelco y r...

Страница 45: ...izquierdo están ubicadas en la parte trasera del tractor justo dentro de cada rueda trasera Enganche las varillas de derivación tirando de cada una hacia afuera hacia la derecha y luego dejando que regresen para trabarlas en su lugar Consulte la Figura 3 1 a a b Figura 3 1 5 Desenganche las varillas de derivación después de hacer rodar el tractor fuera del pálet Consulte la Figura 3 1 6 Retire el ...

Страница 46: ...o Perilla de abrazadera Perilla de abrazadera Figura 3 4 3 Gire el asiento hasta la posición deseada y asegúrelo en su lugar con los tornillos de reborde y las tuercas de seguridad con brida que extrajo antes Tenga cuidado de no doblar o dañar el cableado mientras instala el asiento Vea la Figura 3 4 NOTA Asegúrese de empujar el cable excedente del cableado para que ingrese en el orificio de la ca...

Страница 47: ... del suelo Siga estos pasos para ajustar las ruedas a Retire la tuerca de seguridad que fija uno de los tornillos de pivote de la rueda de calibre delanteros a la cubierta Retire la rueda de calibración y el tornillo de hombro Vea la Figura 3 8 Tuerca de seguridad Rueda de calibración frontales Tornillo hombro Medidor de Agujeros Rueda Índice Bracket Figura 3 8 b Inserte el tornillo de pivote en l...

Страница 48: ... y una el cable negro al borne negativo de la batería utilizando el perno y la tuerca hexagonal Consulte la Figura 3 9 3 Coloque el capuchón de goma rojo por encima del borne positivo de la batería para protegerlo contra la corrosión NOTA Si la batería se pone en funcionamiento después de la fecha indicada en su parte superior o al costado de la misma cárguela siguiendo las instrucciones de la sec...

Страница 49: ... altura de la plataforma desde 1 1 2 en la muesca más baja hasta 4 en la muesca más alta Manija de elevación de la plataforma La manija de elevación de la plataforma se encuentra en la parte delantera derecha de la consola y se utiliza para levantar y bajar la plataforma de la cortadora de césped Tire de la manija hacia la izquierda para sacarla de la muesca y empuje hacia abajo para bajar la plat...

Страница 50: ...ntrol del acelerador estrangulador El control del acelerador estrangulador está ubicado en la consola del lado derecho a la derecha del asiento del operador Cuando se lo coloca en cierta posición se mantiene una velocidad de motor uniforme Empuje la palanca de control del acelerador estrangulador hacia adelante para aumentar la velocidad del motor El tractor se ha diseñado para operar con el contr...

Страница 51: ...tencias de batería baja Change Aceite La pantalla mostrará las letras CHG seguido de las letras OIL seguido de las letras pronto y finalmente seguido por el tiempo acumulado del metro CHG OIL PRONTO TIME se alternará en la pantalla durante 7 minutos después de que el metro llegue a 50 horas Este servicio cuidadora intervall petróleo ocurrirá cada 50 horas Antes de que finalice el intervalo cambie ...

Страница 52: ...os antes de la recarga de combustible Apriete el tapón de combustible con firmeza Antes de hacer funcionar el tractor Antes de hacer funcionar el tractor lea este manual con atención para familiarizarse con el funcionamiento de todos los instrumentos y controles El manual se preparó con la finalidad de ayudarlo a hacer funcionar y mantener el tractor eficientemente Se certifica que este motor func...

Страница 53: ...s a una aceleración intermedia antes de someterlo a la carga 8 Observe el medidor horario panel indicador Si se enciende la luz del indicador de batería o de presión de aceite detenga el motor inmediatamente Haga controlar el tractor por el distribuidor de servicio autorizado Arranque del motor en clima frío Al arrancar el motor a temperaturas cercanas o inferiores al punto de congelamiento asegúr...

Страница 54: ...nces los frenos se enganchan pero también se engancha la correa de transmisión de manera que la misma se dañará si se empuja hacia adelante o hacia atrás 6 Para conducir marcha atrás verifique que el área de atrás esté despejada Luego presione lentamente hacia adelante el pedal de transmisión marcha atrás con la parte anterior de la planta del pie NO con el talón hasta alcanzar la velocidad desead...

Страница 55: ... objeto que sea arrojado mantenga a los observadores a los ayudantes niños y mascotas alejados al menos 25 metros de la máquina mientras está en funcionamiento Detenga la máquina si alguien se acerca La siguiente información será de utilidad cuando use la plataforma de corte con su tractor ADVERTENCIA Planifique el patrón de corte para evitar que la descarga de materiales se realice hacia los cami...

Страница 56: ...egún sea necesario P P Revise la presión de neumático P P Revisar Limpiar inferior de la plataforma P Grasa Castings delanteros P Lubricar Frente Caster Ruedas y ruedas Husillos P P Inspeccione y lubricante Ruedas de plataforma P P Comprobar cubierta de nivel Paso P P Compruebe Correas y Poleas por Daños desgaste P Compruebe que todo el hardware está en su lugar y seguro P Revisar y limpiar debajo...

Страница 57: ...pie cualquier aceite residual de la manguera de drenaje de aceite Pase el tapón de cabeza cuadrada en la manguera de drenaje apropiado y apriete completamente el tapón 6 Reemplace el filtro de aceite y vuelva a llenar el motor con aceite nuevo según las instrucciones en el manual del operador del motor 7 Vuelva a insertar la manguera a través de la retención de bucle de abrazadera Transmisión hidr...

Страница 58: ...uerto de agua a la izquierda de la superficie de la cubierta Vea la Figura 6 2 Figura 6 2 5 Abra el agua 6 Mientras está sentado en la posición del operador en el tractor arranque el motor y coloque el acelerador en la posición FAST 7 Active el PTO 8 Permanezca en la posición del operador con la plataforma de corte colocada por un mínimo de dos minutos lo que permite la parte inferior de la plataf...

Страница 59: ...ede ajustar y se utiliza para ajustar los otros ganchos 4 Con una llave levante o baje el lado izquierdo de la plataforma girando el engranaje de ajuste Consulte la Figura 6 5 5 La plataforma se encuentra correctamente nivelada cuando las dos mediciones desde las puntas de las cuchillas son iguales Una vez alcanzado el ajuste necesario vuelva a ajustar el perno de cabeza hexagonal de la ménsula fr...

Страница 60: ...urador y otros componentes del sistema de combustible la reparación o sustitución ADVERTENCIA Drene el combustible sólo en un contenedor aprobado al aire libre lejos de una llama abierta Deje que el motor se enfríe Apague cigarrillos cigarros pipas y otras fuentes de ignición antes de drenar el combustible 4 Quite las bujías y vierta aproximadamente una onza de aceite en cada cilindro Girar el mot...

Страница 61: ...tería marcado POS 4 Levante con cuidado la batería para sacarla del tractor 5 Instale la batería repitiendo los pasos anteriores en orden inverso ADVERTENCIA Siempre conecte el conductor positivo a la batería antes de conectar el conductor negativo Esto evita la generación de chispas o posibles lesiones producidas por un cortocircuito eléctrico causado por el contacto del cuerpo del tractor con la...

Страница 62: ...correa de la polea del PTO 1 Usando la manija de elevación de la cubierta levante la plataforma a la posición que le ofrece mayor recorrido horizontal de la correa entre las poleas locas de la plataforma y la polea del PTO en la parte inferior del motor 2 Sentado detrás del tractor mirando hacia adelante llegar debajo del tractor para agarrar la correa por la parte delantera de la polea del PTO AD...

Страница 63: ...la PTO en la base del motor 9 Asegúrese de que la correa esté en las poleas del husillo de la plataforma y que el lado trasero de la correa esté contra las poleas locas fija y móvil 10 Sentado detrás del tractor mirando hacia adelante asegúrese de que la correa no esté retorcida luego estire la mano debajo del tractor para agarrar la correa y tirar de la misma hacia la polea de la PTO ADVERTENCIA ...

Страница 64: ...idad con brida para fijar el conjunto 6 Coloque la correa como se muestra a continuación vuelva a instalar la cubierta consulte Instalación de la plataforma Cuidado de las cuchillas de la cortadora de césped ADVERTENCIA Proteja sus manos utilizando guantes reforzados cuando manipule las cuchillas Cuando realice el mantenimiento de la plataforma de corte tenga cuidado para no cortarse con las cuchi...

Страница 65: ...ueden causar lesiones graves Para evitar lesiones envuelva la superficie de corte de la cuchilla con un paño Cambio de la correa de transmisión Para cambiar la correa de transmisión del tractor se deben retirar varios componentes y se necesitan herramientas especiales Solicite distribuidor de servicio autorizado que realice el reemplazo de la correa de transmisión Desplazamiento lento del tractor ...

Страница 66: ...hilla 3 Verifique la presión de los cuatro neumáticos La cortadora de césped no procesa los recortes como abono si está equipada con kit de abono 1 La velocidad del motor es demasiado lenta 2 Pasto mojado 3 4 Césped demasiado alto La cuchilla de la cortadora no está afilada 1 Coloque el control del regulador en la posición FAST velocidad rápida representada por una liebre 2 No procese abono cuando...

Страница 67: ...Notas 9 31 ...

Страница 68: ...32 Section 9 Notas ...

Страница 69: ...33 Section 9 Notas ...

Страница 70: ...tacto con el Departamento del Servicio Técnico de MTD Consumer Group Inc al teléfono 1 800 800 7310 o por correo electrónico en http support mtdproducts com COBERTURA DE LA GARANTÍA DE EMISIONES GENERALES MTD Consumer Group Inc garantiza al comprador final y a cada comprador subsiguiente que el equipos de exteriores está diseñado construido y equipado de modo de cumplir con todas las regulaciones ...

Страница 71: ... adicional no exenta o modificada PIEZAS GARANTIZADAS La reparación o el reemplazo de cualquier pieza garantizada que de otro modo pudiese estar cubierta por la garantía podrá ser excluida de tal cobertura de garantía si MTD Consumer Group Inc demuestra que el equipos de exteriores es objeto de uso incorrecto negligencia o mantenimiento inadecuado y que tal uso incorrecto negligencia o mantenimien...

Страница 72: ...bertura en los siguientes casos a El motor o las piezas que lo componen Estos productos pueden tener garantía del fabricante por separado Consulte los términos y condiciones de la garantía aplicable del fabricante b Las bombas válvulas y cilindros del rompetroncos tienen una garantía separada de un año c Los artículos necesarios para el mantenimiento de rutina como por ejemplo lubricantes filtros ...

Отзывы: