background image

3

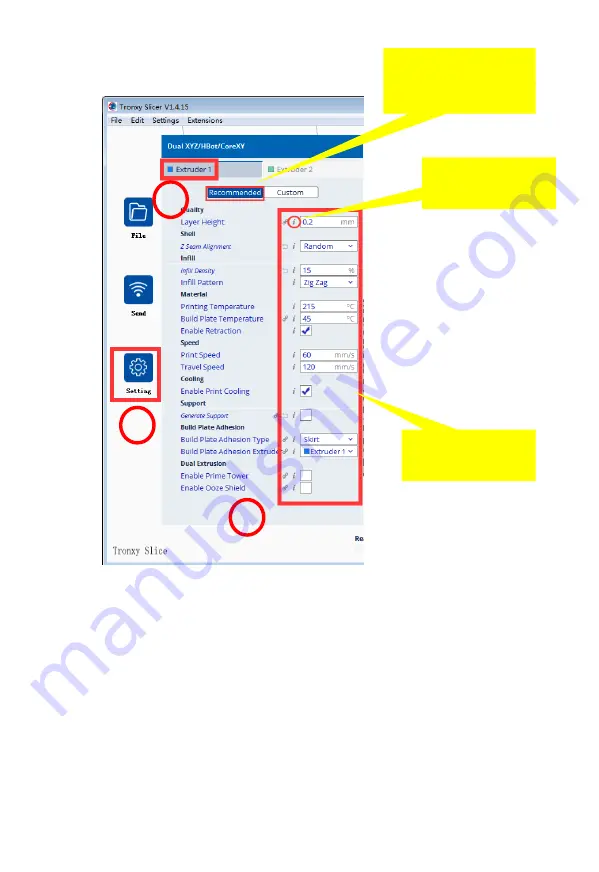
Model parameter Settings: file - select 

model.

1

3

Move your mouse 
over here to 
comment

2

Optional 
recommendation 
or customization

Parameter 
setting

Thickness

Important parameters that determine the print quality, typically 

0.4 nozzle is set to 0.2
Print temperature

PLA 200

ABS 240

Other filaments can be 

consulted
Platform temperature

PLA:45

; ABS:80

Other filaments can be 

consulted
Adhere type

Increase the adhesion of the first layer of the platform model 

and reduce the edge sticking or peeling when the model is printed
Filament diameter: filament diameter is 1.75mm
Nozzle size

The nozzle diameter is usually 0.4mm

Print speed

advs 60mm/s

Do not set too fast, too fast will affect printing 

accuracy

Some parameters are set for reference

Содержание XY-3

Страница 1: ...Instructions Model name XY 3 SHENZHEN TRONXY TECHNOLOGE CO LTD ...

Страница 2: ...roblems please ask a professional to deal with them 9 Do not use the machine under high temperature above 85 C environment otherwise may damage to the machine 10 It is recommended not to run the printer when unattended 11 The machine is not covered by warranty as follows A Product damage caused by abnormal external force such as falling extrusion knock collision B product damage caused by violatio...

Страница 3: ...ue 1 Introduction to basic parameters 4 2 Packing list 5 3 Introduction to machine structure 6 4 Installation instructions 7 5 Connection 8 6 Product debugging 9 7 Print operation 10 8 Fault cause analysis 21 ...

Страница 4: ...environmental temperature 8 40 C print thickness 0 1mm 0 4mm optional Environmental humidity 20 80 Machine materials Aluminium and sheet metal Slicing software TRONXY exclusive slice software Machine weight 9 5kg File format STL OBJ DAE AMF G Code Packing weight 11kg Operate software Repetier Host Cura Packing size 630 552 195mm Operate system WinXP Win7 MacOS Machine size 588 544 529mm Power fail...

Страница 5: ...ines Reader incl SD card printer head XY 3 Control box ilament rack HM5 25 4PCS PM4 25 2PCS quick coupling M6 Filament USB cable Hotbed sticker Tie screwdriver Scrabble knife Hexagonal wrench Specification reinforced p late 2 Packing list ...

Страница 6: ...assembly 9 print head parts 16 Z moto 23 voltage change over 3 extruder 10 leveling nuts 17 USB interface 24 4 Z Endstop 11 Y axis wheel 18 SD card interface 25 5 control box 12 hotbed 19 Y axis motor 26 6 bottom frame 13 lead screw 20 Z Endstop 27 7 teflon tube 14 X axis moto 21 Power switch 28 1 3 4 5 6 7 8 9 10 11 12 13 15 14 16 19 20 21 3 Introduction to machine structure ...

Страница 7: ...n the upper beam Put the four holes on the base and lock the four holes on the base with four PM5 25 screws Take left and right reinforced plate Install on the pr inter as shown 3 4 Power supply Control box Tighten the boat nuts with a screwdriver Fix the control box on the aluminum of the base Pay attention The control box must be fixed on the beam otherwise its easy to hit the print head 2 M4 25...

Страница 8: ...Y Endstop Heat bed Power Z motor X motor Extr motor X motor Y motor Z motor E motor Endstop Heat bed Power Connection AC 110V 220V Z Endstop X Endstop Thermal line Thermal line Fault detectionr Fault detectionr ...

Страница 9: ... the X axis assembly to the highest point then lock the 4 M3 8 screws in the screw nut Also manually turn the X axis component to the minimum and then lock the power unit 2 M3 8 screws 4 M3 8 screws of proper screw rod screws can be unscrewed if there is any problem The power will not be switched until the X axis component is returned smoothly X axis assembly 2 Belt adjustment If the belt is too l...

Страница 10: ... 2 Machine details Company LOOG Software version ID code Display style Speaker volume 3 Language selection English Chinese switch 4 Factory Settings factory data reset screen test 5 Screen correction 2 Tools menu 1 manual Z axis turn up X axis turn right Z axis turn down displacement distance Y axis go forward Y axis turn back X axis turn left The extrusion motor sends out filaments Zero place Ext...

Страница 11: ...5 27 200 2 preheating 4 Automatic leveling 6 Z axis set zero this function only automatically leveling before it takes effect 3 Unload filaments Extrusion motor delivering filaments Extrusion motor sent out filaments 5 Fan Fan 1 switch Fan 2 switch 6 Emergency stop Emergency stop task Set Z to 0 3 ...

Страница 12: ...e filaments press the extruder clip with your hand insert the filaments into the hole of the extruder until the nozzle is in position When the filaments flow out of the nozzle the filaments have been loaded select Z offset put one A4 paper between the nozzle and platform pulling the paper backwards and forwards if it happens to have a little bit of resistance that is well spaced Then click Set Z t...

Страница 13: ...g completed if leveling nut adjustment fails to meet leveling it can be adjusted via upper and lower adjustment of z axis adjusting block and then fine tuning with leveling nut until the platform leveling 1 A4paper 2 leveling nuts 3 Z Endstop Attention If the platform is uneven the first layer of printing may be as follows 1 too high partial integral 2 too low partial integral 3 moderate As shown ...

Страница 14: ...ion direction The model has been sliced and attached to the card Choose one of them to print such as Cat mobile phone stand After waiting for the temperature to reach the target temperature it will automatically start printing Filament Filament too low moderate B phenomenon inadequate extrusion consumables or even scraping the platform C phenomenon extrusion consumables uniform just to the platfor...

Страница 15: ...lation program of USB driver 2 click Software 3 and click CH340G USB Drive 4 According to the computer system select decompress 5 and get the installation driver after decompress 1 2 3 4 5 1 3 2 1 Connect power2 Connect the USB cable to the computer3 Connect the USB cable to the motherboard ...

Страница 16: ...nstable factors such as signal interference are very easy to exist Therefore it is recommended that customers use offline printing as much as possible Install 6 7 Connect the computer with data cable it is not possible to install the driver automatically when you first connect to the computer so to check whether the driver is installed successfully right click on the computer and select my compute...

Страница 17: ...Slice software 1 Slice software installation 1 install file click TRONXY choose langrage OK next accept install complete 3 1 1 2 3 2 4 5 Chinese and English options ...

Страница 18: ...l Rotate model Model mirror Estimated usage time speed Model size 2 Model operation file select model move zoom rotate mirror 1 2 After selecting the model you can move scale ro tate mirror Other operations 1 right click on the blank part of the model to rotate the model 2 click the left mouse button on the blank part of the model to move the model 3 scroll the scroll wheel in the middle of the mo...

Страница 19: ...200 ABS 240 Other filaments can be consulted Platform temperature PLA 45 ABS 80 Other filaments can be consulted Adhere type Increase the adhesion of the first layer of the platform model and reduce the edge sticking or peeling when the model is printed Filament diameter filament diameter is 1 75mm Nozzle size The nozzle diameter is usually 0 4mm Print speed advs 60mm s Do not set too fast too fas...

Страница 20: ...nces printers printer Settings The first line of code setting no changes are required in general The last line of code setting no changes are required in general Filament and nozzle diameter Model size setting Print type setting ...

Страница 21: ...bnormal noise the motor line is loose and poor contact leads to abnormal sound due to shaking Check the wiring the driving voltage is too large or too small adjust the driving voltage of the main board motor damage 3 Unable to read SD card content it is not displayed when inserted on the computer It needs to be used after formatting SD card there are illegal characters in the filename and rename t...

Отзывы: