background image

18


Automatic Flush


Press and hold the Setting button [      ], and then press the 
Flush button [       ] to turn this function on/off. When the 
function is turned on, you will hear short beep. When you turn 
it off, you will hear a long beep.  

R


Note: When automatic flush is off, the toilet will not 

flush when you a) leave the seat after sitting down b) 
leave the seat after standing as detected by the sensor 
and c) using the toe touch.  


Adjusting the Flush Time


Rotate the side knob downwards for Front Wash [      ] for 
approximately 8 seconds. When you have successfully entered 
this mode, you will hear a double beep and the green light on 
the knob begins flashing green.  


You are now ready to adjust the amount of water that fills the 
bowl before the flush. Using the remote press the > or < button 
to increase or decrease the amount. When you hear a double 
beep, you have reached the maximum or minimum setting. 
Once you have set your desired level press the flush button on 
the side knob. Your side knob begins flashing yellow. 


You are now ready to adjust the length of time that the 
SyphonAssist jet is active. Using the remote press the > or < 
button to increase or decrease the amount. When you hear a 
double beep, you have reached the maximum or minimum 
setting. Once you have set your desired level press the flush 
button on the side knob. Your side knob begins flashing red. 


You are now ready to adjust the amount of water that fills the 
bowl after the flush. Using the remote press the > or < button to 
increase or decrease the amount. When you hear a double 
beep, you have reached the maximum or minimum setting. 
Once you have set your desired level press the flush button on 
the side knob. You have now exited the flushing time 
adjustment. 

R


Note: Waiting too long without any buttons pressed in 

any of these adjustments will cause the toilet to exit this 
mode.  

Содержание Tahum TETBCERN-12.WH

Страница 1: ...Tahum Instruction Manual bidets reimagined...

Страница 2: ...8 Getting to know your bidet 8 9 Stop 13 8 10 Rear Wash 13 8 11 Adjustable Water Pressure 13 8 12 Adjustable Spray Wand Position 14 8 13 Adjustable Water Temperature 14 8 14 Front Wash 14 8 15 Drying...

Страница 3: ...uctions on the safe use and the hazards involved when using this product x It is unwise to allow children to play with this electronic bidet supervised or not x It is not recommended that children who...

Страница 4: ...er attempt to disassemble repair or alter the product yourself xOr it may cause fire electric shock heat or short circuit Please do not install the toilet in the car ship or any other moving objects x...

Страница 5: ...y cause fire electric shock heat and short circuit because of moisture condensation Please do not damage the power cable or plug Do not strike yank twist bend excessively or alter the electrical cords...

Страница 6: ...ol too tired and with somnolence This is an electrical product please do not install it in a place where it will get wet easily or in areas with high humidity If installed in the bath ram please insta...

Страница 7: ...ck the cleaning nozzle Pull out the plug regularly and clean off the dust with a dry cotton cloth Use the new hose parts that come with the product The old ones should not be reused Keep the product a...

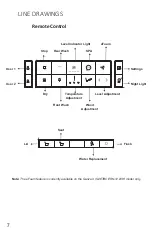
Страница 8: ...oam Stop Rear Wash SPA User 1 Settings User 2 Night Light Dry Temperature Level Adjustment Adjustment Front Wash Wand Adjustment Seat Lid Flush Water Replacement Note The eFoam feature is currently av...

Страница 9: ...ver Lid Safety Instructions Back Cover Water Outlet Side Knob Water Supply Pipe Seat Sensor Dryer Washer Heating Seat Toilet Bowl Filter Angle Valve of Water Supply Rear Wash Manual Flush Button Front...

Страница 10: ...ter a user leaves the seat for around 60 seconds Pre Rinse The Pre Rinse starts anytime the seat sensor has been activated A quick jet of water covers the bowl to help waste slide down Automatic Flush...

Страница 11: ...you have reached the maximum or minimum level GETTING TO KNOW YOUR LID SEAT Opening and Closing the lid There are four methods to open and close the lid These methods include 1 by hand 2 using the re...

Страница 12: ...ally Method 1 Using your hand you can open or close the seat R Note Do not interrupt the lid opening or closing with your hand if is moving via another method This can cause the gears to break Method...

Страница 13: ...ic Lid Opening deactivates you hear a short beep Setting Automatic Seat Opening Closing Factory Settings On Press and hold the Settings button and then press the Seat button When Automatic Seat Openin...

Страница 14: ...nozzle drying and live water replacement Rear Wash When the user is seated press the Rear Wash button to start rear washing The pipe oscillating function starts automatically to help increase the clea...

Страница 15: ...hen the user is seated press the Feminine Wash button to start front washing The oscillating function starts automatically to help increase the cleaning area Press the Feminine Wash button again to st...

Страница 16: ...he Spa button again during the wash will pause un pause the pressure and temperature adjustments but continue washing Press the Stop button to stop the SPA function Note The spa washing will automatic...

Страница 17: ...h button Children Wash When the user is seated press and hold the User 1 button for approximately 2 3 seconds Child washing begins and will automatically stop after 90 seconds Child washing presets th...

Страница 18: ...mode user s adjustment about water flow temperature and position will be automatically saved for later memory The remote will exit the user preset after entering standby state for some while GETTING...

Страница 19: ...ar a double beep you have reached the maximum or minimum setting Once you have set your desired level press the flush button on the side knob Your side knob begins flashing yellow You are now ready to...

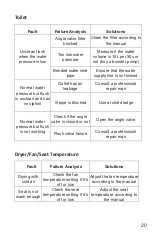
Страница 20: ...nce the beep sounds you will have successfully paired your remote control with your toilet bidet combo TROUBLESHOOTING GUIDE Note please contact support troneplumbing with your error code Error Code E...

Страница 21: ...hon Outlet has air leakage Consult a professional repair man S pipe is blocked Use a toilet dredge Normal water pressure but flush is not working Check if the angle valve is closed or not Open the ang...

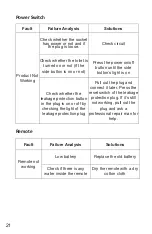
Страница 22: ...is on Check whether the leakage protection button in the plug is on or off by checking the light of the leakage protection plug Pull out the plug and connect it later Press the reset switch of the lea...

Страница 23: ...e that the inlet pipe Cleaning strength is not enough Check if the water pressure is set to low Increase the water pressure using the remote Check if inlet filter is blocked or not Clean the inlet fil...

Страница 24: ...before doing any maintenance work DO NOT rinse this product with water during maintenance Toilet Bowl Cleaning x Please ensure that the electrical plug is taken out x Please use soft damp cloth to wi...

Страница 25: ...ion Block x The junction block is installed on the water supply angle valve It cannot be pressed by a foreign matter and must be away from any corrosive substances x The junction block should be insta...

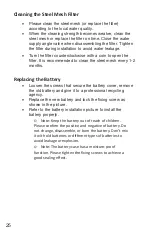
Страница 26: ...months Replacing the Battery x Loosen the screws that secure the battery cover remove the old battery and give it to a professional recycling agency x Replace the new battery and lock the fixing scre...

Страница 27: ...5 0 7L min Seat Temperature Adjustment Total 4 gears Normal around 104 F Water Temperature Total 4 gears Normal around 104 F Wind Temperature Total 4 gears Normal around 104 to 149 F Cleaning Time No...

Страница 28: ...support troneplumbing com www troneplumbing com...

Отзывы: