Trojan SUMMIT 280 Скачать руководство пользователя страница 24

24

WARM UP & COOL DOWN

WORKOUT GUIDELINES 

Each workout should include the following 3 parts:

1. A WARM-UP:


5 to 10 minutes of stretching and light exercise.  A proper warm-up increases your body

     temperature, heart rate, and circulation in preparation for exercise.

2. TRAINING ZONE EXERCISE:


20 to 30 minutes of exercising with your heart rate in your

     training zone. (Note: During the first few weeks of your exercise program, do not keep your heart

     rate in your training zone for longer than 20 minutes). 

3. COOL-DOWN: 

5 to 10 minutes of stretching. This will increase the flexibility of your muscles

     and will help to prevent post-exercise problems.

EXERCISE FREQUENCY

To maintain or improve your condition, plan 3 workouts each week, with at least 1 day

of rest between workouts. After a few months of regular exercise, you may complete up to 5

workouts each week, if desired. Remember, the key to success is to make exercise a regular and

enjoyable part of your everyday life.
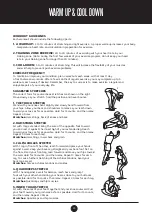
SUGGESTED STRETCHES

The correct form for several basic stretches are shown on the right.

Move slowly as you stretch, hold the position and never bounce.

1. TOE TOUCH STRETCH

Stand with your knees bent slightly and slowly bend forward from

your hips. Allow your back and shoulders to relax as you reach down 

toward your toes as far as possible. Hold for 15 counts, and then relax. 

Repeat 3 times. 

Stretches:


Hamstrings, back of knees and back.

2. HAMSTRING STRETCH 

Sit with 1 leg extended. Bring the sole of the opposite foot toward

you and rest it against the inner thigh of your extended leg. Reach

toward your toes as far as possible. Hold for 15 counts, and then relax.

Repeat 3 times for each leg. 

Stretches: 

Hamstrings, lower back and groin.

3. CALF/ACHILLES STRETCH

With 1 leg in front of the other, reach forward and place your hands

against a wall. Keep your back leg straight and your back foot flat on

the floor. Bend your front leg, lean forward and move your hips toward

the wall. Hold for 15 counts, and then relax. Repeat 3 times for each

leg. To cause further stretching of the Achilles tendons, bend your

back leg as well. 

Stretches:


Calves, Achilles tendons and ankles.

4. QUADRICEPS STRETCH

With 1 hand against a wall for balance, reach back and grasp 1

foot with your other hand. Bring your heel as close to your buttocks

as possible. Hold for 15 counts, then relax. Repeat 3 times for each leg. 

Stretches: 

Quadriceps and hip muscles.

5. INNER THIGH STRETCH 

Sit with the soles of your feet together and your knees outward. Pull

your feet toward your groin area as far as possible. Hold for 15 counts,

and then relax. Repeat 3 times.

Stretches:


Quadriceps and hip muscles.

1

2

3

4

5

Содержание SUMMIT 280

Страница 1: ...MANUAL LEVELS CARDIO Visit facebook com trojanhealth www trojanhealth co za www instagram com trojanhealth CAUTION READ ALL PRECAUTIONS AND INSTRUCTIONS IN THIS MANUAL BEFORE USING THIS EQUIPMENT KEEP...

Страница 2: ..._ 12 Console Functions ____________________________________________ 18 Exercise Instructions _________________________________________ 20 Fitness Tips Techniques _____________________________________...

Страница 3: ...nsult your physician To avoid muscular pain and strain begin each workout by stretching and warming up and end each session by cooling down and stretching INSTALLATION Trojan recommends that all equip...

Страница 4: ...amaged or worn do not attempt to use or repair the equipment yourself Please contact our service department on 0861 TROJAN 0861 876526 to arrange a repair Customers residing outside South Africa can c...

Страница 5: ...0 Elliptical Trainer provides a convenient and simple method to begin your assault on getting your body in shape and achieving a healthier lifestyle Before reading further please review the drawing be...

Страница 6: ...e packaging to make sure all parts are included Basic tools such as spanners will be provided for assembly 1 PC A M8 x 45 mm 4 PCS C M8 x 16 mm 6 PCS H M8 x 75 mm 2 PCS L M8 x 45 mm 4 PCS D M8 x 15 mm...

Страница 7: ...RDWARE TOOLSLIST 2 PCS I M8 10 PCS F M10 2 PCS O D8 5 x 20 x R30 mm 2 PCS N D8 5 x 20 x R16 mm 4 PCS S D19 4 x 24 mm 4 PCS G D10 5 x 32 mm 2 PCS E D8 5 x 32 mm 2 PCS B D8 5 x 16 mm 14 PCS P D8 2 mm 4...

Страница 8: ...h S13 14 15 1 X Wrench S13 14 1 Y Washer ID4 2 Z Wrench S5 1 1 Main Frame 1 2 Front Stabiliser 1 3 Rear Stabiliser 1 No Description Qty 4 Front Post 1 5 The Middle Handlebar 1 6 Console 2 7 R L Lower...

Страница 9: ...hain Cover R L 2 46 Screw ST4 0 x 12 mm 14 47 Nut 4 48 Shaft 1 49 Belt Roller 1 50 Bolt 4 51 Sleeve 1 52 Bolt 1 No Description Qty 53 Bolt 1 54 Bolt 1 55 Screw M3 x 10 mm 2 56 Cycle Body 1 57 Pulley 2...

Страница 10: ...10 EXPLODEDDRAWING...

Страница 11: ...11 EXPLODEDDRAWING...

Страница 12: ...ALLATION Assemble the Front Stabiliser 2 and Rear Stabiliser 3 to the Main Frame 1 with 2 Bolts A and 2 Washers B STEP 2 INSTALLING THE UP RIGHT POST Slide the Front Post Cover 29 on to the Front Post...

Страница 13: ...ebar 7R 7L over the Front Post 4 Then tighten the Lower Handle 7R 7L with 1 Hex Head Bolt D 1 Spring Washer P and 1 Washer E STEP 3 STEP 4 INSTALLING THE PEDAL ARMS Slide the Plastic Spacers 13 1 Wash...

Страница 14: ...9L Then tighten them with 1 Hex Head Bolt H 1 Washer B and 1 Nut M8 I ASSEMBLYSTEPS STEP 5 STEP 6 INSTALLING THE PEDAL BAR Assemble the End Cap 11R 11L on the Pedal Arm 9R 9L and tighten them with 3 S...

Страница 15: ...Bolts L and 2 Washers B and 2 Nuts I STEP 7 STEP 8 INSTALLING THE HANDLEBARS Slide the Upper Handlebars 8R 8L into the Lower Handlebars 7R 7L Tighten the Lower Handlebars 7R 7L on the Upper Handlebars...

Страница 16: ...and tighten them with 2 Spring Washers P and 2 Bolts Q ASSEMBLYSTEPS STEP 9 STEP 10 INSTALLING THE CONSOLE Unfasten the Screws R in the Console 6 and connect the Console Wire 28c b Attach the Console...

Страница 17: ...7 ASSEMBLYSTEPS STEP 11 INSTALLING THE CONSOLE Fit the Front Post Cover 4 and tighten with 2 Screws J and 1 Screw T Connect the Handle Pulse Wire 31 to the socket at the bottom of the Console 6 STEP 1...

Страница 18: ...Put 2 AA batteries into the console which will provide an activation beep and the LCD displays all functions for approximately 2 seconds SCAN Press MODE button until appears on SCAN At this setting th...

Страница 19: ...this setting the total distance travelled after the batteries were installed will be displayed PULSE Press MODE button until appears at PULSE At this setting the console will display your current hea...

Страница 20: ...rcises as shown below Each stretch should be held for approximately 30 seconds do not force or jerk your muscles into a stretch If it hurts STOP THE EXERCISE PHASE This is the stage where you put the...

Страница 21: ...cal Trainer you will need to have the resistance set quite high This will put more strain on your leg muscles and may mean you cannot train for as long as you would like If you are also trying to impr...

Страница 22: ...TRAINING Along with aerobic exercising which helps get rid of and keep off the excess fat that our bodies can store weight training is an essential part of the exercise routine process Weight training...

Страница 23: ...SITY To maximise the benefits of exercising it is important to exercise with the proper intensity The proper intensity level can be found by using your heart rate as a guide For effective aerobic exer...

Страница 24: ...your back and shoulders to relax as you reach down toward your toes as far as possible Hold for 15 counts and then relax Repeat 3 times Stretches Hamstrings back of knees and back 2 HAMSTRING STRETCH...

Страница 25: ...n Summit 280 Elliptical Trainer in a clean and dry environment away from children PROBLEM SOLUTION There is no display on the Console 1 Remove the Console and verify the wire that comes from the Conso...

Страница 26: ...urer in respect of any injury loss or damage direct indirect or consequential arising out of the use of or inability to use this product and whether or not occasioned by the Manufacturer s negligence...

Страница 27: ...still under warranty will be repaired free of charge as long as it complies with the terms and conditions of the warranty refer to warranties section in this manual Any items that need to be repaired...

Отзывы: