

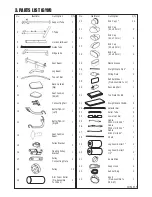
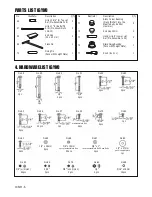


1061M-8
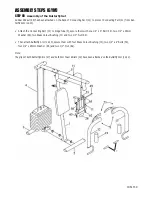
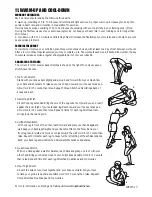
ASSEMBLY STEPS (GYM)
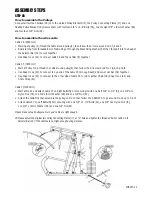
STEP 02
Assembly of the Bar and Top Frame
• Attach the Support Tube (1) to the T-Tube (2), secure them with two 3/8” x 4” Bolt (51), two 3/8” Nut (63) and four
3/8” x 19mm Washer (66).
• Attach the Back Cushion (9) to the Support Tube (1), secure them with two 5/16” x 2-1/4” Bolts (54) and two
5/16” x 16mm Washer (68).
• Put the Ridge Tube (5) on top of the Support Tube (1).
• Then put the Fitting Plate (27) on top of the Ridge Tube (5), secure them with two 3/8” x 2-1/2” Bolt (52), two
3/8” Nut (63) and four 3/8”x 19mm Washer(66).
Note:
The direction of the Bolts should be from Support Tube (1) through the Fitting Plate (27). Incorrect direction of the bolts will
affect the cables.
• Firmly connect the Ridge Tube (5) and the two Guiding Tubes (4), secure them with two 3/8”x1” Bolts (59) and two
3/8” x 19mm Washer (66).
Note:
Two 3/8” x 1” Bolts (59) and two 3/8” x 19mm Washer
(66) have been attached on the Guiding Tube (4), so
please separate them, then follow Steps below to
assemble.
• Attach two Pulley Bracket (15) to Support Tube
(1), secure them with two 5/16” x 2 3/4” Bolts (53),
four 5/16” x 16mm Washer (68) and two 5/16”
Nuts
(64).
• Attach Press Pin (58) to Support Tube (1) with
one 5/16” x 1 3/4” Bolt (57), two
5/16” x 16mm Washer (68) and one Nut (64).
• Attach Knob (44) and 3/8” x 1” Washer (67)
to the Press Pin (58).
68
15
68
64
53
68
Содержание OLYMPIAD 300
Страница 23: ...1061M 23 14 EXPLODED DRAWING GYM...
Страница 24: ...1061M 24 15 EXPLODED DRAWING BENCH...
Страница 28: ...1061M 28...


