


1061M-13
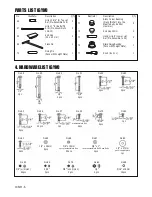
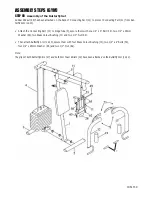
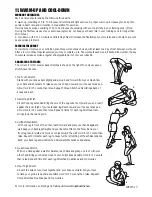
8. ASSEMBLY STEP (BENCH)
STEP 01
• Connect the Rear Leg (A2) with the Horizontal Beam (3) on the Gym,
secure them with two 3/8” x 4” Bolt (A15), four 3/8” Washer (A27), and two
3/8” Nylon Nut (A24).
• Connect the Main Frame (A1) with the Rear Leg (A2), secure them with one
3/8” x 2 1/4” Bolt (A16), two 3/8” Washer (A27) and
one 3/8” Nylon Nut (A24).
• Connect the Front Leg (A3) with the Main Frame (A1), secure them with 8 x 50mm Bolt (A17),
two 5/16” Washers (A26) and one 8mm Nylon Nut (A23).
• You can adjust the Front Leg into 3 positions by using the 8 x 42mm Pin (A21).
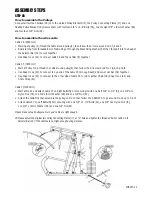
STEP 02
• Attach the two 20 x 40mm End Cap (A13) into the Front Leg (A3).
• Attach the one 38mm Square Cap (A11) into the Main Frame (A1).
• Attach the one 38mm Square Cap (A11) into the Rear Leg (A2).
• Slide the one Roller Tube (A4) into the hole on the Rear Leg (A2).
• Slide the two Leg Foam Roller (A10) onto both sides of the Roller Tube (A4) and then attach two 1” End Cap (A14).
• Slide the one Roller Tube (A4) into the hole on the Main Frame (A1).
• Slide the two Leg Foam Roller (A10) on both sides of the Roller Tube (A4), and then attach two 1” End Cap (A14).
Содержание OLYMPIAD 300
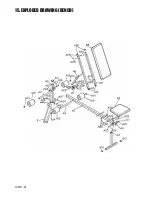
Страница 23: ...1061M 23 14 EXPLODED DRAWING GYM...
Страница 24: ...1061M 24 15 EXPLODED DRAWING BENCH...
Страница 28: ...1061M 28...


