background image

12

10331

OPERATION INSTRUCTIONS

ENTER

• 

Press the “ENTER” button to confirm a desired pre-set program or confirming the next step in the 
program selecting process. 

MODE

• 

During standby, pressing the “MODE” button will cycle through the different programs/settings available. 

INSTANT SPEED KEy

• 

Pressing the “INSTANT SPEED KEY” will set the treadmill at that specified speed. The speeds available 
are 1, 2, 4, 6, 8 and 10 km/h. 

INSTANT INCLINE KEy

• 

Pressing the “INSTANT INCLINE KEY” will set the treadmill at that specified incline. The levels available 
are 2, 4, 6, 8, 10 and 12 degrees. 

NOTE

: During a workout session or in standby, removing the safety key will immediately stop the workout 

session and the running deck. 
Replacing the safety key will return all pre-set workout sessions to the weight resetting display and the incline 
and speed to “0”.

HEART RATE INSTRUCTION

HAND GRIP PULSE

• 

During a workout session, holding the hand pulse sensors will display a heart rate reading within 20 
seconds. 

• 

Ensure that you palms are moist to assist with contact. 

WIRELESS HEART RATE RECEIVER

• 

For a more accurate heart rate reading, a wire heart rate belt may be used.  

Age

Age

Age

Age

H

DEFAULT

L

H

DEFAULT

L

H

DEFAULT

L

H

DEFAULT

L

13

197

124

124

31

180

113

113

49

162

103

103

67

145

92

92

14

196

124

124

32

179

113

113

50

162

102

102

68

144

91

91

15

195

123

123

33

178

112

112

51

161

101

101

69

143

91

91

16

194

122

122

34

177

112

112

52

160

101

101

70

143

90

90

17

193

122

122

35

176

111

111

53

159

100

100

71

142

90

89

18

192

121

121

36

175

110

110

54

158

100

100

72

141

90

89

19

191

121

121

37

174

110

110

55

157

99

99

73

140

90

88

20

190

120

120

38

173

109

109

56

156

98

98

74

139

90

88

21

189

119

119

39

172

109

109

57

155

98

98

75

138

90

87

22

188

119

119

40

171

108

108

58

154

97

97

76

137

90

86

23

187

118

118

41

170

107

107

59

153

97

97

77

136

90

86

24

186

118

118

42

169

107

107

60

152

96

96

78

135

90

85

25

185

117

117

43

168

106

106

61

151

95

95

79

134

90

85

26

184

116

116

44

167

106

106

62

150

95

95

80

133

90

84

27

183

116

116

45

166

105

105

63

149

94

94

28

182

115

115

46

165

104

104

64

148

94

94

29

181

115

115

47

164

104

104

65

147

93

93

30

181

114

114

48

163

103

103

66

146

92

92

BPM

BPM

BPM

BPM

Содержание iSMART 500

Страница 1: ...N READ ALL PRECAUTIONS AND INSTRUCTIONS INTHIS MANUAL bEfORE USINGTHIS EQUIPMENT KEEPTHIS MANUAL fOR fUTURE REfERENCE Visit facebook com trojanhealth www trojanhealth co za iSMART 500 TREADMILL USER MANUAL TM ...

Страница 2: ...___ 15 App Installation _ ________________________________________________ 23 Maintenance ____________________________________________________ 29 FitnessTips Techniques___________________________________________ 31 Conditioning Guidelines_ __________________________________________ 32 Warm Up Cool Down_ _________________________________________ 33 Trouble Shooting _________________________________...

Страница 3: ... during exercise you feel faint dizzy or experience pain stop exercising immediately and consult your physician To avoid muscular pain and strain begin each workout by stretching and warming up and end each session by cooling down and stretching ACCESS CONTROL Trojan recommends that all fitness equipment be used in a supervised area It is recommended that the equipment be located in an access cont...

Страница 4: ...you follow our maintenance tips to ensure the continued correct function of yourTrojan equipment Before any use examine all accessories approved for use with theTrojan equipment for damage or wear Should yourTrojan equipment appear damaged or worn do not attempt to use or repair the equipment yourself Please contact our service department on 0861 TROJAN 0861 876526 to arrange a repair OPERATING WA...

Страница 5: ... that is properly installed and grounded in accordance with all local codes and ordinances DANGER improper connection of the equipment grounding conductor can result in a risk of electric shock Check with a qualified electrician or serviceman if you are in doubt as to whether the product is properly grounded Do not modify the plug provided with the product If it will not fit the outlet have a prop...

Страница 6: ...ise TheTrojan iSMART 500Treadmill provides a convenient and simple method to begin your assault on getting your body in shape and achieving a healthier lifestyle Before reading further please review the drawing below and familiarise yourself with the parts that are labelled Read this manual carefully before using theTrojan iSMART 500Treadmill Base Console Display Safety Key Power Cable Power Switc...

Страница 7: ...l parts are included Basic tools such as spanners will be required for assembly No Description Qty 50 L Shaped Hex Wrench 5mm x 70 mm x 70 mm 1 66 Base 1 69 Suction Cups Ø30 mm 2 79 UprightTube L 1 80 UprightTube R 1 81 Truss Hex Screw M8 x P1 25 mm x 20 mm 6 105 Decorative Cover L 1 106 Decorative Cover R 1 81 50 80 79 105 106 69 66 ...

Страница 8: ...l until assembly is completed Tools are provided for use in assembly Majority of the parts here have been preassembled at the factory WARNINGS Assemble the treadmill before removing the securing strap Two people are required to complete the assembly steps 1 Step 1 Raise the Console Display Shelf 92 and tighten with oneTruss Hex Screw 81 to the UprightTube L R 79 80 81 92 80 79 ...

Страница 9: ... STEPS 2 Step 2 Raise the UprightTubes L R 79 80 and tighten with twoTruss Hex Screws 81 on each of the Upright Tubes L R 79 80 with the provided L Shaped Hex Wrench 50 The securing strap can now be removed 81 81 79 80 ...

Страница 10: ...ws 107 on each side Tighten with the provided L Shaped Hex Wrench 50 Step 4 Place the Suction Cups 69 in an area they will be able to secure your device on the treadmill 3 Device 4 69 CAUTION Ensure that cables are not damaged during assembly or when tightening screws Re check All bolts and nuts are tightened securely before using the machine ...

Страница 11: ...ore than 5 minutes the session will be ended and revert back to standby Should the workout session be paused holding the STOP button for 4 seconds will continue the workout session While in Selection Mode pressing the STOP button will take you back to the previous selections SPEED Press the SPEED button to manually adjust your desired speed by 0 1 km h per press Holding the SPEED in will rapidly i...

Страница 12: ...lms are moist to assist with contact WIRELESS HEART RATE RECEIVER For a more accurate heart rate reading a wire heart rate belt may be used Age Age Age Age H DEFAULT L H DEFAULT L H DEFAULT L H DEFAULT L 13 197 124 124 31 180 113 113 49 162 103 103 67 145 92 92 14 196 124 124 32 179 113 113 50 162 102 102 68 144 91 91 15 195 123 123 33 178 112 112 51 161 101 101 69 143 91 91 16 194 122 122 34 177 ...

Страница 13: ...ries burnt The weight can be re set during the weight setting screen or after the Safety Key has been removed and replaced STANDBY Should the treadmill be switched on and not be used for a period of more than 20 minutes the system will go into the standby state Press any key to bring the console out of standby QUICK START MODE STARTTRAINING In standby mode pressing the ENTER button will confirm th...

Страница 14: ...1 3 BODY FAT Press ENTER to select the program Press STOP to go back to the selection screen again MANUAL PROGRAM During the Manual settings you will be required to set an end goal for one of the following settings Time Distance or Calorie TIME Press ENTER to confirm select the Manual workout and enter time setting Press SPEED or SPEED to adjust the target time The default value is 0 00 and ranges...

Страница 15: ...ave pressed ENTER to confirm the program you will receive a count down from 3 and display READY GO before starting the workout P4 Interval Scroll to P4 and press ENTER to select P4 Enter the training intensity level setting by pressing SPEED or SPEED to select your desire intensity The default value is 1 and ranges from 1 10 levels Press SPEED or SPEED to set your desired time The default value is...

Страница 16: ...d speed by pressing SPEED or SPEED Press INCLINE or INCLINE to adjust the Incline Press ENTER to set the User Program Profile Zones There are 20 different stages in each of the User Programs 20 stages Select your desired Speed and Incline for each of the different stages Press ENTER to select U1 and enter the end goal time Press ENTER to confirm the Random Program and enter theTime setting Press S...

Страница 17: ...ed can reach the maximum of 18 km h and an Incline level of 12 HRC 60 or 75 PROGRAM Press ENTER to confirm select 60 or 75 and enterTime setting Press SPEED or SPEED to adjust the targetTime The default value is 0 00 and ranges from 01 00 99 00 minutes seconds Press ENTER to confirm theTime and enter the Age setting Press SPEED or SPEED to adjust the target Age The default value is 30 and ranges f...

Страница 18: ... SPEED to adjust the Sex to female or back to male Press ENTER to move on to the next parameter Weight The default value is 70 kg and ranges from 23 130 kg Press SPEED or SPEED to adjust the target Weight by 1 kg Press ENTER and place both hands on the Hand Pulse Sensors for 15 Seconds The Body FatValue will be displayed within 15 seconds Press STOP to go back to the Standby Note Should you not pr...

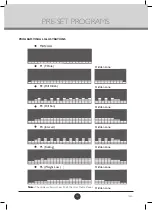
Страница 19: ... ILLUSTRATIONS Note The display will only show 20 of the User Profile Zones Hidden zone MANUAL P1 9 Hole P2 Hill Climb P3 Hill Run P4 Interval P5 Rolling P6 Weight Loss Hidden zone Hidden zone Hidden zone Hidden zone Hidden zone Hidden zone ...

Страница 20: ...20 10331 PRE SET PROGRAMS ...

Страница 21: ...2 4 0 4 8 8 8 5 6 8 8 5 6 9 6 6 4 9 6 6 4 9 6 7 2 9 6 7 2 9 6 7 2 9 6 7 2 9 6 6 4 9 6 6 4 9 6 5 6 8 8 7 2 4 8 4 0 3 2 Level 6 ELEVATION 2 0 2 0 3 0 3 0 3 0 4 0 4 0 4 0 4 0 5 0 5 0 5 0 5 0 6 0 6 0 6 0 5 0 5 0 5 0 5 0 4 0 4 0 4 0 4 0 3 0 3 0 3 0 3 0 2 0 2 0 km h 3 2 4 0 4 8 9 6 6 4 9 6 6 4 10 4 7 2 10 4 7 2 10 4 8 0 10 4 8 0 10 4 8 0 10 4 8 0 10 4 7 2 10 4 7 2 10 4 6 4 9 6 8 0 4 8 4 0 3 2 Level 7 EL...

Страница 22: ... 4 8 6 4 8 0 8 8 8 0 9 6 8 8 9 6 8 8 9 6 8 8 9 6 8 8 9 6 8 8 9 6 8 8 9 6 8 8 9 6 8 8 9 6 8 8 8 0 6 4 4 8 4 0 3 2 Level 6 km h 3 2 4 0 4 8 6 4 8 0 8 8 9 6 10 4 9 6 10 4 9 6 10 4 9 6 10 4 9 6 10 4 9 6 10 4 9 6 10 4 9 6 10 4 9 6 10 4 9 6 8 0 6 4 4 8 4 0 3 2 Level 7 km h 4 0 4 8 5 6 7 2 8 8 9 6 10 4 11 2 10 4 11 2 10 4 11 2 10 4 11 2 10 4 11 2 10 4 11 2 10 4 11 2 10 4 11 2 10 4 11 2 9 6 8 0 7 2 5 6 4 ...

Страница 23: ...he App download instructions and download the Tread Monitor or Run On Earth App These are the only compatible Apps for the treadmill bluetooth device pairing Step 1 Please place your device on the console in front of the LCD display Step 2 Go in to the device Settings Step 3 Open Bluetooth App and look for devices Step 4 The device should pick up the iSmart 500 treadmill ...

Страница 24: ...Press the HOME button on your device to go to your device s home screen and open the downloaded App Step 9 After entering the App treadmill will automatically connect to the App and the show the start menu Step 10 After using the App close the App by pressing the HOME button on your device Turn off the Bluetooth connectivity on your device After about 10 seconds the treadmill console will beep and...

Страница 25: ...ay Store and search for Pafers Follow the App download instructions and download the Run On Earth App This is the only compatible App for the treadmill bluetooth device pairing Step 1 Please place your device on the console in front of the LCD display Step 2 Go in to the device Settings Step 3 Open Bluetooth App and look for devices ...

Страница 26: ... App will be unlocked Step 8 Press the HOME button on your device to go to your device s home screen and open the downloaded App Step 9 After entering the App treadmill will automatically connect to the App and the show the start menu Step 10 After using the App close the App by pressing the HOME button on your device Turn off the Bluetooth connectivity on your device After about 10 seconds the tr...

Страница 27: ...ay be disrupted due to the device resource allocation If the connection is interrupted treadmill will go into a protection function and start beeping continuously before slowing down the speed of the running belt The iOS Device App is not working properly Step 1 Double press your HOME button and delete all temporary memory of your Apps including Pafers App Step 2 Enter your device Settings program...

Страница 28: ...es may not be displayed correctly and may need to be calibrated Note Update iOS to 6 0 version or above Android to 4 0 or above to allow users to have the best experience ENGLISH METRIC CHANGING MODE Under the Weight setting window on the treadmill console press and hold ENTER for 10 seconds to go into the ENGLISH METRIC changing mode The current Language and Unit of Measure will be displayed If t...

Страница 29: ...tine cleaning of your treadmill will extend the product s life STORAGE Store theTrojan iSMART 500Treadmill in a clean and dry environment away from children BELT ADJUSTMENT Belt adjustment and tension performs two functions Adjustment for tension and centring The running belt has been adjusted properly at the factory However transportation uneven flooring or other unpredicted reasons could cause t...

Страница 30: ...ll for the first time If the treadmill is used on a regular basis the running deck should be lubricated once a month If the treadmill is not used for two months or more the treadboard must be lubricated before use BELTTRACKING ADJUSTMENT If during use you notice that the running belt either shifts to the right or the left of centre switch off the treadmill remove the Safety Key and unplug the equi...

Страница 31: ...your muscles via your heart and lungs Aerobic exercise improves the fitness of your lungs and heart your body s most important muscle Aerobic exercise fitness is promoted by any activity that uses your large muscles arms legs or buttock for example Your heart beats quickly and you breathe deeply An aerobic exercise should form part of your entire exercise routine WEIGHTTRAINING Along with aerobic ...

Страница 32: ...rcise intensity To maximise the benefits of exercising it is important to exercise with the proper intensity The proper intensity level can be found by using your heart rate as a guide For effective aerobic exercise your heart rate should be maintained at a level between 65 and 85 of your maximum heart rate as you exercise This is known as your target zone You can find your target zone in the tabl...

Страница 33: ...one hand against a wall for balance reach back and grasp one foot with your other hand Bring your heel as close to your buttocks as possible Hold for 15 counts then relax Repeat 3 times for each leg Stretches Quadriceps and hip muscles 5 Inner Thigh Stretch Sit with the soles of your feet together and your knees outward Pull your feet toward your groin area as far as possible Hold for 15 counts an...

Страница 34: ...cated in If it has tripped reset or have an electrician replace the breaker in your home Have an electrician check for inadequate voltage at the outlet Treadmill loses power during use Have an electrician check for inadequate voltage at the outlet Check the house electrical breaker box and the circuit breaker for the room the treadmill is located in If it has tripped reset or have an electrician r...

Страница 35: ...on any obligation of the manufacturer in respect of any injury loss or damage direct indirect or consequential arising out of the use of or inability to use this product and whether or not occasioned by the manufacturer s negligence or any act or omission on its part PROOF OF PURCHASE Any claim in terms of the warranty must be supported by a proof of purchase or a warranty number Warranty numbers ...

Страница 36: ...er warranty Any items still under warranty will be repaired free of charge as long as it complies with the terms and conditions of the warranty Refer to warranties section in this manual Any items that need to be repaired that are NOT covered in the warranty will be for the consumer s expense A quote for the repair replacement of these items will be provided to the consumer for approval prior to r...

Страница 37: ...Wire 1 44 Air Shocks 2 16 Wire Clip Fixing Knob UC 0 PCZUC0 2 45 Lower Motor Cover 2 17 Washer Drill Cross Self Tapping Screw Ø4 mm xP0 7 mm x 16 mm 2 46 Washer Drill Cross Self Tapping Screw Ø4 mm x 12 mm 1 18 Wire Clip Fixing Knob UC 0 5 PCZUC0 5 1 47 MP3 Sound Wire 8 19 Sensor Fixing Base 1 48 Extension Wire 14 AWG x 150 mm 1 20 Motor 1 49 Extension Wire 14 AWG x 90 mm 1 21 Motor Fixing Adjustm...

Страница 38: ...drail Switch Sticker Angle 1 72 Foot Pad 4 104 Handrail Switch Wire Lower 2 73 Washer Drill Cross Self Tapping Screw Ø4 mm x 20 mm 8 105 Decorative Cover L 1 74 Incline Base 1 106 Decorative Cover R 1 75 End Cap 15 mm x 30 mm x 2 0 mm 4 107 Truss Cross Screw M5 x P0 8 mm x 15 mm 6 76 Truss Hex Screw M10 x P1 5 mm x 35 mm 4 108 Cylinder 1 77 Incline Base Extended Shaped Iron Plate Pin 2 78 R Pin Ø1...

Страница 39: ...39 10331 exploded drawing ...

Страница 40: ......

Отзывы: