Trojan ALTITUDE 600 Скачать руководство пользователя страница 12

10221-12

8. COMPUTER FUNCTIONS (CONT.)

1.  WARM UP and COOL DOWN function: 
   During WARM UP or any selected Program, if you change SPEED or INCLINATION, the value will increase or 

decrease in the next level. If you are in COOL DOWN  then SPEED and INCLINATION is not affected, and STOP is 
the only function which can be carried out.

2.   PROGRAM has 30 levels in all. The first three levels are WARM UP and the last three are COOL DOWN. Each is 1 

minute. The time you select, except for the three WARM UP and COOL DOWN levels (6 minutes) will be split evenly 
between the remaining 24 levels.

3.   The MANUAL and 9 HOLE programs do not have WARM UP or COOL DOWN functions. When the distance 

covered is equal to 3.5KM, the motor will stop, the INCLINE will return to 0 and the display shows END.

IV. PROGRAM OPERATION AND INSTRUCTION : 

Manual Mode 
1.   When you press START, the motor will start after a 3 seconds countdown.  The treadmill starts at the minimum speed 

of   the treadmill and the matrix LCD window will display the running track measuring the distance covered in a 
counter-clockwise direction. The track is 0.4KM (0.25Miles).

2.   Speed increments are 0.1km/h. Press + or - keys to increase or decrease speed or alternatively press the INSTANT 

SPEED key 1 , 2 , 4 , 6 , 8 , 10 to move directly to the selected speed.

3.   Incline increments are 1. Press + or - keys to select increase or decrease incline or alternatively press the INSTANT 

SPEED key 2 , 4 , 6 , 8 , 10 , 12 to move directly to the selected incline.

4.  Time : pre-set 20 min-range5 - 99min , increments 1 min.
5.  During exercise, if there is PULSE signal, the CALORIES window will display pulse.
6.   If you press STOP when the motor is working, the running motor and the incline motor will stop and the window will 

display STOP.  If you press START again, the motor will start after a 3 second countdown, the speed will be kept the 
same as before the stop, and the incline will be increased to the set height before the stop.

7.   When in the Stop position, hold the STOP key for 3 seconds, and the treadmill will go back to the START/READY 

position.

8.   In the END status, if it last 30 seconds, the window will go back to START/READY status. Alternatively press STOP to 

revert back to the START/READY status.

9.   Under START/READY status, enter CUSTOM mode. After setting TIME, press ENTER to set the SPEED and INCLINE 

levels you want. There are 30 intervals to set and you can set the intervals by pressing ENTER. After setting press 
START to start.

10.  After entering into the FUNCTION of the program, the LED for LEVEL and the window will blink. The FUNCTION 

is to select the exercise level (L1~L10). Press + or  – to change the level and press ENTER

11.  After selecting LEVEL, the TIME window will blink, press + or  –  to set the exercising time. After finish setting, press 

ENTER or START to start.
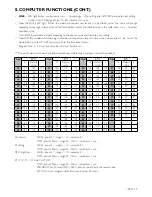
PROGRAM Mode 

 (under START/READY status, press PROGRAM to enter setting.)

P1 Manual  TIME : pre-set 20 min-range5~99min , increments 1 min.
P2 9 hole  LEVEL : pre-set 1 , range 1 - 10 ,  increments 1 , 3500 meter distance.
P3 hill climb  LEVEL : pre-set 1 , range 1 - 10 , increments 1.


TIME : pre-set 30min-range 20 - 99min , increments 1 min.

P4 hill run  LEVEL : pre-set 1 , range 1 - 10 , increments 1.
 

              TIME : pre-set 30min-range 20 - 99min , increments 1 min.

P5 HRC  

HRC function : This function only works if a heart beat is detected

  The  program  aims  to  exercise  the  cardio-vascular  system.  When  exercising,  the  heartbeat  value  is  maintained  at  

the pre-set value. The angle and speed will vary to maintain the heartbeat value in the pre-selected range to achieve the 
exercise benefit.

Содержание ALTITUDE 600

Страница 1: ...SPACE MY TIME CAUTION READ ALL PRECAUTIONS AND INSTRUCTIONS IN THIS MANUAL BEFORE USING THIS EQUIPMENT KEEP THIS MANUAL FOR FUTURE REFERENCE ALTITUDE 600 TREADMILL TREADMILl CARE INSTRUCTION AND ASSEM...

Страница 2: ...OLDING TRANSPORT 8 6 MAINTENANCE 9 7 GROUNDING INSTRUCTIONS 10 8 COMPUTER FUNCTIONS 11 9 FITNESSTIPS TECHNIQUES 20 10 CONDITIONING GUIDELINES 21 11 WARM UP AND COOL DOWN 22 12 FREQUENTLY ASKED QUESTIO...

Страница 3: ...onsibility of the owner Keep children away from all equipment Parents or others supervising adults must provide close supervision of children if the equipment is used in the presence of children INSTA...

Страница 4: ...ide close supervision of children if the equipment is used in the presence of children Do not wear loose fitting clothing or jewellery when using the equipment It is also recommended that users tie up...

Страница 5: ...your assault on getting your body in shape and achieving a healthier lifestyle Before reading further please familiarise yourself with the parts that are labelled Read this manual carefully before usi...

Страница 6: ...10 x 20 x 2 0t 2 4 Plastic Knob 2 183 Allen Key Screwdriver 5mm x 70mm x70mm 1 184 Allen Key 6mm x 80mm x 80mm 1 193 Truss Philips Screw 5 x 15 8 137 Power Cord 1 185 Silicone 1 ITEM Description Qty 1...

Страница 7: ...otate the Computer Consol into the upright position and secure each side with one Plastic Knob 4 Pull the Handrails down into the horizontal position and then secure them with one Allen Bolt 168 one F...

Страница 8: ...ck TRANSPORT Place your right foot onto the right base foot tube With two hands holding the left and right handgrip tubes pull the treadmill toward you You can now easily move the treadmill to the des...

Страница 9: ...ICATION Lift one side of the treadbelt and feel the top surface of the treadboard If the surface is slick to the touch then no further lubrication is required If the surface is dry to the touch apply...

Страница 10: ...nnection of the equipment grounding conductor can result in a risk of electric shock Check with a qualified electrician or serviceman if you are in doubt as to whether the product is properly grounded...

Страница 11: ...ion press the required PROGRAM function key to be able to enter training parameters for the selected program 3 Fan button switches the fan ON and OFF 4 When the power is turned off the treadmill will...

Страница 12: ...ing motor and the incline motor will stop and the window will display STOP If you press START again the motor will start after a 3 second countdown the speed will be kept the same as before the stop a...

Страница 13: ...91 91 16 194 122 122 34 177 112 112 52 160 101 101 70 143 90 90 17 193 122 122 35 176 111 111 53 159 100 100 71 142 90 89 18 192 121 121 36 175 110 110 54 158 100 100 72 141 90 89 19 191 121 121 37 1...

Страница 14: ...0 2 0 2 0 2 0 2 0 2 0 2 0 2 0 2 0 2 0 2 0 1 5 1 0 KPH 1 6 2 4 3 2 3 2 3 2 3 2 3 2 3 2 3 2 3 2 3 2 3 2 3 2 3 2 3 2 3 2 3 2 3 2 3 2 3 2 3 2 3 2 3 2 3 2 3 2 3 2 3 2 3 2 2 4 1 6 Level 6 ELEVATION 0 0 1 0...

Страница 15: ...4 0 4 8 8 8 5 6 8 8 5 6 9 6 6 4 9 6 6 4 9 6 7 2 9 6 7 2 9 6 7 2 9 6 7 2 9 6 6 4 9 6 6 4 9 6 5 6 8 8 7 2 4 8 4 0 3 2 Level 6 ELEVATION 2 0 2 0 3 0 3 0 3 0 4 0 4 0 4 0 4 0 5 0 5 0 5 0 5 0 6 0 6 0 6 0 5...

Страница 16: ...6 8 8 9 6 8 8 9 6 8 8 9 6 8 8 9 6 8 8 9 6 8 8 9 6 8 8 9 6 8 8 9 6 8 8 9 6 8 8 8 0 7 2 4 8 4 0 3 2 Level 6 ELEVATION 0 0 0 0 0 0 0 0 0 0 1 0 1 0 1 0 1 0 1 0 1 0 1 0 1 0 1 0 1 0 1 0 1 0 1 0 1 0 1 0 1 0...

Страница 17: ...5 4 5 3 0 2 5 2 0 KPH 3 2 4 0 4 8 8 8 6 4 8 8 6 4 8 8 6 4 8 8 6 4 8 8 6 4 8 8 6 4 8 8 6 4 8 8 6 4 8 8 6 4 8 8 6 4 8 8 6 4 8 8 7 2 4 8 4 0 3 2 Level 6 MPH 2 0 2 5 3 0 6 0 4 5 6 0 4 5 6 0 4 5 6 0 4 5 6...

Страница 18: ...2 0 KPH 3 2 4 0 4 8 6 4 8 0 8 8 8 0 9 6 8 8 9 6 8 8 9 6 8 8 9 6 8 8 9 6 8 8 9 6 8 8 9 6 8 8 9 6 8 8 9 6 8 8 8 0 6 4 4 8 4 0 3 2 Level 6 MPH 2 0 2 5 3 0 4 0 5 0 5 5 6 0 6 5 6 0 6 5 6 0 6 5 6 0 6 5 6 0...

Страница 19: ...0 4 0 3 5 2 0 1 5 1 0 KPH 1 6 2 4 3 2 4 8 5 6 6 4 7 2 7 2 7 2 8 0 8 0 8 0 8 0 8 8 8 8 8 8 8 8 8 0 8 0 8 0 7 2 7 2 7 2 6 4 6 4 6 4 5 6 3 2 2 4 1 6 Level 6 MPH 1 0 1 5 2 0 3 5 4 0 4 5 5 0 5 0 5 0 5 5 5...

Страница 20: ...ht training helps tone build and strengthen muscle If you are working above your target zone you may want to do a less amount of reps MUSCLE CHART ALTITUDE 600TREADMILL The exercise routine that is pe...

Страница 21: ...feet from walls and furniture EXERCISE INTENSITY To maximize the benefits of exercising it is important to exercise with the proper intensity The proper intensity level can be found by using your hea...

Страница 22: ...Allow your back and shoulders to relax as you reach down toward your toes as far as possible Hold for 15 counts then relax Repeat 3 times Stretches Hamstrings back of knees and back 2 Hamstring Stretc...

Страница 23: ...e power supply Leave for 1 minute then reconnect the power supply turn on the power switch and reconnect Safety Key If this does not rectify the problem please follow the steps on page 24 for E6 E7 In...

Страница 24: ...incline position If the error persists please contact our call centre on 0861 786 526 0861TROJAN B When the incline angle of the treadmill is stuck in a low position drawing 1 Press the STOP button a...

Страница 25: ...33 XRA 013 017F Computer Board AMP 1 34 SAK3 8 Round Head Philips SelfTapping Screw 3 x 8 33 35 XEK 151 002 Key Board APM KB2008 1 36 XL 419 10PIN Wire 1 NO SERIAL NO DESCRIPTION QTY 37 XL 836A Contro...

Страница 26: ...Rear End Cap Left 1 108 P 2138R Rear End Cap Right 1 109 SAN4 20 Round Head Philips Drilling Screw M4 x P0 7 x 20 Fine PitchThread 2 NO SERIAL NO DESCRIPTION QTY 110 SMN4 16 Washer Drilling Philips Sc...

Страница 27: ...2 XLT025 Extension Wire Black 14AWG x 120 x 2T 1 208 SCE6 10 Truss Philips Screw M6 x P1 0x10 9 209 XHA T34 Chest Belt Pulse Emitter 1 210 XLT006 Extension Wire White 14AWG x 200 x 2T NO SERIAL NO DES...

Страница 28: ...10221 28 14 EXPLODED DRAWING...

Страница 29: ...ves all other warranties guarantees conditions or liabilities express or implied arising by law or otherwise including without limitation any obligation of the manufacturer in respect of any injury lo...

Страница 30: ...dure 2 Cost of Repairs 2 1 Under warranty Any items still under warranty will be repaired free of charge as long as it complies with the terms and conditions of the warranty refer to warranties sectio...

Отзывы: