background image


22 


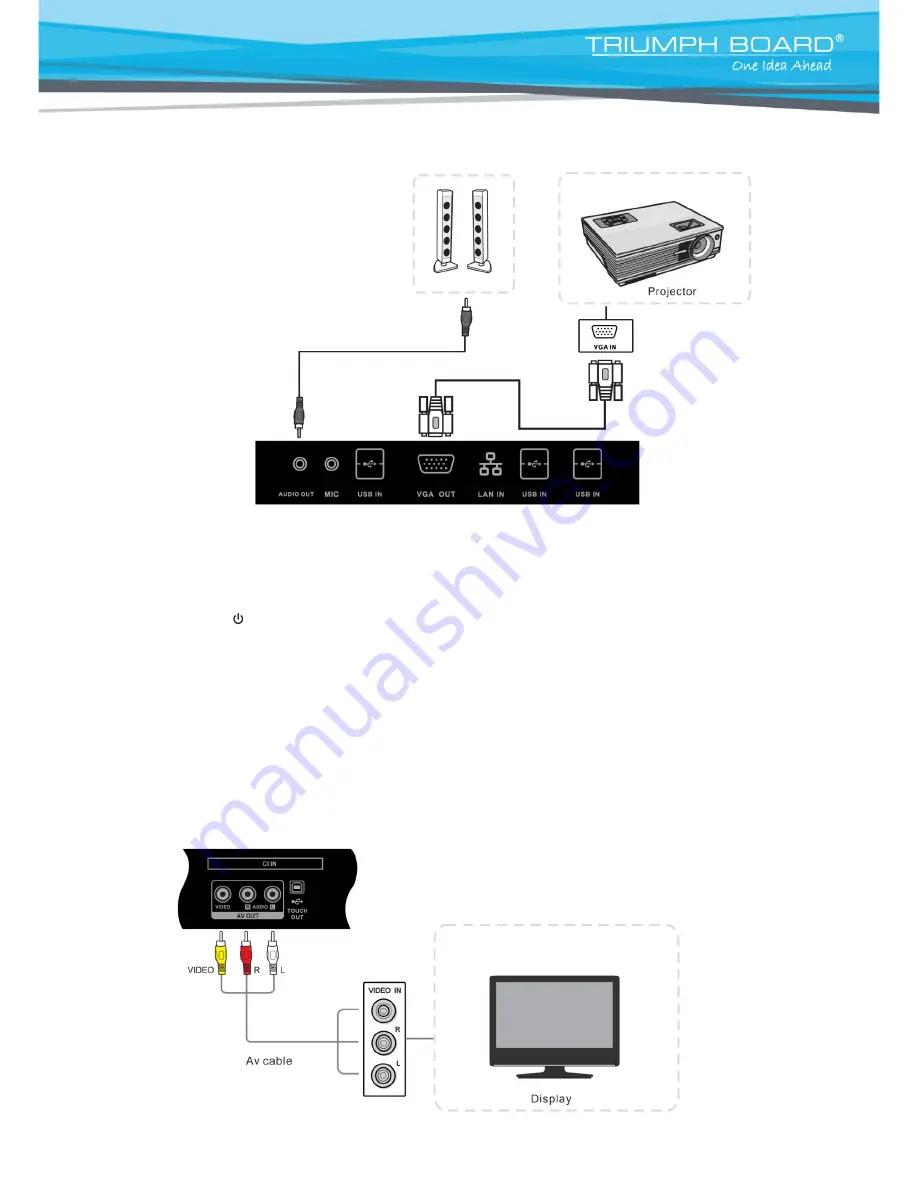
5.4.6) VGA OUT 


a)  Connect a VGA cable with the device with VGA, Connect an audio cable with the 

Audio  OUT  

b)  Plug the POWER cord and switch it on from the rear panel 

c)  Press 


to turn the power on 

d) 

Press INPUT switch to HDMI source


e) 

Setup the VGA OUT or Multi-Screen in the WINDOWS, mouse right-click on Desktop, 
run Screen Resolution item of internal computer. 


NOTE

: VGA-OUT can output the image in the internal computer only


5.4.7) AV OUT 


Connect other display


Содержание 70" MULTI Touch LED LCD

Страница 1: ...eries TRIUMPH BOARD 55 MULTI Touch LED LCD TRIUMPH BOARD 65 MULTI Touch LED LCD TRIUMPH BOARD 70 MULTI Touch LED LCD TRIUMPH BOARD 84 MULTI Touch LED LCD TRIUMPH BOARD a s Neklanova 122 15 128 00 Praha 2 Czech Republic European Union www triumphboard com ...

Страница 2: ...rnal external computer 19 5 3 TV Aerial optional 19 5 4 A V Connection 19 5 4 1 AV IN 19 5 4 2 S VIDEO 20 5 4 3 YPbPr 20 5 4 4 HDMI1 HDMI2 21 5 4 5 Coaxial Connecting 21 5 4 6 VGA OUT 22 5 4 7 AV OUT 22 5 4 8 USB Device 23 5 4 9 Network Cable 23 5 4 10 Microphone 23 5 4 11 RS232 connecting optional part of TV Tuner 23 5 4 12 Internal PC basic operations 24 6 Menu Operation 25 6 1 Input source 25 6...

Страница 3: ...ock Menu 31 6 8 1 Block Program 31 6 9 Setup Menu 32 6 10 EPG 32 7 Troubleshooting 34 7 1 Software Reinstallation 35 7 2 Turning off the Touch keyboard in Windows 36 8 Software protocols 37 8 1 Description 37 8 2 Protokol 38 9 Care and Maintenance 42 10 Repair Service and Contacts 43 ...

Страница 4: ...2580111327 8592580111242 8592580111181 8592580111280 8592580111334 8592580111297 8592580111150 8592580111198 8592580111341 8592580111303 is in conformity of essential requirements of EU directives EU Standards EN 55022 2010 EN 55024 2010 EN 55013 2001 A1 2003 A2 2006 EN 55020 2007 A11 2011 EN 61000 3 2 2006 A1 2009 A2 2009 EN 61000 3 3 2008 In the configuration tested the EUT complied with the sta...

Страница 5: ...84 display equipment Fuse in inlet 6 3A 250 VAC LCD Screen Never use any other tough or sharp object to replace the plastic stylus writing pen Unplug the power supply plug before cleaning Clean the screen with a soft dustless and dry cloth Never use water or the spray type detergent to clean the unit For deep clean contact an authorized service center Please don t display the high brightness image...

Страница 6: ...after double clicking the standby key for switching off internal PC The LED indicator in the right bottom corner of the frame illuminates orange in standby mode Battery Please dispose of batteries responsibly Please don t let children touch the batteries Do not throw batteries into a fire ...

Страница 7: ...TI Touch LED LCD no need for a projector Easy installation No limitations caused by light conditions Elegant and stylish appearance TRIUMPH BOARD MINI PC for MULTI Touch LED LCD Series TRIUMPH BOARD MINI PC is a powerful fully integrated personal computer for TRIUMPH BOARD LED LCD MULTI Touch Series TRIUMPH BOARD MINI PC is equipped with Intel i5 processor Intel graphics card and 4 GB RAM which en...

Страница 8: ... 1428 48 H x 803 52 V Outline Dimension 1591 x 961 x 110 mm Package Dimension 1728 x 1140 x 250 mm Net Gross weight 66 85 kg TRIUMPH BOARD 70 MULTI Touch LED LCD EAN 8592580111181 8592580111280 8592580111334 8592580111297 Screen Type TFT LCD A Standard LED backlight Resolution 1920 x1080 Refreshing Sequence 4 ms 120 Hz 4000 1 Display Area 1538 880 H x 865 620 V Outline Dimension 1713 x 1035 x 98 m...

Страница 9: ...speed USB Writing Facility Any Opaque Object that ø 5mm Writing Screen Mohs hardness of 7 PC System Optional TV Tuner Optional ATV DVB T Inputs and Outputs HDMI 2 S Video 1 Coaxial 1 Audio IN 2 VGA IN 2 AV OUT 1 Touch OUT 1 CI IN 1 AV IN 1 Component 1 AC IN 1 Power 1 Sound System Power Amplify 30W Number of Sound box 2 Sound Surround Power Power Requirements 100 240 V AC 50 60 Hz Overall Power Con...

Страница 10: ...580111594 Processor Intel i5 Graphics Integrated Intel HD4000 Sound Card Integrated High Definition AudioStereo Networking Integrated 10 100 1000 Mbps adapted Memory 4 GB DDRIII Hard Drive 500 GB SATA WIFI 802 11 a b g n 2x2 dual band WiFi 2 4 5 GHz Bluetooth 4 0 USB 4x USB 2 0 and 2x USB 3 0 Lan Port RJ45 1 VGA Out 1 Audio Side Headphone and Mic Ports Net Gross Weight 1 1 3 kg Processor Intel i5 ...

Страница 11: ...r Manual SW Manual Styluses Battery Remote Control Power Cords VGA Cable USB Cable Audio Cable and USB Flash Drive with software packages Quick User Guide User Manual SW Manual 2x Stylus Batteries Remote control Power Cord EU UK US VGA Cable USB Cable Audio Cable USB Flash Drive ...

Страница 12: ...channel number order Move between OSD items menu up and down 5 VOL Volume adjust Set value of the item in the OSD menu move left right 6 Remote control signal receiver Receive the remote control signal After pressing the button on the remote control LED flashes 7 Power indicator Indicator color shows the status of power on off on green standby mode orange off off ...

Страница 13: ... USB cable For calibration and settings of the external device to install Touch Service Driver 6 AV IN Compound video Audio IN 7 RF IN CATV interface antenna input Only for analog and digital TV mode 8 COAXIAL Coaxial output for audio devices 9 RS 232 Configuration serial interface used for data transfer and device control 10 AV OUT Audio Video OUT to an external display device 11 S VIDEO S VIDEO ...

Страница 14: ...ernal device audio input 19 MIC Connect a collect device with microphone 20 VGA OUT Connect External Display VGA IN to the output device 21 Connect USB device 2 0 such as Hard Disk USB keyboard mouse etc 22 Connect USB device 3 0 such as Hard Disk USB keyboard mouse etc NOTE Do not include interface 16 17 18 19 20 21 a 22 if unit excludes internal PC and 7 9 without TV Tuner ...

Страница 15: ...14 4 4 Remote control ...

Страница 16: ...omputer 11 INPUT Source selected button 12 MENU Menu display input source selection 13 RESET ASPECT Press reset touch frames under the PC HDMI VGA source Adjust the picture ratio Easy Service Driver must be installed 14 RED ALT TV source button ALT key in WINDOWS mode of internal computer 15 GREEN TAB TV source button TAB key in WINDOWS mode of internal computer 16 YELLOW DESKTOP TV source button ...

Страница 17: ...close button 32 F2 Function button Teletext conceal button 33 F3 Function button Teletext index button 34 F4 Function button Teletext zoom in button 35 F5 Function button Teletext lock button 36 F6 Function button Teletext sub page button 37 ANGLE F7 F7 Function button Display the concealed teletext button 38 SUBTITLE F8 digital TV sub title button F8 Function button 39 F9 Function button 40 GOTO ...

Страница 18: ...inst Please do not mix new and old batteries Replace the cover by aligning the base of the remote control and pressing it back into place b Remote control area The range of remote control receiver is as shown Please throw the scrap batteries into the recycle bin by way of environmental protection CAUTION RISK OF EXPLOSION IF BATTERY IS REPLACED BY AN INCORRECT TYPE DISPOSE OF USED BATTERIES ACCORD...

Страница 19: ...ower on g When using a laptop redirect the output to LED LCD Monitor press functional F key The value of the F key varies by notebook manufacturers h If picture signal of external computer is not detected automatically press INPUT to switch to VGA1 VGA2 source i For calibration and settings of the external device to install Touch Service Driver NOTE The best resolution of external computer input i...

Страница 20: ...ve VGA OUT HDMI OUT Audio OUT USB Interface Support Resolution 800 600 1024 768 1920 1080 5 3 TV Aerial optional a Connect a RF cable with CATV terminal b Plug the POWER cord and switch it on from the rear panel c Press to turn the power on d Press INPUT switch to TV source ATV DTV e Press MENU and select auto tuning 5 4 A V Connection 5 4 1 AV IN ...

Страница 21: ... Press to turn the power on d Press INPUT switch to AV source 5 4 2 S VIDEO a Connect S VIDEO cable with the device with S VIDEO b Connect the audio cable for audio red connector is Audio R right white connector is the Audio L left c Plug the POWER cord and switch it on from the rear panel of LED LCD Monitor d Press to turn the power on e Press INPUT switch to S VIDEO source 5 4 3 YPbPr ...

Страница 22: ...nect a HDMI cable with the device with HDMI b Using the appropriate drivers for your graphics card with HDMI output and HDMI cable video sound does not need to use extra audio cable for audio c Plug the POWER cord and switch it on from the rear panel d Press to turn the power on e Press INPUT switch to HDMI source 5 4 5 Coaxial Connecting a Connect a Coaxial cable with the device with coaxial conn...

Страница 23: ... and switch it on from the rear panel c Press to turn the power on d Press INPUT switch to HDMI source e Setup the VGA OUT or Multi Screen in the WINDOWS mouse right click on Desktop run Screen Resolution item of internal computer NOTE VGA OUT can output the image in the internal computer only 5 4 7 AV OUT Connect other display ...

Страница 24: ...put the picture and sound of TV S VIDEO and AV source to external display 5 4 8 USB Device Connection of USB devices For control of internal computer 5 4 9 Network Cable 5 4 10 Microphone 5 4 11 RS232 connecting optional part of TV Tuner ...

Страница 25: ...tions such as power on off or adjust the volume etc 5 4 12 Internal PC basic operations a Wait about 30 seconds after the machine connects to the mains press POWER get the unit ready in standby mode b Then press the button internal computer will start c To switch the internal computer off double press ...

Страница 26: ...ith the TV set a Press INPUT to display the input source list b Press or INPUT to select the input source you want to choose c Press ENTER to enter the input source d Press EXIT to quit 6 2 First time Installation a Press to select OSD Language press OK to select language and to enter sub menu b Press to select Country press OK to start tuning ...

Страница 27: ...26 6 3 Auto Tuning 6 4 ChannelMenu Press MENU to display the main menu and press to select theitem ...

Страница 28: ...lay the information of current program CI lnformation Display the information of the Cl card 6 4 1 DTV ManuaI Tuning ATV ManuaI Tuning On 6 4 2 Program Edit The four colored key is the shortcut key for programming the channel a First press to highlight the channel you want to delete or move or skip then b Press the RED button to delete the channel c Press the YELLOW button to select and press to m...

Страница 29: ...nformation about the signal 6 4 4 Cl lnformation Press button to select Cl lnformation then press OK button to display details if you have inserted the CIcard 6 4 5 ScreenMenu Screen Menu is available only in PC D815 or DVI mode When DVI signal input only Horizontal Position and Vertical Position can be adjusted ...

Страница 30: ...hlight one of the following options b Press ENTER or enter next sub menu to adjust it c Press EXIT to clear on screen menu or MENU back to the previous menu Picture Mode When Picture Mode is set to Personal the following settings can be manually adjusted Press P MODE shortcut button on the remote control to select picture mode directly Contrast Brightness Color Tint Sharpness Highlight the item an...

Страница 31: ...Only in Personal mode the follow items can be adjusted Bass Adjust the low frequency band response Treble Adjust the high frequency band response Balance Adjust the level of sound coming from the left or right speaker Auto Volume Set to reduce the fluctuation of the sound between channels and programs automatically SPDIF MODE Off Auto PCM Select the SPDJF mode AD Switch Set AD switch on or off 6 7...

Страница 32: ...nt the TV to remain on after your last operation Cancel by setting it to Off OSD Timer Select the time in seconds that you want the on screen display to remain on after your last operation 6 8 Lock Menu Press MENU to display the main menu and press to select the Lock Menu Lock System The default password is 0000 and the master password is 4711 The following items will work only when Lock system is...

Страница 33: ...File System check and set the PVR file system Record List Select to view the record list Aspect Ratio Set the display aspect ratio till the picture is fit onto the screen The options are different according to different input source BIue Screen Set the screen background color blue or not when no valid signal input When analog TV input and has no signal snow noise will display if this option is cle...

Страница 34: ...about program c Press the YELLOW button to display the schedule list which will show all the timers you have set for reminding and recording d Press the BLUE button to setup a timer for reminding if you want the TV to remind you to watch a specified program when it s going to start NOTE When the time appointment is in conflict a warning message will appear ...

Страница 35: ... choose in menu SCREEN horizontal and vertical sync Only in the case of VGA connections Background streaking 1 Choose auto adjust 2 Adjust clock and phase Press the MENU button on the remote control and choose in menu SCREEN horizontal and vertical sync Only in the case of VGA connections False color 1 Check the VGA 2 Adjust Chroma brightness and contrast Press the P MODE button on the remote cont...

Страница 36: ... panel of computer 3 Check the audio cable VGA OUT silence 1 Check for proper audio connection 7 1 Software Reinstallation All software packages that come with the MULTI Touch LED LCD are already installed on the internal MINI PC optional If it is necessary to reinstall the software use an USB Flash Drive with software in USB ports in MINI PC or in your external PC There is also possible to reinst...

Страница 37: ... See also the MyScript Stylus User Guide help file in MyScript Stylus folder on USB Flash Drive Active Touch keyboard feature in Windows can interfere with MyScript Stylus We recommend you to deactivate Windows Touch keyboard to use it properly 1 Click on Start and choose Control Panel 2 Search and click on Tablet PC settings 3 Choose Other 4 Click on Go to Input Panel Settings 5 In Opening tab de...

Страница 38: ...er control unit with RS232 protocol 8 1 Description Hardware specification LED LCD communication port is in the rear side near the Tuner 1 Connector type DSUB 9 Pin Male 2 Pin Assignment Male DSUB 9Pin outside view Pin Signal Remark 1 NC 2 TXD Output to TV 3 RXD Input from TV 4 NC 5 GND 6 NC 7 NC 8 NC 9 NC frame GND Pin2 is TXD Pin3 is RXD Pin to Pin connection as below ...

Страница 39: ...nu 1379 DEBUG Item 6 switch on OFF AA BB CC 01 01 00 02 DD EE FF Switch input signal ATV AA BB CC 02 01 00 03 DD EE FF DTV AA BB CC 02 02 00 04 DD EE FF AV AA BB CC 02 09 00 0B DD EE FF YPBPR AA BB CC 02 0B 00 0D DD EE FF VGA1 AA BB CC 02 03 00 05 DD EE FF VGA2 AA BB CC 02 04 00 06 DD EE FF HDMI1 AA BB CC 02 06 00 08 DD EE FF HDMI2 AA BB CC 02 07 00 09 DD EE FF USB AA BB CC 02 05 00 07 DD EE FF PC...

Страница 40: ...DD EE FF NUM_5 AA BB CC 07 08 00 0F DD EE FF NUM_6 AA BB CC 07 09 00 10 DD EE FF NUM_7 AA BB CC 07 0A 00 11 DD EE FF NUM_8 AA BB CC 07 0B 00 12 DD EE FF NUM_9 AA BB CC 07 0C 00 13 DD EE FF NUM_0 AA BB CC 07 0D 00 14 DD EE FF AA BB CC 07 0E 00 15 DD EE FF CH_RETURN AA BB CC 07 0F 00 16 DD EE FF ASPECT AA BB CC 07 10 00 17 DD EE FF SOURCE AA BB CC 07 11 00 18 DD EE FF MENU AA BB CC 07 12 00 19 DD EE...

Страница 41: ... AA BB CC 07 39 00 40 DD EE FF DVD Function 1 optional DVD_PALY_P AUSE AA BB CC 04 00 00 04 DD EE FF DVD_PAUSE AA BB CC 04 01 00 05 DD EE FF DVD_STOP AA BB CC 04 02 00 06 DD EE FF DVD_FF AA BB CC 04 03 00 07 DD EE FF DVD_FR AA BB CC 04 04 00 08 DD EE FF DVD_PREV AA BB CC 04 05 00 09 DD EE FF DVD_NEXT AA BB CC 04 06 00 0A DD EE FF DVD_1 AA BB CC 04 07 00 0B DD EE FF DVD_2 AA BB CC 04 08 00 0C DD EE...

Страница 42: ...0 20 DD EE FF DVD_DOWN AA BB CC 04 1D 00 21 DD EE FF DVD_LEFT AA BB CC 04 1E 00 22 DD EE FF DVD_RIGHT AA BB CC 04 1F 00 23 DD EE FF DVD_ENTER AA BB CC 04 20 00 24 DD EE FF DVD_GOTO AA BB CC 04 21 00 25 DD EE FF DVD_REPEAT AA BB CC 04 22 00 26 DD EE FF DVD_SETUP AA BB CC 04 23 00 27 DD EE FF DVD_DEVICE AA BB CC 04 24 00 28 DD EE FF DVD_PROG AA BB CC 04 25 00 29 DD EE FF DVD_CARD AA BB CC 04 26 00 2...

Страница 43: ...o not handle liquids near or on the unit b Don t use machine for a long time Don t use system for long periods of time please unplug unit when not in use To prevent system failures and power supply surges use power surge protector c Display modes YPbPr Mode Resolution Display Mode Vertical frequency Hz 480p 480i 60 576p 576i 50 720p 50 60 1080i 50 60 1080p 50 60 VGA Mode Resolution Display Mode Ve...

Страница 44: ... effort has been made to ensure all information contained in this user guide is correct but the accuracy or completeness is not guaranteed Before using this product you must evaluate it and determine if it is suitable for your intended application You assume all risks and liability associated with such use Any statements related to this product which is not contained in this manual or any contrary...

Отзывы: