background image

CHAPTER 5  FUNCTIONS

5-14

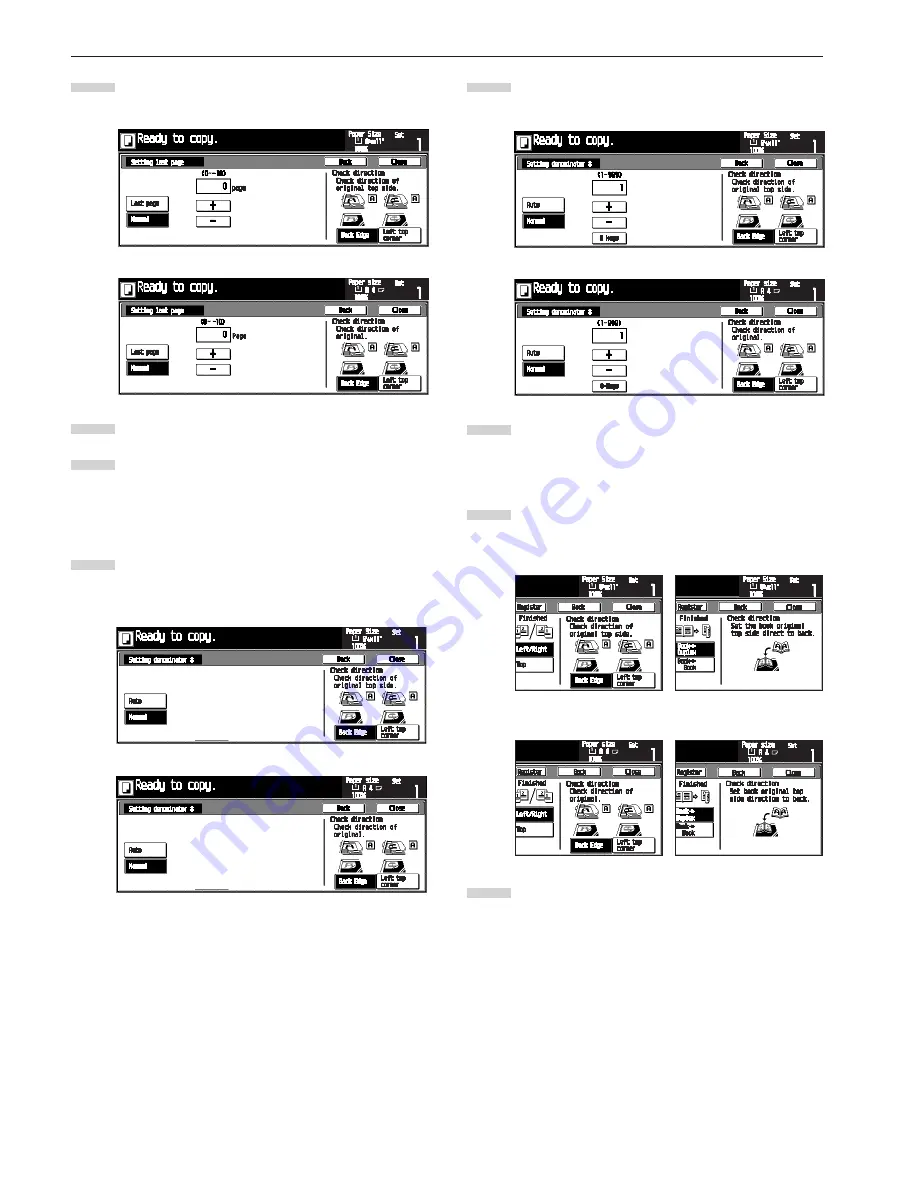
Touch the [Manual] key.
The denominator number set-up screen will appear.

Specify the denominator number by touching the [+] key
or [–] key.
The numeric keys can also be used by touching the
[# keys] key.

Check the orientation of the originals according to the
message.

Copying will start when the [Start] key is pressed.

Touch the [Manual] key.
The last page set-up screen will appear.

Specify the last page by touching the [+] key or [–] key.

Press the [Close] key.
The touch panel will return to the numbering style set-
up screen.
When the “1/n” is selected, the [set denominator #] key
will appear.

When setting the denominator number manually, touch
the [set denominator #] key.
The “Setting denominator #” screen will appear.

16

Inch specifications

Metric specifications

17

18

13

14

15

Inch specifications

Metric specifications

Inch specifications

Metric specifications

1-sided or 2-sided originals

2-page (open-face) originals

1-sided or 2-sided originals

2-page (open-face) originals

19

12

Inch specifications

Metric specifications

Содержание DC 2025

Страница 1: ...Instruction Handbook DC 2025 2035 Digital Multifunctional System ...

Страница 2: ...egistered mark The Auto Shut off time setting becomes 15 to 120 minutes in the areas correspond ing to the Swiss Energy 2000 program All rights reserved No part of this material may be reproduced or transmitted in any form or by any means electronic or mechanical including photocopying recording or by any information storage and retrieval system without permission in writing from the Publisher Leg...

Страница 3: ...attention to or incorrect compliance with the related points Symbols The symbol indicates that the related section includes safety warnings Specific points of attention are indicated inside the symbol General warning Warning of danger of electrical shock Warning of high temperature The symbol indicates that the related section includes information on prohibited actions Specifics of the prohibited ...

Страница 4: ...argin 5 6 4 Making copies with clean edges Border erase mode 5 8 1 Erasing blemishes from edges of copies Sheet Erase 5 8 2 Erasing blemishes from the edges and middle of copies made from books Book Erase 5 8 5 One copy from two or four originals Layout copy 5 10 1 2 in 1 5 10 2 4 in 1 5 10 6 Printing page numbers on the copies Print page numbers function 5 12 7 Overlaying images Form overlay mode...

Страница 5: ...ault settings 6 24 3 Print Form 6 34 4 Selection of language 6 36 5 Drum refreshing 6 37 CHAPTER 7 OPTIONAL EQUIPMENT 7 1 1 Duplex Document Processor 7 1 2 Document Processor 7 2 3 Paper Feeder 7 3 4 Paper Feeder 7 3 5 Document Finisher 7 3 6 Document Finisher 7 6 7 Built in Finisher 7 6 8 Duplex unit 7 7 9 Job separator 7 8 10 Key counter 7 8 11 Printer board 7 8 12 Network scanner 7 8 13 Fax Kit...

Страница 6: ...copy from two or four origi nals Layout copy page 5 10 5 Copying two page originals as separate pages Page separation copy mode page 5 4 When optional duplex document pro cessor is installed 4 Duplex copying from various originals Duplex copy page 5 1 When optional duplex unit is installed 9 Printing page numbers on the copies Print page numbers function page 5 12 25 400 50 70 141 400 abcdefghijk ...

Страница 7: ...d on the touch panel Touch panel language selection page 6 36 25 A full range of optional equipment is available 䡵 Duplex Document Processor page 7 1 䡵 Printer board page 7 8 1 E C D A B 5 3 4 1 2 E D C B A 5 4 3 2 1 B A 18 Inverting black and white Invert copy mode page 5 28 1 2 3 4 5 6 7 8 A B C C B A English Español 䡵 Document Processor only for Copiers with a copy speed of 25 copies per minute...

Страница 8: ...䡵 Printer board page 7 8 v 䡵 Job separator page 7 8 䡵 Network scanner page 7 8 䡵 Key counter page 7 8 䡵 Duplex unit page 7 7 䡵 Built in Finisher page 7 6 䡵 Document Finisher page 7 3 䡵 Document Finisher page 7 6 䡵 Paper Feeder page 7 3 䡵 Fax kit page 7 8 ...

Страница 9: ...mperature inside Do not touch parts in this area because there is a dan ger of getting burned Label 4 High temperature inside Do not touch parts in this area because there is a danger of getting burned Label 3 Moving parts inside May cause personal injury Do not touch moving parts NOTE DO NOT remove these labels Label 2 Do not incinerate toner and toner containers Dangerous sparks may cause burn C...

Страница 10: ... humidity or dust and dirt if dust or dirt become attached to the power plug clean the plug to avoid the danger of fire or electrical shock Avoid locations near radiators heaters or other heat sources or locations near flammable items to avoid the danger of fire To keep the copier cool and facilitate changing of parts and maintenance allow access space as shown be low Leave adequate space especial...

Страница 11: ... the power cord from the outlet ALWAYS remove the power plug from the outlet when moving the copier If the power cord is damaged there is a danger of fire or electrical shock If the copier will not be used for a short period of time overnight etc turn the power switch OFF 嘷 If it will not be used for an extended period of time va cations etc remove the power plug from the outlet for safety purpose...

Страница 12: ...duct as intended does not re sult in inhalation of excessive dusts Keep away from children Do not incinerate toner and toner containers Danger ous sparks may cause burn Other precautions Always read the safety instructions which are included in the box or printed on the container when handling consumables Dispose of the toner or toner containers in accordance with Federal State and Local rules and...

Страница 13: ...e for copying Place originals face down with the edges aligned with the size scales on the left and rear sides of the platen 6 Original size scales Be sure to align the original with these when setting the original on the platen 7 Drawer 1 Holds up to 500 sheets of standard paper standard paper specified by our company 8 Drawer 2 Holds up to 500 sheets of standard paper standard paper specified by...

Страница 14: ...after toner container replacement or when copy images become soiled with toner F Front cover Open to replace the toner container or waste toner box G Main switch Turn ON I before starting to make copies H Copy store section Copied paper is stored here I Length adjustment plate Adjust to the length of the paper to be set in the drawer J Width adjustment lever Hold the lever and adjust the width gui...

Страница 15: ... the copier functions The indicator lights or blinks green or orange according to the state of the machine E Printer key Indicator Press to use the optional printer functions The indicator lights or blinks green or orange according to the state of the ma chine F Scanner key Indicator Press to use the optional scanner functions The indicator lights or blinks green or orange according to the state o...

Страница 16: ...the machine status and required operations 2 Displays the size and magnification ratio of the paper set in each drawer 3 Displays the number of copies to be made 4 Paper size keys Indicator icon Displays the size of paper that is set in each of the drawers When selecting the drawer from which paper will be fed touch the appropriate key to highlight that key The key is displsyed when the special pa...

Страница 17: ...at the lorwer right cor ner the setting screen will be displayed Resister key Touch this key to register the settings to a registration key Back key Touch this key to return to the initial screen of the current mode Close key Touch this key to return to the previous screen NOTE Displayed keys on the Basic User choice screen can be changed or added using Customize Main function on page 6 32 or Cus ...

Страница 18: ...CHAPTER 2 NAMES OF PARTS 2 6 ...

Страница 19: ...e each drawer can be set to hold paper of any desired size from 11 17 to 5 1 2 8 1 2 Metric specifications The each drawer can be set to hold paper of any desired size from A3 to A5R and Folio IMPORTANT Set the type of paper standard paper recycled paper letter heads or colored paper to be loaded in the drawer in Paper type 1st to 2nd cassette on page 6 16 1 1 How to load paper Pull the drawer out...

Страница 20: ...paper is kept under the claws of the drawer If not reload the paper 4 NOTE Before leaving the copier in disuse for a prolonged period of time remove the paper from the drawer s and seal it in its origi nal packaging to protect from moisture Also when storing pa per in a high temperature and high humidity environment seal it in a moisture proof bag 3 Loading paper into the multi bypass Special pape...

Страница 21: ...sing the optional printer function envelopes can be set in the multi bypass NOTE The types of envelopes that can be used are COM 10 Mon arch DL and C5 Up to 20 envelopes can be loaded in the multi bypass at a time Open the multi bypass Align the insert guides with the envelope size Open the flap of the envelope and set it with the copy side facing up ward With the flap facing the outside in sert t...

Страница 22: ... times or more to loosen and mix the toner inside 2 Replacing the toner container and waste toner box If Add toner to resume copying appears on the message dis play replenish the toner Although several copies can be made after the message appears it is recommended to replace the toner container immediately After replacing the toner container be sure to also replace the waste toner box Replenish to...

Страница 23: ...in Remove the grid cleaner and replace the cap Fit the new waste toner box into the copier Grasp the handle on the toner container and insert the toner container along the rail of the printer Hold the toner container by hands and fully insert it into the printer Remove the waste toner box Close the opening of the waste toner box with its seal CAUTION Do not incinerate toner and toner containers Da...

Страница 24: ...PER 3 6 Gently pull the cleaning shaft as far as it will go push and pull it several times and then push it back in IMPORTANT Do not pull the cleaning shaft with force or pull it out completely Close the front cover 15 1 2 16 ...

Страница 25: ...de see page 5 22 Adding covers for copies see page 5 23 Feeding a paper as a backing sheet for transparencies see page 5 26 Inverting black and white see page 5 28 Making mirror image copies see page 5 29 Copying large number of originals in one batch see page 5 30 1 Basic copying procedure 1 Warm up Turn the main switch ON At the end of warm up Ready to copy will appear on the message display NOT...

Страница 26: ...ghter When adjusting the copy exposure automatically touch the Ex posure mode key and then the Auto key to set the Auto Expo sure mode In the Auto Exposure mode copy exposure is auto matically adjusted to an appropriate level based on the exposure of the original When touching the ECO key to highlight it the copier turns into the toner economy mode In the toner economy mode the expo sure level wil...

Страница 27: ...ality key to open the Orig image quality screen Text Photo mode Touch the Text Photo key to highlight it Set this mode to copy originals with mixed text and photo Photo mode Touch the Photo key to highlight it With this mode a dimentional effect of photo is added Text mode Touch the Text key to highlight it With this mode pencil and fine lines are clearly copied NOTE The default copy quality mode ...

Страница 28: ...remove the paper from the drawer or multi bypass used and turn the paper upside down CAUTION If the copier will not be used for a short period of time over night etc turn the main switch OFF 嘷 If it will not be used for an extended period of time vacations etc remove the power plug from the outlet for safety purposes during the time the copier is not in use 1 Auto magnification selection mode The ...

Страница 29: ... Touch the key or key to change the displayed mag nification ratio The numeric keys can also be used by touching the keys key Copying will start when the Start key is pressed Touch the Paper size key to specify the paper size and then touch the AMS key The magnification ratio will be displayed Copying will start when the Start key is pressed 2 3 1 2 Inch specifications Metric specifications 3 4 25...

Страница 30: ... key The Reduce Enlarge screen will appear Touch the key corresponding to the desired zoom ratio NOTE The zoom ratio can be changed in increments of 1 from the selected ratio by pressing the key or key Copying will start when the Start key is pressed 1 2 Inch specifications Metric specifications 3 4 XY zoom mode It is possible to set the zoom ratio for the length and the width of the copy independ...

Страница 31: ...e resumed at the same settings as before after the rush job is finished Press the Interrupt key to light the indicator The Inter rupt mode OK screen will appear Remove the present original s and put it them aside Set the new original s and execute copying When copying ends press the Interrupt key again and replace the newly copied original s with the one s re moved before Then press the Start key ...

Страница 32: ...eset Energy Saver 5 Auto shut off function This function automatically turns the main switch OFF 嘷 if no copying operation is performed for a certain period 15 to 240 minutes To make copies again set the main switch to the ON I position Auto shut off function The auto shut off function is a power saving feature which auto matically turns the main switch OFF 嘷 when a certain time elapses with out c...

Страница 33: ...zes that can be used are A3 to A5R 2 Duplex copying from a book original Facing pages of a magazine or book are copied on both sides of the paper by a single press of the Start key IMPORTANT Inch specifications The original size that can be used in this mode is limited to 11 17 and 8 1 2 11 Metric specifications The original size that can be used in this mode is limited to A3 A4R and A5R 1 2 1 2 1...

Страница 34: ...e top the copies are oriented in the same direction Set the original s Touch the 2 sided Separation key The 2 sided Separation screen will appear Touch the 2 sided 2 sided key for 2 sided originals Book 2 sided key for 2 page open face originals or 1 sided 2 sided key for 1 sided originals If you touch the 2 sided 2 sided key or Book 2 sided key go to the next step If you touch the 1 sided 2 sided...

Страница 35: ...ying will start Specify the binding orientation of finished copies Check the orientation of originals according to the mes sage IMPORTANT If the orientation of the originals is incorrect it may result in wrong finished copies 5 6 7 8 Start Stop Clear 5 6 8 9 0 Inch specifications Metric specifications 1 sided or 2 sided originals 2 page open face originals 1 sided or 2 sided originals 2 page open ...

Страница 36: ...own the middle and copied onto two separate sheets of paper IMPORTANT Inch specifications The available size of originals is limited to 11 17 and 8 1 2 11 and paper size is limited to 11 8 1 2 Metric specifications The available size of originals is limited to A3 A4R and A5R and paper size is limited to A4 2 Page separation copies from two sided originals Each face of a two sided originals is copi...

Страница 37: ...ction keys will appear Touch the 2 sided 1 sided or Book 1 sided key ac cording to the type of the originals Specify the binding orientation of the originals Check the orientation of originals according to the mes sage IMPORTANT If the orientation of the originals is incorrect it may result in wrong finished copies 4 8 7 5 6 Inch specifications Metric specifications 2 sided originals 2 page open f...

Страница 38: ...gin is set to Auto 2 Front back margin When making two sided copies the margin positions and mar gin width can be selected separately for the front and back sides of the copies Inch specifications The margin width can be set to 0 1 8 1 4 3 8 1 2 5 8 or 3 4 Metric specifications The margin width can be set to 0 mm or between 1 mm and 18 mm in increments of 1 mm Set the original s IMPORTANT Be sure ...

Страница 39: ...front side margin touch the Front Back margin key The Back page margin screen will appear Set the desired margin by touching the 쑿 쑼 쑿 or 씰 key Check the orientation of originals according to the mes sage IMPORTANT If the orientation of the originals is incorrect it may result in wrong finished copies Copying will start when the Start key is pressed Inch specifications Metric specifications 4 Inch...

Страница 40: ...tes the center border Center Inch specifications The Border width can be selected from 0 1 8 1 4 3 8 1 2 5 8 and 3 4 The Center width can be selected between 1 8 and 1 1 2 in increments of 1 8 Metric specifications The Border width can be selected between 0 mm and 18 mm The Cener width can be selected between 0 mm and 36 mm NOTE The initial value of the erasing border width can be set See Default ...

Страница 41: ...r and Center when the book erase is selected set up screen will appear Touch the key or key to set the width of border The numeric keys can also be used by touching the keys key Copying will start when the Start key is pressed 4 Inch specifications Metric specifications 5 6 ...

Страница 42: ... onto one sheet though this will require the optional duplex unit When setting the originals on the platen originals are arranged in the order from 1 to 2 2 4 in 1 Use this mode to copy four originals onto one sheet It can be used in conjunction with the duplex copy mode to copy eight origi nals onto one sheet though this will require the optional duplex unit When setting originals on the platen o...

Страница 43: ...nding to the desired layout Select the type of borderline by touching the Solid Dot ted or Borders key If a borderline is not necessary touch the None key IMPORTANT If the message Select drawer appears close the Combine screen and select the drawer Press the Start key Scanning will start When originals are set in the Document Processor copy ing will start after scanning the set originals When an o...

Страница 44: ...f the copy The arrow in the illustration indicates the direction that the origi nals are being fed Set the originals Press the Function key The Function screen will appear Touch the Page key The Page screen will appear 6 Printing page numbers on the copies Print page numbers function 1 2 Inch specifications Metric specifications 3 Inch specifications Metric specifications E 5 D 4 C 3 B 2 A 1 E 2 D...

Страница 45: ...et up screen 5 When the start number is not 1 touch the Setting start key Then Setting start screen will appear Specify the start number by touching the key or key The numeric keys can also be used by touching the keys key Press the Close key The touch panel will return to the numbering style set up screen If the page numbering is to be stopped before the last original touch the Last page key The ...

Страница 46: ...st page by touching the key or key Press the Close key The touch panel will return to the numbering style set up screen When the 1 n is selected the set denominator key will appear When setting the denominator number manually touch the set denominator key The Setting denominator screen will appear 16 Inch specifications Metric specifications 17 18 13 14 15 Inch specifications Metric specifications...

Страница 47: ...crements between 10 and 100 The preview will appear to the right side When the originals are set in the Document Processor set the original of the overlay image onto the top of origi nals When the originals are set on the platen set the original of the overlay image Press the Start key Scanning will start When the originals are set on the platen go to the next step Replace the original and press t...

Страница 48: ...3 B4 and A4R 1 1 1 1 1 Finish Right The order of copying will be performed so that the stacked and folded pages of the finished copies will read from right to left 2 2 2 2 2 Finish Left The order of copying will be performed so that the stacked and folded pages of the finished copies will read from left to right Set the originals in the Document Processor IMPORTANT Set the sheet originals with the...

Страница 49: ...pages Press the Start key Scanning will start When originals are set in the Document Processor copy ing will start after scanning the set originals When an original is set on the platen a message for scanning the next original appears Go to the next step Replace the original and then press the Start key Scanning will start When all originals are scanned touch the Scanning fin ished key Copying wil...

Страница 50: ... Copy onto the cover If the original that will be copied onto the front cover is scanned in first the paper onto which it is copied will be in the front cover position after the copies are finished and folded in the center Do not copy onto the cover When the finished copies are folded in the center both the front and back covers will be blank 9 Making a booklet two page open face originals Booklet...

Страница 51: ...ppear Select the type of original and finishing by touching the desired key When the optional document finisher with the center staple function is installed the Center Staple key is dis played allowing the center staple of up to 10 sheets 40 pages When copying the cover touch the Copy on front cov key The Copy on front cover screen will appear Touch the Cover key IMPORTANT When copying the cover s...

Страница 52: ... does not work Set the original s Touch the Function key The Function screen will appear 10 Sorting without document finisher Sort copy Touch the Sort Finish key The Sort Finished screen will appear Touch the Sort ON key Touch the 1 set key Copying will start when the Start key is pressed 2 Inch specifications Metric specifications 1 3 4 Inch specifications Metric specifications 5 6 3 2 1 3 2 1 3 ...

Страница 53: ... available for rotate copy is limited to 11 8 1 2 and 5 1 2 8 1 2 Metric specifications The paper size available for rotate copy is limited to A4 and A5R When the rotate copy function is not used perform the following procedure Touch the Function key and then the Down key The next Function screen will appear Touch the Auto Rotation key The Auto Rotation screen will appear Touch the No rotate key I...

Страница 54: ...rocessor in this mode Inch specifications Originals used in this mode are limited to 11 17 and 8 1 2 11 or 8 1 2 14 and 8 1 2 11 and the width of all original must be the same Metric specifications Originals used in this mode are limited to A3 and A4 or Folio and A4R and the width of all original must be the same Set originals in the Document Processor Touch the Auto Selection key The Auto Selecti...

Страница 55: ... copies Special paper set in the multi bypass is fed as a front cover or as both a front and back cover to the copy sets With this mode 2 sided Front or Blank can be selected for the front cover For the back cover Front Blank or No can be selected 1 An example of two sided copying is illustrated Back Front Blank No 2 sided Front Blank 1 ...

Страница 56: ...k cover When the Cover key is touched the selection screen of the back cover will appear Select the copying condition of the back cover Press the Start key Scanning will start When originals are set in the Document Processor copy ing will start after scanning the set originals When an original is set on the platen a message for scanning the next original appears Go to the next step Replace the ori...

Страница 57: ...ize selection 1 Inch specifications Metric specifications 3 Inch specifications Metric specifications Specify the original size by touching the desired key When specifying the scanning area touch the Input size key The scanning area set up screen will appear Specify the scanning area based on the left rear corner by touching the key or key for the Y and X direc tions The numeric keys can also be u...

Страница 58: ...other static electricity can cause problems This mode automatically place a backing sheet between the transparencies during copy ing for easy handling Copying onto the backing sheet from the same original and multiple copies are possible IMPORTANT Transparecies must be fed from the multi bypass tray Copying onto the backing sheet The originals will be copied onto the transparencies and then the sa...

Страница 59: ...PTER 5 FUNCTIONS 5 27 Touch the OHP back key The OHP back screen will appear Touch the Copy key or Blank key Copying will start when the Start key is pressed 4 Inch specifications Metric specifications 5 6 ...

Страница 60: ... Touch the Function key The Function screen will appear Touch the Down key The next page will appear 1 2 3 Inch specifications Metric specifications 4 Metric specifications Inch specifications 5 Inch specifications Metric specifications 6 16 Inverting black and white Invert copy mode Touch the Invert key The invert copy set up screen will appear Touch the On key Copying will start when the Start k...

Страница 61: ...e Function key The Function screen will appear Touch the 왔 Down key The next page will appear Touch the Mirror key The Mirror screen will appear 1 2 4 Inch specifications Metric specifications Touch the On key Copying will start when the Start key is pressed 5 6 Inch specifications Metric specifications 3 Inch specifications Metric specifications ...

Страница 62: ... to scan different sets of originals into memory at different times and then copy them all at one time A large number of originals can be copied at one time by scanning all of the originals of the same size or type as an individual job and then storing each of those jobs Set the original Touch the Function key The Function screen will appear Touch the Batch Scanning key The Batch scanning screen w...

Страница 63: ...e when high quality copies are not necessary For information on how to select whether you want the toner economy mode to be automatically selected or not each time the copier is turned on see ECO print on page 6 26 The exposure level will be lowered Set the original Touch the Function key The Function screen will appear Touch the 왔 Down key The next page will appear 1 2 4 Inch specifications Metri...

Страница 64: ...the orientation of originals is required Touch the Function key The Function screen will appear Touch the Down key The next page will appear Touch the Orig set direction key The Orig set direction screen will appear Touch the Back Edge or Left top corner key 20 Original set direction 1 3 Inch specifications Metric specifications 4 2 Inch specifications Metric specifications ...

Страница 65: ...nel Touch the Basic key The Basic screen will appear Touch the Program key The Program screen will appear Touch the Register key The Register present setting screen will appear Select the number 1 to 8 of the program to be regis tered The Enter name screen will appear 21 Memorizing frequently used settings Program mode 2 Inch specifications Metric specifications 1 3 Inch specifications Metric spec...

Страница 66: ...r program screen will appear 2 Copying with a registered program On the Basic screen touch the Program key to display the Program screen Select the button of the registered program Set the original and then press the Start key Copying will start with the registered program 6 7 Inch specifications Metric specifications 1 Inch specifications Metric specifications 2 Inch specifications Metric specifi...

Страница 67: ...h the Back or Del key to delete the old button name and enter the new button name and then touch the End key NOTE For details of the character entry see 5 Entering the program name When the message The set program is registered Is it correct is displayed check the name and then touch the Yes key 1 Inch specifications Metric specifications 2 Inch specifications Metric specifications 3 4 Inch specif...

Страница 68: ...Delete key The Delete registration screen will appear Select the program button 1 to 8 you want to delete When the message This program will be deleted Are you sure is displayed touch the Yes key The Program screen will appear 1 Inch specifications Metric specifications 4 Inch specifications Metric specifications 3 2 Inch specifications Metric specifications Inch specifications Metric specificatio...

Страница 69: ...elete the entered characters one by one from the cursor position to the right hand side When the entry is complete touch this key The entry is enabled and the display will return to the previous screen Touch this key to enter 1 space Touch these keys to enter the character Before the character entry you can select the upper case keyboard layout by touching the Space key To return to the lower case...

Страница 70: ...E To enter the upper case characters touch the Shift key to dis play the upper case character keyboard 1 2 3 Inch specifications Metric specifications Touch the End key The message The set program is registered Is it cor rect is displayed Check the name and then touch the Yes key The entry is enabled and the display will return to the previous screen Inch specifications Metric specifications ...

Страница 71: ...to the Register key Some functions in the Basic and the User choice screens can also be registered to the key Use the following steps to register Touch the Function key The Function screen will appear Touch the Combine key The Combine screen will appear 1 3 Inch specifications Metric specifications Inch specifications Metric specifications 2 Inch specifications Metric specifications Inch specifica...

Страница 72: ...nfirm the registration No and then touch the Yes key The Combine key will appear at the right hand side of the Function screen NOTE Some functions in the Basic and the User choice screens can also be registered The Register key will be active with these functions Whether the Register key is displayed or not in the operation screen can be set beforehand in the Display register key screen in the Cop...

Страница 73: ...een The Combine screen will appear Touch the Register key The Register screen will appear Touch the Delete key The Delete registration screen will appear 1 Inch specifications Metric specifications 2 Inch specifications Metric specifications 3 Inch specifications Metric specifications Inch specifications Metric specifications 23 Deleting the Register key ...

Страница 74: ...ch the Combine key The confirmation message will appear Confirm the key name and then touch the Yes key Control returns to the Combine screen 4 Inch specifications Metric specifications 5 Inch specifications Metric specifications ...

Страница 75: ...ment can be managed using up to 8 digit codes for up to 500 departments Limits for the number of copies can be set on a department by department basis 1 Copy management mode CHAPTER 6 COPIER MANAGEMENT Metric specifications 1 2 8 5 4 3 6 7 Inch specifications 1 8 5 4 3 6 7 2 ...

Страница 76: ...nts for the various departments after a suitable period of time Copy counts cannot be cleared individually Follow this procedure to view copy totals It is possible to view the number of copies made on the machine by each department Follow this procedure to print out the number of copies made in each department in report form Turn ON copy management to apply the management settings that you registe...

Страница 77: ... make various settings Registering new ID codes Register a new 8 digit Max ID code and then set the maximum number of copies Display the Management code menu screen See 2 How to display the Management code menu screen 2 How to display the Management code menu screen Display the Management code menu screen Press the Default setting key on the control panel The Default setting menu screen will appea...

Страница 78: ...0 with the numeric keys NOTE Entering 0 enables unlimited copying Touch the Back key to display the Register Delete screen Re enter the ID code and the maximum number of copies Touch the Close key Register Delete screen will appear NOTE To register a new ID code touch the Next Register key and then repeat steps 4 to 6 5 2 3 4 6 Inch specifications Metric specifications Inch specifications Metric s...

Страница 79: ...ode menu screen Touch the ID code Reg Del key The Register Delete screen will appear Select the ID code to be deleted and then touch the Delete key The message Are you sure you want to delete this ID code will appear Make sure to check the code to be deleted and then touch the Yes key The Register Delete screen will appear NOTE To delete other ID code repeat steps 2 to 4 7 8 1 2 3 4 Inch specifica...

Страница 80: ... alter the copy limit of another department repeat steps 2 to 4 Touch the Close key The Management code menu screen will appear Touch the On key below Copy and then touch the Close key The selected management code is turned ON and then the display will return to the Default setting menu screen Altering limits Alter limits for the copies of respective departments without de leting or re registering...

Страница 81: ...f time Copy counts cannot be cleared individually Display the Management code menu screen See 2 How to display the Management code menu screen Touch the Counter clear key A message asking you to confirm the deletion of the copy counts will appear To clear the codes touch the Yes key To cancel touch the No key The copy counts are cleared and the control returns to the Management code menu screen 5 ...

Страница 82: ...y Touch the Close key The Management code menu screen will appear Touch the Close key The display will return to the Default setting menu screen Printing a copy management list Print out the number of copies made in each department in re port form Display the Management code menu screen See 2 How to display the Management code menu screen NOTE Make sure 11 8 1 2 or A4 size paper is set in the draw...

Страница 83: ...The selected settings are turned ON and the display will return to the Default setting menu screen Turning printer management ON OFF optional Turn ON printer management to apply the management settings that you registered See the Instruction manual for the optional printer 4 Making copies when the copier is in the copy management mode When the copier is in the copy management mode the 4 digit Ente...

Страница 84: ...ing a wrong code touch the Clear key and then re enter the code by using the numeric keys When a wrong code is antered the error sound is issued Re enter the correct code The Basic screen will appear and you can copy After copying press the Management key 2 1 Inch specifications Metric specifications Inch specifications Metric specifications 3 ...

Страница 85: ...ether paper in the cassette set in the Special paper is used or not in the auto paper selection mode or in the auto cassette switch ing mode Select what paper size will be displayed on the touch panel for 1st cassette Select what paper size will be displayed on the touch panel for 2nd cassette Select the type standard or special of paper to be loaded in the 1st cassette Select the type standard or...

Страница 86: ...th the optional document finisher or job separator Selects where to eject facsimile paper the in ner tray job separator document finisher or mail box This setting is not displayed when the copier is not equipped with the optional document finisher or job separator Selects the initial screen displayed when the power is turned ON Selects whether you want the beep that sounds when you touch the touch...

Страница 87: ...eric keys The Machine default screen will appear NOTE The 4 digit management pin code can be changed See Man agement code change on page 6 20 Select the item and then perform the settings by follow ing 3 Changing the default settings 3 Changing the default settings Auto cassette switching ON OFF Selects whether the Auto cassette switching function is used or not Display the Machine default screen ...

Страница 88: ...3 4 5 1 Select Special paper in the setting item list at the left hand side of the screen and then touch the Change key The Special paper screen will appear Select the cassette for such special paper as colored paper or recycled paper NOTE To cancel the settings touch Back key The display will return to the Machine default screen Touch the Close key The display will return to the Machine default s...

Страница 89: ... Access ing the machine default setting mode Select Paper size 1st cassette in the setting item list at the left hand side of the screen and then touch the Change key The Paper size 1st cassette screen will appear Select the paper size as 1st cassette to be displayed on the touch panel To use the auto selection mode touch the Auto key NOTE To cancel the settings touch Back key The display will ret...

Страница 90: ...he 2nd cassette See Paper type 1st cassette Check bypass sizing When copying with the multi bypass select whether or not you want to confirm the paper size key of the basic screen in regard to those cassettes that contain such special paper or recycled paper Display the Machine default screen See 2 Access ing the machine default setting mode Select Check bypass size express in the setting item lis...

Страница 91: ...rn to the Default setting menu screen Auto preheat time Select the length of time that you want to elapse after copying ends before the energy saving auto preheat function is engaged Display the Machine default screen See 2 Access ing the machine default setting mode Select Auto preheat time in the setting item list at the left hand side of the screen and then touch the Change key The Auto preheat...

Страница 92: ...to the Default setting menu screen 1 3 4 5 Inch specifications Metric specifications Inch specifications Metric specifications 2 Select FAX output mode optional Select where to eject facsimile paper the inner tray job separa tor document finisher or mailbox Display the Machine default screen See 2 Access ing the machine default setting mode Select Select FAX output mode in the setting item list at...

Страница 93: ... setting menu screen Key sound ON OFF Select whether you want the beep that sounds when you touch the touch panel to be turned ON or OFF Display the Machine default screen See 2 Access ing the machine default setting mode Select Key sound in the setting item list at the left hand side of the screen and then touch the Change key The Key sound ON OFF screen will appear Select panel key sound mode ON...

Страница 94: ...ose key The display will return to the Machine default screen Touch the Close key The display will return to the Default setting menu screen Management code change Change the pin code that gives you access to the various default settings and management IMPORTANT If you do change the management pin code however be sure to keep a note of the new code If you do happen to forget the pin code consult y...

Страница 95: ...ault setting menu screen Auto shut off ON OFF Select whether you want the auto shut off time function to be turned ON or OFF Display the Machine default screen See 2 Access ing the machine default setting mode Select Auto shut off in the setting item list at the left hand side of the screen and then touch the Change key The Auto shut off screen will appear To use the Auto shut off function touch t...

Страница 96: ...to be automatically selected each time originals are set or whether you want to manually select the paper size Sets the most frequently used cassette to be automatically selected before any other cassette The multi bypass tray cannot be selected as the default cassette Specifies which mode you want to be automati cally selected for enlargement reduction zoom copying the fixed size zoom mode or the...

Страница 97: ... settings can be done by touching the Register key in each screen Selects the layout of the main functions in the Basic screen Selects the layout of the functions except the main functions in the copy operating screens 1 4 6 mm 999 ON 1 Exposure Mode 2 Reduce Enlarge 3 Finishing 4 1 2 sided 5 Original size 6 Original quality 7 Margin 8 Erase 9 Combine 10 None 11 None 12 None Default erase width Pr...

Страница 98: ... exposure mode you want to be automatically selected each time the copier is turned on the auto exposure mode or the manual exposure mode Display the Copy default screen See 2 Accessing the copy default setting mode Select Exposure mode in the setting item list at the left hand side of the screen and then touch the Change key The Exposure mode screen will appear Select default mode of copy exposur...

Страница 99: ...en 1 2 3 4 5 Original type Specify the copy quality mode that you want be automatically selected each time the copier is turned on Display the Copy default screen See 2 Accessing the copy default setting mode Select Original type in the setting item list at the left hand side of the screen and then touch the Change key The Original type screen will appear Select default mode of original image qual...

Страница 100: ... the Close key The display will return to the Default setting menu screen Background exp adj Adjust the ground color of the copied paper Display the Copy default screen See 2 Accessing the copy default setting mode Select Background exp adj in the setting item list at the left hand side of the screen and then touch the Change key The Background exp adj screen will appear Touch the Lighter key or D...

Страница 101: ...he display will return to the Default setting menu screen 1 2 3 4 5 Inch specifications Metric specifications Inch specifications Metric specifications 1 2 3 4 5 Inch specifications Metric specifications Inch specifications Metric specifications Default cassette Set the most frequently used cassette to be automatically se lected before any other cassette The stack bypass tray cannot be selected as...

Страница 102: ... 4 5 Inch specifications Metric specifications Inch specifications Metric specifications Default magnification Specify which mode you want to be automatically selected for enlargement reduction zoom copying the fixed size zoom mode or the standard zoom mode Display the Copy default screen See 2 Accessing the copy default setting mode Select Default magnification in the setting item list at the lef...

Страница 103: ...ng menu screen 1 2 3 4 5 Inch specifications Metric specifications Inch specifications Metric specifications Manual exposure adjustment Mixed Adjust the overall exposure level for the Text Photo manual exposure mode Display the Copy default screen See 2 Accessing the copy default setting mode Select Manual exp adj Mixed in the setting item list at the left hand side of the screen and then touch th...

Страница 104: ...3 4 5 Inch specifications Metric specifications Inch specifications Metric specifications Manual exposure adjustment Photo Adjust the overall exposure level for the Photo manual expo sure mode Display the Copy default screen See 2 Accessing the copy default setting mode Select Manual exposure adjustment Photo in the set ting item list at the left hand side of the screen and then touch the Change k...

Страница 105: ... Metric specifications Inch specifications Metric specifications Default erase width Set the initial value of the erasing border width for the sheet erase or the outer erasing border for the book erase in the border erase mode Display the Copy default screen See 2 Accessing the copy default setting mode Select Default erase width in the setting item list at the left hand side of the screen and the...

Страница 106: ...t setting menu screen 1 2 3 4 5 Inch specifications Metric specifications Inch specifications Metric specifications Display register key Sets whether or not to display the Register key in the copy op eration screen The settings can be done by touching the Reg ister key in each screen Display the Copy default screen See 2 Accessing the copy default setting mode Select Display register key in the se...

Страница 107: ...dd function screen will appear Use the arrow keys in the Addition Mode box to select an item and then touch key to move the entry item from the Addition mode box to the appropriate number low in the Resisted mode box NOTE To cancel the settings touch Back key The display will return to the Copy default screen Touch the Close key The display will return to the Copy default screen Touch the Close ke...

Страница 108: ...ist of the default values selected in the Copy Default Setting Machine Report Outputs the list of the default values selected in the Machine Default Setting Counter Report Outputs the average copy density black ratio for each print size of the copy printer or FAX function NOTE Make sure 11 8 1 2 or A4 size paper is set in the drawer If not set it When the wrong paper is set the paper selection scr...

Страница 109: ...r and then the report will be output NOTE To cancel the report output touch the Cancel key When the report is complete the display will return to the Print report menu screen Touch the Close key The display will return to the Default setting screen 5 6 Metric specifications Inch specifications ...

Страница 110: ...he Language screen will appear Touch the key corresponding to the desired language For example the following Basic screen will appear when the Français key is touched 2 1 3 4 4 Selection of language 5 Metric specifications Inch specifications Metric specifications Inch specifications Metric specifications Inch specifications To display the screen with another language do the steps 1 to 3 and then ...

Страница 111: ...fault setting key on the control panel The Default setting menu screen will appear Touch the Drum refresh key The Drum refresh screen will appear Touch the On key The Now drum refreshing message will appear and the paper is fed from the multi bypass to execute drum refreshing NOTE To cancel drum refreshing touch the cancel key When drum refreshing completes after ejecting the pa per the Drum refre...

Страница 112: ...CHAPTER 6 FUNCTIONS 6 38 ...

Страница 113: ...ng and page separation copy ing 1 1 1 1 1 Originals that can be used with the Document Processor Sheet originals only Original weights Single sided original of 35 g m2 to 160 g m2 two sided original of 50 g m2 to 120g g m2 Original sizes 11 17 A3 maximum to 5 1 2 8 1 2 A5R minimum Capacity 100 sheets 8 1 2 11 A4 and smaller 75 g m2 or 80 g m2 70 sheets 8 1 2 14 Folio and larger 75 g m2 or 80 g m2 ...

Страница 114: ...essor Before opening the Document Processor check that no original is present on the original table or original eject cover If present the original may fall off when the Document Processor is opened Set the original with the side to be copied facing down ward Be sure to align the original with the original size scales Hold the Document Processor open close handle and close the Document Processor I...

Страница 115: ...platen 3 Paper Feeder Two Paper Feeders of the same type as drawer in the main body can be added Capacity and the paper loading method is the same as those for the standard drawer in the main unit Paper misfed in the optional Paper Feeder can be removed by opening its left cover 4 Paper Feeder The Paper Feeder holds up to 3 000 sheets of 11 8 1 2 A4 size standard paper Pull the Paper Feeder out to...

Страница 116: ...anned originals will be displayed NOTE Repeat this operation for all originals when using the platen After all the originals have been scanned press the Scanning finished key Copying will begin and finished copies will be ejected face down onto the tray with each full set shifted slightly from the previous one Remove all of the finished copies from the tray 3 3 3 3 3 Copying in the Staple mode Thi...

Страница 117: ...ll not appear Touch the 2 holes key The staple position set screen will appear Press the key that corresponds to the desired position of holes Hole punching will be accomplished as shown in the illustration as viewed from the front of the copies IMPORTANT The position of the holes on each page may differ very slightly due to the fact that holes are punched in one sheet at a time Set the originals ...

Страница 118: ...r Stacking mode If the number of copies to be made in the Non sort mode is set to a number greater than the acceptable limit 250 sheets the fin ished copies will be ejected onto the Sort tray 7 Built in Finisher The finisher stores a large quantity of copies It can also sorts multiple copies into sets by shifting the eject position Paginated copies can be stapled too 1 Sort tray 2 Finisher tray So...

Страница 119: ... 2 Clearing a staple jam Remove the staple cartridge referring to the 1 1 1 1 1 Refilling the Stapling Unit Push up on the tab A on the protective faceplate in order to raise the faceplate Remove the jammed staple from the tip of the staple cartridge the end where staples are set Lower the protective faceplate back into its original posi tion Replace the staple holder back in its original position...

Страница 120: ...rom a com puter is printed out or fax pages are printed out Setting the key counter Insert the key counter securely into the key counter opening NOTE When the key counter function is used copies cannot be made unless the key counter is inserted into the copier If the key counter is not inserted securely Insert key counter appears on the message display 11 Printer board If the printer board is inst...

Страница 121: ...in the selected mode is loaded Check the paper The orientation of the original and the selected paper are different Change the orientation of the original If the Start key is pressed same size copy ing will be performed The number of copies reached the limit set in the copy management mode and no more copies can be made Clear the copy count from the management mode There is not enough toner in the...

Страница 122: ...th the main switch turned ON by following the appropriate procedure Originals have not been fed correctly from the Document Processor op tional Remove the originals with the main switch turned ON by follow ing the appropriate procedure The duplex unit optional is out of order and duplex copying is not pos sible Contact your service representative immediately There are 100 sheets of paper stored on...

Страница 123: ...When paper misfeeds If a paper misfeed occurs copying will stop A misfeed message will appear and the misfeed location will be indicated on the message display Remove the misfed paper by referring to 2 Removal procedures with the main switch Inch specifications Metric specifications Copier Printer Scanner Fax Indicator Lights or Blinks orange Action Take appropriate measures according to the messa...

Страница 124: ...ere is a danger of elec trical shock CAUTION The copier s fixing unit is extremely hot Take sufficient care when working in theis area as there is a danger of getting burned Do not reuse misfed paper If paper is torn during removal be sure to remove all loose scraps from inside the copier or they could cause misfeed later After misfed paper has been removed warm up will begin The Misfeed indicator...

Страница 125: ...area as there is a danger of getting burned Close the left cover 1 2 3 4 5 Misfeed in left cover 1 JAM 35 If the message below appears a misfeed has occurred in the left cover 1 Remove the misfed paper using the procedure given below Pull up the lock lever to open the left cover 1 Remove the misfed paper When the duplex unit is installed raise the duplex unit to remove the misfed paper Remove the ...

Страница 126: ...1 Inch specifications Metric specifications 5 CAUTION The copier s fixing unit is extremely hot Take sufficient care when working in theis area as there is a danger of getting burned Close the left cover 1 Press the START key after the Press Start Key Re starting message appears The message below appears Repeat the steps 1 to 6 The message below appears Perform the appropriate action by following ...

Страница 127: ...ow Remove all the paper remaining in the multi bypass Pull up the lever to remove the misfed paper If the misfed paper cannot be removed go to the next step Pull up the lock lever to open the left cover 1 Remove the misfed paper When the duplex unit is installed raise the duplex unit to remove the misfed paper If the misfed paper cannot be removed go to the next step Open the front cover 2 5 3 4 1...

Страница 128: ...y Remove the misfed paper Replace the internal tray in its original position Close the front cover 2 2 2 2 2 Misfeed in Duplex Document Processor optional JAM 70 to 76 If the message below appears a misfeed has occurred in the Duplex Document Processor Remove the misfed original using the procedure given below If the original is on the original table remove it Open the Document Processor original ...

Страница 129: ...3 3 3 3 Misfeed in Document Processor optional JAM 70 to 73 If the message below appears a misfeed has occurred in the Document Processor Remove the misfed original using the pro cedure given below Open the Document Processor original cover Remove the misfed original If paper is torn during removal be sure to remove all loose scraps from inside the copier or they could cause misfeed later Close th...

Страница 130: ...inisher optional JAM 80 to 89 If a misfeed has occurred in the document finisher remove the misfed paper referring to the operation guide for the document finisher Remove the misfed paper in the built in finisher output section Lower the built in finisher tray Remove the misfed paper Raise the built in finisher tray back into its original posi tion 4 5 6 2 1 3 8 9 7 Metric specifications 1 2 3 ...

Страница 131: ... 4 1 7 2 6 28 4 2 6 28 6 29 3 4 3 1 Connect the plug to an AC outlet Perform the corrective action corresponding to the message When setting originals on the platen place them face down When setting originals in the optional Docu ment Processor place them face up To change the overall exposure perform the auto exposure adjustment Adjust the exposure to the correct degree using the copy exposure ad...

Страница 132: ... 1 3 1 3 1 8 3 9 1 To change the overall exposure perform the auto exposure adjustment Adjust the exposure to the correct degree using the copy exposure adjustment keys To change the overall exposure perform the exposure adjustment for the each copy qual ity mode Clean the platen and or the original cover Open the front cover and pull and push back in the cleaning shaft Clean the transfer roller w...

Страница 133: ...olvents for this purpose Cleaning the platen Lift open the original cover Wipe the platen with a soft cloth damp ened with alcohol or a mild detergent Never use thinner or other organic solvents for this purpose If soiling such as black lines appear on the copy while using the optional Document Processor the slit glass a is soiled Wipe the slit glass with a soft cloth dampened with alcohol or a mi...

Страница 134: ...right along with the separator Close the left cover 1 Cleaning the transfer roller Open the front cover Remove the cleaning brush 3 4 5 Pull up the lock lever to open the left cover 1 While rotating the gear as shown clean the transfer roller by moving the cleaning brush from left to right along with the transfer roller Close the left cover 1 4 5 3 1 2 ...

Страница 135: ... g m2 Duplex unit Standard paper 64 80 g m2 Multi bypass Standard paper 45 200 g m2 special paper letterheads colored paper and transparencies envelopes DL C5 COM 10 Monarch when using the printer function only Continuous copying 1 250 sheets Light source Rare gas lamp Developing system Dry process Fixing system Heat roller Cleaning system Blade Photoconductor a Si Functions and modes Self diagnos...

Страница 136: ...sult in hazardous radiation exposure This label is attached to the laser scanner unit inside the machine and is not in a user access area The labels shown below is attached on the rear side of the machine DANGER INVISIBLE LASER RADIATION WHEN OPEN AVOIDO DIRECT EXPOSURE TO BEAM CAUTION NVISIBLE LASER RADIATION WHEN OPEN ACOID EXPOSURE TO BEAM ATTENTION RAYONNEMENT LASER INVISIBLE SI OUVERT DANGERE...

Страница 137: ...h this declaration relates is in conformity with the following specifications Limits and methods of measurement for immunity characteristics of information technology equipment Limits and methods of measurement for radio interference characteristics of information technology equipment Limits for harmonic currents emissions for equipment input current 16A per phase Limitation of voltage fluctuation...

Страница 138: ...E1 ...

Страница 139: ...UTAX GmbH Ohechaussee 235 22848 Norderstedt Germany ...

Отзывы: