Triumph Adler DC 2018 Скачать руководство пользователя страница 14

Copying Functions 

1-6

ADVANCED OPERATION GUIDE

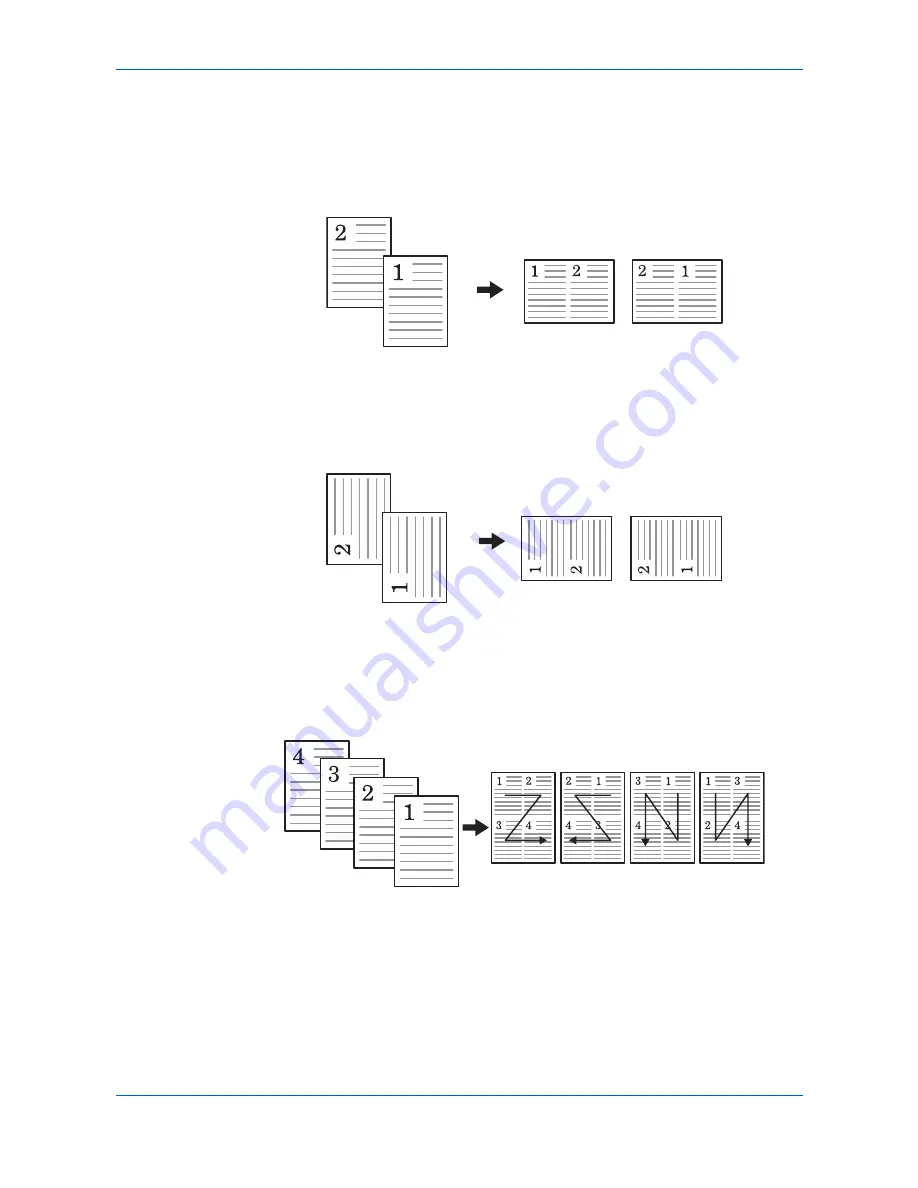
The following illustrations indicate the effects of each direction and layout setting:

2 in 1 > Top Edge to Rear.

2 in 1 > Top Edge to Left

4 in 1 > Top Edge to Rear

Original

Copied Image

Left to Right/Top to 

Bottom

Right to Left

Original

Copied Image

Left to Right/Top to 

Bottom

Right to Left

Original

Copied image

Top to 

Bottom to 

Right

Top to 

Bottom to 

Left

Right to 

Left to 

Bottom

Left to 

Right to 

Bottom

Содержание DC 2018

Страница 1: ...Instruction Handbook Advanced DC 2018 Digital Multifunctional System ...

Страница 2: ......

Страница 3: ...tion 2 1 Scanning Documents 2 2 Using the Address Book 2 4 Selecting Color Scan Mode 2 5 Selecting the Original Quality for Scanning 2 5 Selecting the Scanning Resolution 2 6 Adjusting the Exposure for Scanning 2 6 Selecting the Original Size for Scanning 2 7 Selecting the Send Size 2 7 Zoom Scanning 2 8 Selecting the Original Placement for Scanning 2 8 Continuous Scanning 2 9 Selecting the Image ...

Страница 4: ...g User Login 6 1 ID management 6 1 7 Job Accounting Managing Accounts 7 2 Setting Limitation of Use 7 2 Deleting an Account 7 4 Changing Limitation of Use 7 4 All Account Management 7 4 Individual Account Management 7 5 Default Settings 7 7 Using Job Accounting 7 8 8 Using EWS Embedded Web Server System Requirements 8 1 Accessing EWS 8 2 EWS Pages 8 2 Start Page 8 3 Basic Page 8 6 Printer Page 8 1...

Страница 5: ...nt KX Driver User Guide Describes how to install and set the printer driver This guide is stored on the CD ROM as a PDF document Network FAX Driver Operation Guide Describes how to use the Network FAX Driver to send documents created on a network computer directly from that computer to the other FAX System This guide is stored on the CD ROM as a PDF document Network Tool for Clients Operation Guid...

Страница 6: ...itional or useful information about a function or feature Can also contain references to other publications NOTE For information about storing the pin refer to step 10 Important Used to provide important information IMPORTANT Ensure paper is not folded curled or damaged Caution Cautions are statements that suggest mechanical damage as a result of an action CAUTION Do not pull the cassette out when...

Страница 7: ...em An example of a route map and its significance is shown below System Menu Counter This represents the control panel button to be pressed S or T Press the up or down button until System Setting is displayed System Setting Enter S or T Press the up or down button until Network Setting is displayed Network Setting Enter S or T Press the up or down button until TCP IP Setting is displayed TCP IP Se...

Страница 8: ...Introduction viii ADVANCED OPERATION GUIDE ...

Страница 9: ...Completed and returns to the basic screen Selecting the Original Size for Copying 1 Press Copy The basic screen is displayed 2 Press Original Size 3 Press S or T to select the size of the original or if the size of the original is not shown in the display select Others and press Enter For a standard size the display shows Completed and returns to the basic screen For Others proceed to the next ste...

Страница 10: ...uto the display shows Completed and returns to the basic screen If you selected Manual the Manual screen is displayed Proceed to the next step 4 Press S or T to adjust the required value for the exposure Press Enter The display shows Completed and returns to the basic screen Mode Description Text Photo Select this mode when the original contains a mixture of both text and photographs Photo Select ...

Страница 11: ...Select 3 Press S or T to select the zoom type required and press Enter You can choose 100 Auto Standard Zoom or Zoom Entry For 100 and Auto the display shows Completed and returns to the basic screen The original will be copied on the selected paper size For Standard Zoom press S or T to select the zoom ratio Press Enter The display shows Completed and returns to the basic screen Mode Description ...

Страница 12: ...is displayed 2 Press Function 3 Press S or T to select Orig Placement and press Enter The Orig Placement screen is displayed 4 Press S or T to select either Top Edge to Rear or Top Edge to Left and press Enter The display shows Completed and returns to the Function screen Using the Platen Using the Document Processor 5 Press right Select The display returns to the basic screen Left Top Edge to Rea...

Страница 13: ...asic screen Using Combine Mode The images from either 2 or 4 originals can be reduced and combined onto a single copy The borderline of each original can also be marked with a solid line or a dotted line 1 Press Copy The basic screen is displayed 2 Press Function 3 Press S or T to select Combine and press Enter The Combine screen is displayed 4 Press S or T to select either 2 in 1 or 4 in 1 and pr...

Страница 14: ...ut setting 2 in 1 Top Edge to Rear 2 in 1 Top Edge to Left 4 in 1 Top Edge to Rear Original Copied Image Left to Right Top to Bottom Right to Left Original Copied Image Left to Right Top to Bottom Right to Left Original Copied image Top to Bottomto Right Top to Bottomto Left Right to Left to Bottom Left to Right to Bottom ...

Страница 15: ...e and press Enter The Orig Placement screen is displayed The following illustrations indicate the effects of each borderline setting Solid Line Dotted Line Original Copied Image Top to Bottomto Right Top to Bottomto Left Right to Left to Bottom Left to Right to Bottom Copied Image 4 in 1 2 in 1 Copied Image 4 in 1 2 in 1 ...

Страница 16: ... originals in the document processor 2 Press Copy The basic screen is displayed 3 Select the combine mode For more information refer to Using Combine Mode on page 1 5 4 Press Start The originals are scanned automatically and copying in the combine mode will begin Using the Platen with Combine Mode 1 Place the first original to be copied onto the platen 2 Press Copy The basic screen is displayed 3 ...

Страница 17: ...ctions together to form a single job The copies are then produced in one batch as a single job Selecting Continuous Copying 1 Press Copy The basic screen is displayed 2 Press Function 3 Press S or T to select Continuous Scan and press Enter The Continuous Scan screen is displayed 4 Press S or T to select On and press Enter The display shows Completed and returns to the Function screen 5 Press righ...

Страница 18: ...ess right Select Accepted will appear and copying commences Draft Mode Draft mode enables the machine to consume less toner for a page to save your printing costs This will cause images to be printed lighter than normal without affecting print speed When Draft mode setting is On the printing image becomes lighter but readable 1 Press Copy The basic screen is displayed 2 Press Function 3 Press S or...

Страница 19: ...e the original on the platen or in the document processor 8 Press Start Copying begins immediately and completed copies are delivered to the output tray 9 When the job is completed perform the steps 1 through 4 to select Print Override mode Off File Name Entry The file name is used for an e mail report that notifies the end of copying refer to Sending the Job End Report on page 1 13 It is also lis...

Страница 20: ...asic screen 8 After copying is completed it is stored as a file name The file name can be monitored in the Status menu Refer to Checking Jobs Status on page 4 2 Selected Item File Name Example Description Date and Time doc04272005145608 Adds the date and time to the File Name The example shows how a copying job created at 14 56 08 on April 27 2005 would be named The display sequence of Month Day Y...

Страница 21: ... Enter The Destination screen is displayed 5 Press S or T to select Address Book or Address Entry Press Enter When Selecting an Address Book 1 Press S or T to select the contact address required and press Enter A contact address screen is displayed 2 Press Enter The display shows Completed and returns to the Function screen 3 Press right Select The display returns to the basic screen When there is...

Страница 22: ...1 Enter the e mail address to which you want the report to be sent For details on using the numeric keys to enter characters refer to Character Entry in the Operation Guide Press Enter The display shows Completed and returns to the Function screen 2 Press right Select The display returns to the basic screen ...

Страница 23: ... is used to assist with transmission speed and security issues To use the Scanning Function perform the following steps Program the settings including the e mail setting on the machine Use EWS the internal HTML web page to register the IP address the host name of the SMTP server and the recipient Register the destination in the Address Book or One Touch keys When the PC Folder SMB FTP is selected ...

Страница 24: ... another original replace the original and change the settings as required Press Start When all the originals have been scanned press right Select Entering the E mail Address Using the Operation Panel 1 Press Send The basic screen is displayed 2 Press W The Destination screen is displayed 3 Press S or T to select E mail and press Enter The Address Entry screen is displayed 4 Enter the e mail addre...

Страница 25: ...nter The display shows Completed and returns to the Dest Confirm screen 7 Press Send The display returns to the basic screen Deleting a Destination 1 With the corresponding destination selected press W The Destination screen is displayed 2 Press S or T to select Dest Confirm and press Enter The Dest Confirm screen is displayed 3 Press S or T to select the destination required and press Enter The d...

Страница 26: ...asic screen When a contact address is selected the contact address book is displayed Proceed with the next step 5 Press S or T to select the destination required or if the PC Folder is selected enter the login user name and login password and press Enter The display shows Completed and returns to the basic screen Searching Address Name 1 Display the Address Book screen required 2 Press right Selec...

Страница 27: ...to the basic screen Mode Description Full Color The original will be scanned in full color The scanning exposure will be set to Manual Grayscale The shading of the original will be reproduced The scanning exposure will be set to Manual Monochrome The original will be scanned in monochrome The resulting file size for the scan data will be smaller in comparison with the other color modes Mode Descri...

Страница 28: ...Exposure for Scanning The default exposure is Manual 1 Press Send The basic screen is displayed 2 Press Exposure 3 Press S or T to select the exposure mode and press Enter If Auto is selected the display shows Completed and returns to the basic screen If Manual is selected the Manual screen is displayed Proceed to the next step 4 Press S or T to adjust the value for the exposure and press Enter Th...

Страница 29: ...s Enter The display shows Completed and returns to the basic screen Selecting the Send Size The send size defines the size of the image attached and received This does not apply if Full Color or Grayscale is selected when the images are sent at the same size as their originals 1 Press Send The basic screen is displayed 2 Press Function 3 Press S or T to select Send Size and press Enter The Send Si...

Страница 30: ...play shows Completed and returns to the Function screen The original is scanned so that it fits onto the selected send size Selecting the Original Placement for Scanning 1 Press Send The basic screen is displayed 2 Press left Select 3 Press S or T to select the original placement required and press Enter The display shows Completed and returns to the basic screen Using the Platen Mode Description ...

Страница 31: ...returns to the basic screen Using Continuous Scanning 1 Place the first original on the platen 2 Press Send The basic screen is displayed 3 Enter the destination of the intended recipient from the one touch keys Address Book or W To register one touch keys refer to Registering One Touch Keys on page 5 6 To use the address book refer to Using the Address Book on page 2 4 4 Program the features as r...

Страница 32: ...nd press Enter The Image Quality screen is displayed If Full Color or Grayscale has been selected under Selecting Color Scan Mode on page 2 5 the Image Quality screen is displayed 5 Press S or T to select the image quality level and press Enter The display returns to the Function screen 6 Press right Select The display returns to the basic screen 7 Press Start to start scanning When scanning is co...

Страница 33: ...s necessary On is displayed on the basic screen when any characters are entered in the Subject or the Message and Off is displayed when nothing is entered 1 Press Send The basic screen is displayed 2 Press right Select The Subject Entry screen is displayed 3 Enter the subject 60 characters maximum 4 Once the subject has been entered press Enter The Message Entry screen is displayed 5 Enter the mes...

Страница 34: ... Press Enter When Selecting an Address Book 1 Press S or T to select the contact address required and press Enter A contact address screen is displayed 2 Press Enter The display shows Completed and returns to the Function screen 3 Press right Select The display returns to the basic screen When there is no address to send press left Select to return to the Function screen When Selecting an Address ...

Страница 35: ... to the machine using a USB cable before installing the driver If the Plug and Play screen appears click Cancel 2 Install the TWAIN Driver from the CD ROM on your PC Follow the Wizard instructions to continue the installation procedure 3 From the Start menu select All Programs TWAIN Driver setting TWAIN Driver setting The Scanner List dialog box will be displayed 4 Click Add to access the TWAIN Dr...

Страница 36: ...E Using TWAIN 1 Connect your PC to the machine using a USB cable 2 Place the original on the platen 3 Use the TWAIN compatible application to scan from your PC 4 Choose the appropriate settings and click Scan The scanned data will be sent to your PC ...

Страница 37: ... If you are unsure how to use this route map refer to Accessing Menu Items on page vii 2 Press S or T to select the parallel interface mode setting and press Enter The display shows Completed and returns to the System Setting screen Item Description Auto default The machine automatically changes its communication mode to that of the host computer Ordinarily you should leave this setting unchanged ...

Страница 38: ...n and press Enter The display shows Completed and returns to the Network Setting screen Enter IP addresses etc for a network connection see your network administrator È Connect the network cable Refer to Connecting the Cables in the Operation Guide È Perform the following procedures on the operation panel or EWS Make the network settings Network Settings on page 3 2 Restart the machine Select the ...

Страница 39: ...uration parameters including IP address Subnet Mask etc to devices on an IP network DHCP alleviates the administrative burden of managing individual IP addresses Turn this setting On when DHCP is to be used 1 Access DHCP If you are unsure how to use this route map refer to Accessing Menu Items on page vii 2 To use DHCP select On and press Enter The display shows Completed and returns to the TCP IP...

Страница 40: ...Items on page vii 2 Use the numeric keys to enter each segment of the IP address in turn pressing X or to move between segments 3 Press Enter on completion The display shows Completed and returns to the TCP IP Setting screen If you make an error in entering a portion of the IP address press W to return to the previous block of digits and re enter the correct number 4 Register the Subnet Mask Refer...

Страница 41: ...to return to the previous block of digits and re enter the correct number 4 Register the Default Gateway Refer to Default Gateway Setting on page 3 5 Default Gateway Setting If you are not sure of the appropriate Default Gateway address contact your network administrator 1 Access Default Gateway If you are unsure how to use this route map refer to Accessing Menu Items on page vii 2 Use the numeric...

Страница 42: ...d Line Printer IBM Proprinter DIABLO 630 EPSON LQ 850 or PCL6 the display shows Completed and returns to the Printer Setting screen If you selected KPDL the KPDL Err Rep screen is displayed Select whether or not a report is to be printed out upon a KPDL error 3 Press S or T to select either On or Off and press Enter The display shows Completed and returns to the Printer Setting screen If you selec...

Страница 43: ...on page 8 1 Status Screen The following table explains the meaning of the icons displayed on the Status screen Meaning of the icons Job Type Icon Copy job Print job E mail sending job Folder sending job TWAIN job FAX sending job Option Report print job Job Status Icon The job is being processed Processing of the job has been paused The job has been successfully completed The job could not be succe...

Страница 44: ...us you want to check and press Enter The Detail screen is displayed If the job log is not displayed in the Print Job Log screen there is no available information on job history Press right Select 3 Check the displayed information for that job You can also switch the screen to display other job log information for that print job by pressing S or T 4 Once you have completed verifying the information...

Страница 45: ...enu screen is displayed and processing of the jobs is resumed Canceling Jobs Canceling a print job is carried out from the Print Job Status screen and canceling a send job from the Send Job Status screen 1 Access Print Job Status or Send Job Status If you are unsure how to use this route map refer to Accessing Menu Items on page vii 2 Press S or T to select the job you want to cancel and press lef...

Страница 46: ...t status will be one of the following The machine is ready to print The machine is currently printing The machine is preparing to print 3 Once you have completed verifying the status of printing operations press Enter The display returns to the Status Menu screen Verifying the Toner Status The amount of remaining toner is indicated with a 10 level indicator scale Use this scale as a guide to deter...

Страница 47: ...u Items on page vii 2 Press S or T to select the report that you want to print out and press Enter Are you sure is displayed 3 Press left Select 4 Accepted is displayed and printing of the report will begin After the report is printed the display returns to the Report Print screen Status Job Cancel S or T Status Menu Enter S or T Paper Input Enter Report Name Description Menu Map The machine print...

Страница 48: ...ans 1 Access Counter If you are unsure how to use this route map refer to Accessing Menu Items on page vii 2 To check the total number of print made press S or T to select Printed Pages and press Enter To check the total number of scans made press S or T to select Scanned Pages and press Enter The corresponding Total Counter screen is displayed 3 When S or T is pressed it is possible to change bet...

Страница 49: ...ere are seven available levels Message Language You can select the language of the message display from English Français Deutsch Italiano Nederlands Español Português and optionally download messages in other languages Contact your dealer for information 1 Access Language If you are unsure how to use this route map refer to Accessing Menu Items on page vii 2 Press S or T to select the language to ...

Страница 50: ... is recommended you select the most commonly used mode as the default 1 Access Default Dest If you are unsure how to use this route map refer to Accessing Menu Items on page vii 2 Press S or T to select the default operation mode required and press Enter The display shows Completed and returns to the Common Setting screen Unit of Measurement The unit of measurement selected will be used in the cus...

Страница 51: ...he display shows Completed and returns to the Copy Expo Adj screen Turning Scan Noise Reduction On and Off Scan noise reduction is used to reduce the appearance of black lines which can appear on copy and send jobs when using the document processor 1 Access Scan Noise Redu If you are unsure how to use this route map refer to Accessing Menu Items on page vii 2 Press S or T to select either On or Of...

Страница 52: ...cessing Menu Items on page vii 2 Press S or T to select Toner Gauge Rset and press Enter Are you sure is displayed Press left Select The display shows Completed and returns to the Toner Setting screen System Menu Counter S or T Copy Setting Enter S or T Photo Processing Enter Item Description Error diffusion This is the standard method that should be used and is the factory default setting Copies ...

Страница 53: ...o change and press Enter The screen for the selected default setting is displayed 3 Press S or T to select the new default setting and press Enter The display shows Completed and returns to the Function Default screen Function Available Settings Reference Scan Color Select Full Color Grayscale Monochrome page 2 5 Scan Resolution 200 x 100 Normal 200 x 200 Fine 200 x 400 Sup Fine 300 x 300 dpi 400 ...

Страница 54: ...o use this route map refer to Accessing Menu Items on page vii 2 Press S or T to select the one touch key number to register the destination and press Enter When is displayed the destination is not registered A register screen is displayed 3 Press S or T to select Address Book and press Enter The Address Book screen is displayed 4 Press S or T to select the destination required and press Enter Whe...

Страница 55: ...odes and functions displayed on the operation panel can be registered as a single program Registering a Program 1 Select the copy or send options to be registered for example 5 copies Original size A4 Cassette 1 2 Access Program Setting If you are unsure how to use this route map refer to Accessing Menu Items on page vii 3 Press S or T to select the program number required 1 to 8 and press right S...

Страница 56: ...iginals and press Start Copy jobs or send jobs are produced using the settings registered in the program If the program is called from a one touch key it is necessary to register the one touch key refer to Registering One Touch Keys on page 5 6 Restarting the Machine You must restart the machine after you have changed any network settings 1 Access Restart If you are unsure how to use this route ma...

Страница 57: ...Off On Indicates that Reset Power was pressed in order to reset the current settings Job End Buzzer Off On Indicates that a corresponding copy print or send job was completed or that the machine has returned to an operation ready state Ready Buzzer Off On Indicates that the machine is in an operation ready state Warning Buzzer Off On Indicates that in its current state the machine is unable to per...

Страница 58: ... or Off and press Enter The display shows Completed and returns to the Buzzer screen Error Buzzer Off On Indicates that for some reason the corresponding operation has been terminated paused or that user intervention is required This setting applies when one of the following messages appears on the display Close Top or Document Processor Cover Error occurred Call service person Paper Jam at Cassse...

Страница 59: ...e current hour and press X 7 Press S or T to register the current minute and press X 8 Press S or T to register the current second 9 Press Enter The display shows Completed and returns to the Date Timer Set screen Date Format The display sequence of the date which is displayed at the operating panel can be changed to Month Day Year Day Month Year or Year Month Day 1 Access Date Format If you are u...

Страница 60: ...ress Enter The display shows Completed and returns to the Date Timer Set screen Auto Panel Reset The Auto Panel Reset function automatically returns the machine to the default settings when no operation has been performed on the machine or operation panel for a pre set period of between 5 and 495 seconds The factory default setting for this period is 90 seconds The exception is that the current ex...

Страница 61: ...placed in the document processor the cassettes or MP tray are opened or closed or a print job is received 1 Access Low Power Timer If you are unsure how to use this route map refer to Accessing Menu Items on page vii 2 Press S or T or use the numeric keys to select the time for the Low Power Timer to engage and press Enter The display shows Completed and returns to the Date Timer Set screen Auto S...

Страница 62: ...r Set screen Auto Error Clear If a printing error occurs that still allows printing to continue setting Auto Error Clear to On enables the next job to be printed after a set recovery period Error Clear Time has elapsed The factory default setting for Auto Error Clear is Off The Error Clear Time period can be set between 5 and 495 seconds The factory default time is 30 seconds Enabling Auto Error C...

Страница 63: ...sure how to use this route map refer to Accessing Menu Items on page vii 2 Press S or T or use the numeric keys to select the recovery time and press Enter The display shows Completed and returns to the Date Timer Set screen System Menu Counter S or T Date Timer Set Enter S or T Err Clear Timer Enter ...

Страница 64: ...om and press Enter The Size Entry Y screen is displayed 3 Use the numeric keys to enter the Y dimension width of the original to be registered Once the width is displayed press Enter The Size Entry X screen is displayed 4 Use the numeric keys to enter the X dimension height of the original to be registered Once the height is displayed press Enter The display shows Registered and returns to the Ori...

Страница 65: ...ss Enter The Size Entry Y screen is displayed 3 Use the numeric keys to enter the Y dimension height of the print paper to be registered Once the height is displayed press Enter The Size Entry X screen is displayed 4 Use the numeric keys to enter the X dimension width of the print paper to be registered Once the width is displayed press Enter The display shows Registered and returns to the Orig Pa...

Страница 66: ...e Size Where is the cassette number If you are unsure how to use this route map refer to Accessing Menu Items on page vii 2 Press S or T to select the paper size to be used in that cassette and press Enter The display shows Completed and returns to the Cassette Set screen 3 Press S or T to select Cassette Type and press Enter The Cassette Type screen is displayed 4 Press S or T to select the media...

Страница 67: ...for custom media types 1 through 8 1 Access Media Type Adj If you are unsure how to use this route map refer to Accessing Menu Items on page vii 2 Press S or T to select the media type whose registered paper weight and printing exposure you want to change or select one of the custom settings and press Enter The Media Weight screen is displayed If you selected Custom as the media type the Media Nam...

Страница 68: ...et screen Selecting the APS Auto Paper Selection Media Type Use the following procedure to designate the type of paper that will be used when the Auto setting is selected for the paper source 1 Access APS Media Type If you are unsure how to use this route map refer to Accessing Menu Items on page vii 2 Press S or T to select the media type that will be used in the APS Auto Paper Selection mode Pre...

Страница 69: ...route map refer to Accessing Menu Items on page vii 2 Press right Select The Contact Name screen is displayed 3 Enter the contact name and press Enter The Detail screen is displayed 4 PressS or T to select the destination registering The Detail FAX Number E mail Address Folder SMB or Folder FTP screen is displayed 5 Press right Select A register screen is displayed 6 Enter the destination and pres...

Страница 70: ...screen is displayed 6 Press S or T to select Add Member and press Enter The Contacts screen is displayed 7 Press S or T to select the address required and press Enter A contact address screen is displayed 8 Press S or T to select the FAX Number E mail Address Folder SMB or Folder FTP The display shows Registered and returns to the Group Member screen 9 When the member is added repeat steps 5 throu...

Страница 71: ... displayed 5 Edit the information and press Enter The Detail screen display returns When verification and modification of the address are completed press Enter The display shows Registered and returns to the Edit Addressbook screen Delete Address 1 Access Edit Addressbook If you are unsure how to use this route map refer to Accessing Menu Items on page vii 2 Press S or T to select the address requ...

Страница 72: ...s route map refer to Accessing Menu Items on page vii 2 Press S or T to select either Ser Status Page or NW Status Page and press Enter Print Are you sure is displayed 3 Press left Select 4 Accepted is displayed and printing of the report will begin The display returns to the Service Setting screen Item Description Ser Status Page Service Status Page Lists information on the settings and environme...

Страница 73: ...asic screen is displayed If the administrator has not set the password press Enter The basic screen is displayed 3 On completion press Log Out ID management User Login must be enabled by the administrator before it can be used Enabling User Login Use to switch the User Login function On or Off 1 Access User Login If you are unsure how to use this route map refer to Accessing Menu Items on page vii...

Страница 74: ...b Account screen is displayed 2 Press right Select The Menu screen is displayed 3 Press S or T to select Add User and press Enter The User Name screen is displayed 4 Enter the user name and press Enter The User ID screen is displayed 5 Enter the user ID and press Enter The display shows Registered and returns to a login user screen 6 Press S or T to select Detail and press Enter 7 Enter the passwo...

Страница 75: ...sure how to use this route map refer to Accessing Menu Items on page vii If User Login setting is enabled you will need to enter an administrator s User ID press T and enter an administrator s Password and press Enter before the User Job Account screen is displayed 2 Press S or T to select the user name required and press Enter The Detail screen is displayed 3 Press S or T to select the user login...

Страница 76: ...ser List screen returns User Property You can verify the information of the login user However modification of User Name and Password is possible When User Login is set to Off The User Property screen is not displayed 1 Access User Property If you are unsure how to use this route map refer to Accessing Menu Items on page vii 2 Press S or T to select the user The User Property 1 6 to 6 6 screen is ...

Страница 77: ...ccessing Menu Items on page vii If User Login setting is enabled you will need to enter an administrator s User ID press T and enter an administrator s Password and press Enter before the User Job Account screen is displayed 2 Press S or T to select Reject or Permit and press Enter The display shows Completed and the User Job Account screen returns System Menu Counter S or T User Job Account Enter...

Страница 78: ...User Login Management 6 6 ADVANCED OPERATION GUIDE ...

Страница 79: ...ess right Select The display returns to the basic screen Job Accounting Function Description Enabling job accounting Turn job accounting function On or Off Managing accounts Registers ID codes and limitation of use Deletes registered accounts Changes the limitation of use for each account All account management Confirms the total count job accounting report output and counter clear for all account...

Страница 80: ...se You can change the management method so that you can set the limitation of count for copying and printing respectively Copying Limitation This item is displayed if Copy Print Count setting is set to Split 1 Access Account List If you are unsure how to use this route map refer to Accessing Menu Items on page vii 2 Press S or T to select the account to set the limitation and press Enter 3 Press S...

Страница 81: ... press right Select 4 Press S or T to select On and press Enter 5 Enter the maximum pages and press Enter 6 Press left Select twice The display returns to the basic screen Fax Transmission Limitation 1 Access Account List If you are unsure how to use this route map refer to Accessing Menu Items on page vii 2 Press S or T to select the account to set the limitation and press Enter 3 Press S or T to...

Страница 82: ...ii 2 Press S or T to select the account to change the limitation and press Enter 3 Change the limitation of use refer to Setting Limitation of Use on page 7 2 4 On completion press left Select twice The display returns to the basic screen All Account Management Confirming the counter 1 Access Job Account Set If you are unsure how to use this route map refer to Accessing Menu Items on page vii 2 Pr...

Страница 83: ...r 3 Press S or T to select the account and press Enter 4 Press S or T to confirm the counters for printed pages scanned pages FAX TX pages and FAX TX time and press Enter Resetting the counter 1 Access Job Account Set If you are unsure how to use this route map refer to Accessing Menu Items on page vii 2 Press S or T to select Split Account and press Enter 3 Press S or T to select the account and ...

Страница 84: ... map refer to Accessing Menu Items on page vii 2 Press S or T to select Account Report and press Enter Print Are you sure is displayed 3 Press left Select The job accounting report is printed 4 Press right Select The display returns to the basic screen System Menu Counter S or T User Job Account Enter S or T Job Account Set Enter ...

Страница 85: ...o the Default Setting screen 5 Press right Select The display returns to the basic screen Adding Copying Counter to Printing Counter You can select whether to add the copying counter to the printing counter or not 1 Access Job Account Set If you are unsure how to use this route map refer to Accessing Menu Items on page vii 2 Press S or T to select Default Setting and press Enter 3 Press S or T to ...

Страница 86: ...b is then added to the account of the user with that ID For details refer to Editing User Details on page 6 3 1 Input your ID code using the numeric keys and press Enter The basic screen is displayed If you enter an incorrect code press Stop Clear and re enter the code 2 Perform normal copier or send operations 3 On completion press Log Out Printer Operation With job accounting enabled operation o...

Страница 87: ...for NetWare configuration then NWAdmin must also be used to create the NetWare print objects The EWS home page can only be accessed from a PC if the TCP IP protocol is installed on the PC and the IP address has been configured for the machine Required operating systems OS for using EWS Microsoft Windows 98SE ME 2000 XP and Microsoft Windows NT 4 0 Apple Macintosh OS X 10 x The EWS web page has bee...

Страница 88: ... functions onto separate pages The following is an outline of each page accessed Page Description Start page This page allows you to verify this machine s operating status and current settings Basic page This page includes settings that apply to the entire machine such as Device Defaults Security and Basic Networking Printer page This page includes settings that apply to the printing function of t...

Страница 89: ...pported languages may also be selected through language preference settings in your browser To change EWS language Open the Select Language drop down list by clicking it Select the appropriate language If you attempt to view EWS with a character set other than the language that is used on the operation panel s display some characters may be illegible Operation Panel This indicates the machine s op...

Страница 90: ... POP3 General on page 8 23 For more information on SMTP refer to Advanced E mail SMTP General on page 8 22 Network Logical Printer This allows you to verify the settings made on the Logical Printers page of the Advanced Page For more information refer to Advanced Protocols TCP IP Logical Printers on page 8 19 Network Netware This allows you to verify the settings made on the Netware page of the Ad...

Страница 91: ... of the machine and version of EWS Item Description Address Book This shows the status of Contacts and Groups in the Address Book For more information on other items refer to FAX Page on page 8 14 User Login This shows the status of User Logins For more information on other items refer to Jobs Page on page 8 17 About This shows details of the machine and EWS ...

Страница 92: ...o change the password 1 Enter the Old Password 2 Enter the password you want to set in New Password This can be up to 30 character long 3 Enter the same password in Confirm New Password 4 Click the Submit button Basic Security Device EWS provides the ability to restrict the type of access that can be accomplished from the operation panel This can be done by selecting one of the available settings ...

Страница 93: ...o Advanced Protocols TCP IP General on page 8 18 You must restart this machine after you have completed these settings in order to properly register the content of those settings in the machine Refer to Basic Reset on page 8 8 Item Description Host Name Specifies a name for the printing system network component This name is also used as the NetBEUI Printer Name and the SNMP sysName object IP Addre...

Страница 94: ... time that is currently set in the machine Current Universal Time UTC GMT Displays the Greenwich Mean Time that is currently set in the machine Time Zone Sets a time difference Click the drop down list and select your region Summer Time Switches the Summer Time setting On and Off Select On in order to have the Summer Time function applied when the time is synchronized automatically with a time ser...

Страница 95: ...ubmit Deleting the Contact 1 Open the Address Book Contacts page 2 Check the desired contact If you check Number all contacts displayed on the page will be checked Item Description Operation Panel Language You can select the language of the messages on the display by following the procedure given below The following languages are available for selection in the drop down list English Français Deuts...

Страница 96: ...iting the Group 1 Open the Address Book Groups page 2 Click desired number or name to edit the group 3 Click Add Members to add the contacts to the group or click Delete Members to delete the contacts from the group The maximum number that you can add the SMB or FTP address to the group is one 4 Click Submit Deleting the Group 1 Open the Address Book Groups page 2 Check the desired group If you ch...

Страница 97: ...select the size which matches the paper you will use in the input tray Click the Type drop down list and select the type which matches the paper To specify the default input tray click the appropriate radio button under Default Click the Submit button to take settings in effect Item Description Form Feed Timeout Adjusts the timeout between 1 and 495 seconds after which a form feed will occur in th...

Страница 98: ...0 600 dpi The maximum resolution using full color or gray scale modes is 300 dpi To scan in full color or gray scale with 400 dpi or 600 dpi resolution expansion of the internal memory is required Refer to Expansion Memory on page 9 4 Optimize for The original quality is selected according to the type of original Switches the original quality between Text Photo and Text Photo Zoom Switches the zoo...

Страница 99: ...ect You can enter the information that you want to appear in the subject field of the e mail the subject can include the printer model serial number MAC address and equipment ID by entering any of the following conversion strings printer Model serial Serial Number etheraddr MAC Address equipid Equipment ID Body You can enter the information that you want to appear in the body of the e mail ...

Страница 100: ...sing Be sure that the type of phone line you select is correct because if the setting is incorrect dialing will be impossible The choices are Tone DPMF or Pulse 10pps FAX Media Type Sets the media type for printing the received documents Refer to Paper Specifications Speaker Volume Sets the volume of the internal speaker that allows you to listen to conditions on the telephone line when the On Hoo...

Страница 101: ...r of transmitted pages on the top of the received documents 2in1 Receive Enables or disables 2in1 reception Receive Bulk Print Enables or disables FAX bulk reception When enabled the FAX system prints the received documents after its reception completes It will be possible to make copies during that reception Remove Switching Dial Number Specifies the remote switching dial number Remote switching ...

Страница 102: ... Specification and All Day Start Time Specifies the start time for fax forwarding when you select Time Specification in Forward Time above End Time Specifies the end time for fax forwarding when you select Time Specification in Forward Time above Print Selects On or Off whether to print the documents when the fax forwarding is enabled Forward Destination Selects the destination for fax forwarding ...

Страница 103: ...ummary of the pages in Jobs page When clicking the job on each page the detailed information of the job is displayed Page Description Status Print Job Status Shows the job status for each operation Status Send Job Status Status Store Job Status Schedule Shows the scheduled job such as fax delayed transmission Log Print Job Log Shows the job jog for each operation Log Send Job Log Log Store Job Log...

Страница 104: ... from 192 to 254 then use 255 255 255 0 as the subnet mask Default Gateway The IP address of the gateway router for the local network DHCP BOOTP Identifies how the machine obtains its IP configuration DHCP BOOTP automatic configuration via a BOOTP server or a DHCP server RARP Automatic configuration using the Reverse Address Resolution Protocol ARP PING Automatic configuration using the Address Re...

Страница 105: ...inter as well as the TCP raw port number 9100 etc Conversion is applied to data that is input to the specified raw port in accordance with the designated logical printer This port is invalid if it is given a port number that is the same as that of an already specified port e g FTP or LPD Bi directional Printing Enables or disables bi directional printing using the TCP IP raw port If you turn this ...

Страница 106: ...ay be inoperable if you attempt those operations without sufficient privileges Item Description NetWare Protocol Enables or disables the Network Protocol Bindery Mode Enables or disables Bindery Mode Frame Type Sets the Frame type You can choose from Auto 802 3 Ethernet II SNAP or 802 2 File Server Primary Enter the name of the primary File Server to use NDS Tree Enter the name of the NDS Tree NDS...

Страница 107: ...AppleTalk Enables or disables AppleTalk protocol Printer Name Specifies the name of the printing system in the AppleTalk network Zone Name Specifies the name of the AppleTalk zone network An asterisk means the default zone Item Description NetBEUI Protocol Enables or disables NetBEUI protocol Browse Master With this option set to On the printing system becomes the browse master and creates a workg...

Страница 108: ... Account Name When Other is selected for Authenticate the account name set here will be used for SMTP authentication The maximum length of the login account name is 62 characters Login Password When Other is selected for Authenticate the password set here will be used for authentication The maximum length of the login password is 62 characters POP before SMTP Timeout Enter the time if you chose PO...

Страница 109: ... serial Serial Number etheraddr MAC Address host Host Name ip IP Address Event Reports Items Choose the events you want to be reported These events are Add Paper Low Toner Add Toner Cover Open Paper Jam All Other Errors Event Report Interval Enter the interval between sending reports when at least one of the events occur Event Reports Items Check the report items that you want to be scheduled Even...

Страница 110: ... server port number or use the POP3 default port 110 POP3 Server Timeout Enter the time Login User Name Enter the name Login Password Enter the password Use APOP Enables or disables APOP Test The will test one transmission for each press Delete e mail after retrieval Enables or disables the Delete e mail after retrieval function E mail size limit Enter maximum e mail size in Kilobytes When the val...

Страница 111: ...me The MIB II sysName object usually the host or domain name of the printing system sysLocation The MIB II sysLocation object usually the location information of the printing system HP Web Jetadmin Compatibility Turns HP Web Jetadmin Compatibility on or off Authentication Traps Check On to enable or Off to disable the MIB II EnableAuthenTrap object If enabled an SNMP trap is generated when an atte...

Страница 112: ...atabase for the LDAP directory searching Item Description Item Description Equipment ID This is the name by which the machine will be identified Recipient Address The e mail address of the recipient If there is more than one recipient then the addresses should be separated by a semi colon Subject This is the network location and should comprise the following Subject Conversion Strings printer Mode...

Страница 113: ...ation Refer to the Help function in your browser Has the administrator set up an IP Filter function Access EWS from an approved IP address page 8 19 The SNMP Read Community settings function as passwords to control read and write access to the machine via SNMP Access EWS from an approved Read Community page 8 22 Does the version of your browser application support operation using EWS Use a browser...

Страница 114: ...dmin password Contact your dealer or service center Error or Warning is displayed under the STATUS indicator Is there an error message shown in the display Follow the appropriate procedure on the troubleshooting page of Operation Guide Operation Guide Symptom Check Items Corrective Action Reference ...

Страница 115: ...ADVANCED OPERATION GUIDE 9 1 9 Optional Equipment Available Options The following options are available for use with your machine Document Processor Expansion Memory Paper Feeder FAX System ...

Страница 116: ...cument processor Originals with punched holes or perforations Transparencies Soft originals such as carbon or vinyl paper or other originals that are curled wrinkled or creased Irregularly shaped originals wet originals or originals that have adhesive tape or glue on them Originals with clips or staples Remove the clips or staples and straighten any curls wrinkles or creases before placing them in...

Страница 117: ...as 8 1 2 13 inches Oficio II 8 1 2 14 inches Legal and Folio Placing Originals in the Document Processor 1 Check that there are no other originals remaining in the document processor 2 Be sure to fan through the originals a few times to separate the sheets before placing them in the document processor 3 Adjust the original insert guides to fit the width of original to be copied 4 Arrange the origi...

Страница 118: ...e The paper size media type and paper capacity that can be loaded in the paper feeder is the same as that of the included cassette The optional paper feeder should be detached before attempting to pick up or transport the machine Expansion Memory Expansion memory will increase the number of originals that can be scanned at one time An additional 64 MB 128 MB or 256 MB is effective when copying fro...

Страница 119: ...r pin from the rear of the machine and remove the side cover 3 Remove DIMM carefully pull end stoppers outwards then pull DIMM out of the socket 4 Insert DIMM into the DIMM socket so that the notches on DIMM align with the corresponding protrusions in the socket 5 When you have completed installing DIMM replace the side cover and fasten it with the right cover anchor pin FAX System Installing the ...

Страница 120: ...Optional Equipment 9 6 ADVANCED OPERATION GUIDE ...

Страница 121: ...eneral grades of paper economy standard and premium The most significant difference between grades is the ease with which they pass through the machine This is affected by the smoothness size and moisture content of the paper and the way in which the paper is cut The higher the grade of paper you use the less risk there will be of paper jams and other problems and the higher the level of quality y...

Страница 122: ...he edges curled dirty torn embossed or contaminated with lint clay or paper shreds Use of paper in these conditions can lead to illegible printing misfeeding and paper jams and can shorten the life of the machine In particular avoid using paper with a surface coating or other surface treatment The paper should have as smooth and even a surface as possible Composition Do not use paper that has been...

Страница 123: ...ground effect Paper Feed Source Paper Size Dimensions Cassette or MP Tray Letter 8 1 2 11 inches Legal 8 1 2 14 inches ISO A4 210 297 mm ISO A5 148 210 mm JIS B5 182 257 mm Folio 210 330 mm Oficio II 8 1 2 13 inches Executive 7 1 4 10 1 2 inches ISO B5 176 250 mm 16K 197 273 mm MP Tray only Statement 5 1 2 8 1 2 inches ISO A6 105 148 mm JIS B6 128 182 mm Envelope 10 4 1 8 9 1 2 inches Envelope 9 3...

Страница 124: ...lectrostatic properties and toner fusing characteristics The moisture content of the paper varies with the relative humidity in the room When the relative humidity is high and the paper absorbs moisture the paper edges expand becoming wavy in appearance When the relative humidity is low and the paper loses moisture the edges shrink and tighten and print contrast may suffer Wavy or tight edges can ...

Страница 125: ...ze corners that are not square ragged edges welded uncut sheets and crushed edges and corners can cause the machine to malfunction in various ways A quality paper supplier should take considerable care to ensure that these problems do not occur Packaging Paper should be packed in a sturdy carton to protect it from damage during transport Quality paper obtained from a reputable supplier is usually ...

Страница 126: ...bel paper has a structure comprising of three layers as shown in the figure below The top sheet is printed on The adhesive layer consists of pressure sensitive adhesives The carrier sheet also called the linear or backing sheet holds the labels until use Due to the complexity of its composition adhesive backed label paper is particularly likely to give trouble in printing Adhesive label paper must...

Страница 127: ... on envelopes using paper with a basis weight of 60 to 79 g m 16 to 21 lb ream Envelopes must be manually fed An envelope is a more complex object than a single sheet of paper For this reason it may not be possible to obtain consistent printing quality over the entire envelope surface Many envelopes have a diagonal grain orientation Refer to Paper Grain on page Appendix 4 This orientation is more ...

Страница 128: ...even after you smooth it out in such a way set the paper in the MP tray with the leading edge raised up a few millimeters as shown in the illustration Colored Paper Colored paper should satisfy the same conditions as white bond paper listed in Paper Specifications on page Appendix 1 In addition the pigments used in the paper must be able to withstand the heat of fusing during the printing process ...

Страница 129: ...19 Not all media types are available to feed from the paper cassette Certain types of paper should be fed using the MP tray See the table below Yes Can be stored No Cannot be stored Media Type MP Tray Paper Cassette Specification Plain Yes Yes Normal 2 Transparency Yes No Extra heavy Preprinted Yes Yes Normal 2 Labels Yes No Normal 3 Bond Yes Yes Normal 3 Recycled Yes Yes Normal 3 Vellum Yes No Li...

Страница 130: ...to Y Y Y1 Y1 Y Y Y Y Y Y Y Y Y Y Y Y Y Y Y Y Y Y Y Y 6 Exposure Manual adjustment Y Y Y Y Y Y1 Y Y Y Y Y Y Y Y Y Y Y Y Y Y Y Y Y Y 7 Exposure Auto Adjustment Y Y Y Y1 Y Y1 Y Y Y Y Y Y Y Y Y Y Y Y Y Y Y Y Y Y 8 Original placement Y Y Y Y Y Y Y Y Y Y Y Y Y Y Y Y Y Y Y Y Y Y Y Y 9 Original size standard size Y N Y Y Y Y Y Y Y1 Y Y Y Y Y Y Y Y Y Y Y Y Y Y Y 10 Original size custom size Y Y Y Y Y Y Y Y...

Страница 131: ...Y Y Y Y Y Y Y Y Y Y Y Y Y Y Y Y Y Y Y Y Y Y 10 File format JPEG Y Y Y Y Y Y Y2Y1Y1 Y Y Y Y Y Y Y Y Y Y Y Y Y Y Y Y Y Y Y Y Y Y Y Y Y 11 Image quality Text Y Y Y Y Y1Y1 Y Y Y N Y1Y1Y1 Y Y Y Y Y Y Y Y Y Y Y Y Y Y Y Y Y Y Y Y Y 12 Image quality Photo Y Y Y Y Y1Y1 Y Y Y N Y1 Y1Y1 Y N Y Y Y Y Y Y Y Y Y Y Y Y Y Y Y Y Y Y Y 13 Image quality Text Photo Y Y Y Y Y1Y1 Y Y Y N Y1Y1 Y1 Y Y Y Y Y Y Y Y Y Y Y Y ...

Страница 132: ...Appendix 12 ADVANCED OPERATION GUIDE ...

Страница 133: ...ccess computers outside of the network that you are on When no specific gateway is designated for a destination IP address data is sent to the host that is designated as the Default Gateway DHCP Dynamic Host Configuration Protocol This is a protocol that automatically resolves the IP address Subnet Mask and Gateway address on a TCP IP network Use of DHCP minimizes the load of network administratio...

Страница 134: ... amount of time before it executes just such an automatic page break After the waiting period begins once the predetermined time is exceeded the printer will automatically process the currently received data and print it out If there is no further print data for the last page the printer will end processing of that job FTP File Transfer Protocol A very common method of moving files between two Int...

Страница 135: ...e used to locate people organizations and other resources in an Internet or intranet directory Logical Printer This is a software interface that exists between the Windows OS and the printers connected to it A printer refers to the actual device that prints out while a logical printer refers to the software interface that resides on the printer server Low Power Mode This mode is engaged when actio...

Страница 136: ... it possible for you to print data created using application software The printer driver for the printer is contained on the CD ROM supplied with the printer Install the printer driver on the computer connected to the printer Process Unit This is the module that contains photosensitive drum and developer unit Scan Noise Reduction If black lines appear on copies when you feed originals from the doc...

Страница 137: ...ify the network address and which specify the host address TCP IP Transmission Control Protocol Internet Protocol TCP IP is a suite of protocols designed to define the way computers and other devices communicate with each other over a network TWAIN Tool Without An Interesting Name A software driver interface between a scanner and other image capturing devices that lets you scan images from a scann...

Страница 138: ...Glossary Glossary 6 ADVANCED OPERATION GUIDE ...

Страница 139: ...us scanning 2 9 Contrast 5 1 Custom media type 5 19 Custom original size 5 16 Custom paper size 5 17 D Date and time 5 11 Date format 5 11 Default gateway 3 5 8 7 8 18 Default operation 5 2 Default original size 5 18 Device 8 6 Device Defaults 8 9 DHCP 3 3 8 8 8 18 DIMM 9 5 Dithering 5 4 Document processor 1 8 9 2 Draft mode 1 10 Drection and layout 1 6 E E mail address 2 2 Emulation 3 6 Error dif...

Страница 140: ... feed source 5 20 Paper feeder 9 4 Paper selection Appendix 1 Parallel interface 3 1 Pausing jobs 4 2 PC folder 2 2 PC folder address 2 2 Photo processing 5 4 POP3 8 23 Print override mode 1 11 Printer page 8 11 Printer status 4 4 Program 5 7 R Report 4 5 Reporting 2 12 Reset 8 8 Resetting toner status 5 4 Resolution 2 6 Restart 5 8 Resuming jobs 4 3 S Scan noise reduction 5 3 Scanner page 8 12 Sc...

Страница 141: ...Index ADVANCED OPERATION GUIDE Index 3 U User login 6 1 8 7 V Volume 5 9 Z Zoom 1 3 2 8 ...

Страница 142: ...E1U ...

Страница 143: ......

Страница 144: ...2005 3 UTAX GmbH Ohechaussee 235 22848 Norderstedt Germany ...

Отзывы: