background image

7

S

eCtioN

 1 - C

oNverSioN


with

 “o

lDer

” S

tyle

 C

abiNetS

 (

w

/t-h

aNDle

)

Dispenser ground

u

PgraDe

 K

it

 a

SSeMbly

 P

roCeDureS

 / NMD-50 a

SSeMbly

The NMD-50 dispenser does not ship preassembled.  The additional parts to add are the two (2) green lift handles (identi-
cal), two (2)slide brackets (identical), ground lug, dispenser stop bracket and cable guides.

Before proceeding, remove the cassettes from the dispenser to make it more manageable. The dispenser with the cassettes 

installed (empty or full) is a required TWO MAN LIFT.  With the casettes removed. it can be handled by one person.

1.

  Right side Handle,Slide and Stop Bracket Assembly - Mount  a green handle and slide bracket to the right side of 

the cabinet with the two (2) screws provided. The mounting points are at the center and rear ends of the bracket. The 
release tab faces forward. 

NOTE: When attaching any hardware to the sides of the dispenser, pay particular 
attention to NOT OVERTIGHTEN the screws.  The dispenser mounting holes WILL 

strip if too much torque is applied. Hand tighten snug, but firm, only. 

Mounting screws M4x10mm

Release 
tab facing 
forward

2.

  Right side Handle,Slide and Stop Bracket Assembly - 

Slide the stop bracket through the slot in the front of the 
slide bracket and attach to the dispenser in the front hole.  
(M4x10mm)

3.

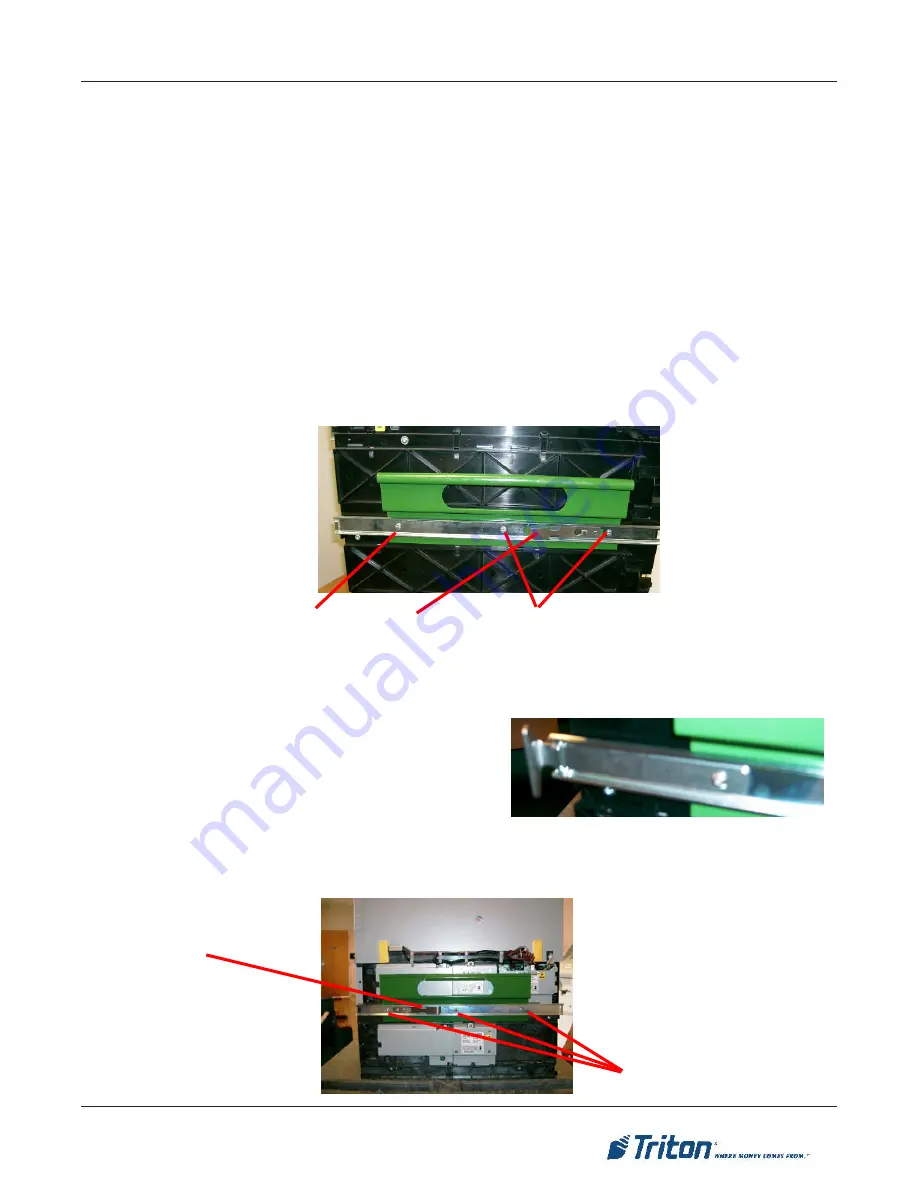
  Left side Handle and  Slide Bracket Assembly - Mount  a green handle and slide  bracket to the left side of the cabinet 

with the three (3) screws provided. The mounting points are at the front,center and rear ends of the bracket. The release 
tab faces forward. 

Mounting screws M4x10mm

Do not install this screw 

Rear

Front

Release 
tab facing 
forward

Содержание RL5000 T HANDLE ATM

Страница 1: ...HaNDle atM TDN 07100 00116 Mar 18 2009 COPYRIGHT NOTICE CorPorate HeaDquarterS 21405 B Street Long Beach MS 39560 PHONE 228 575 3188 FAX 228 575 3200 2008 Triton All Rights Reserved TRITON logo is a...

Страница 2: ...2 SDD to NMD 50 CoNverSioN ProCeDureS Document Updates Mar 11 2009 Original Mar 18 2009 Minor content edits...

Страница 3: ...it These cabinets are identified with a vault door T Handle installed Units built after the above serial number ARE NOT convertible These cabinets current are identified with a vault door Lift handle...

Страница 4: ...0760 Handle Bracket Dispenser Green 2 01060 00416 Ground Connector Quick Connect Molex 1 03072 00009 Clip Panduit Adhesive Cable 5 03082 00000 Custom Slide 18 2 03011 05023 Slide Spacer Bracket 1 0960...

Страница 5: ...When prompted turn power OFF on the ATMs power supply Unlock and open the ATM control panel Turn the power switch to the OFF 0 position If possible unplug the ATM power cord at the wall outlet 5 Disc...

Страница 6: ...cabinet with the two 2 bolts provided 1 4 20x1 2 The mounting points are at the ends of the bracket on the TOP 3 Left Side Slide Rail Remove the dispenser slide bracket from the slide assembly Mount...

Страница 7: ...provided The mounting points are at the center and rear ends of the bracket The release tab faces forward NOTE When attaching any hardware to the sides of the dispenser pay particular attention to NO...

Страница 8: ...sm fully into the cabinet Repeat extending inserting the mechanism into the cabinet a few times to ensure there is no binding of the slide rails The first few times will be difficult 4 Left side Groun...

Страница 9: ...2 3 and 4 The shorter cable routes through retainers 3 and 4 only The ground cable routes through retainer 5 only Any excess ground cable can be bundled inside retainer 5 9 Cassettes Place empty casse...

Отзывы: