


Aspirante thermostatic power shower
15
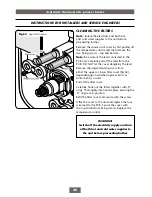
REPLACING THE COVER
IMPORTANT
:
Make sure that the earth
contact spring within the unit is not distorted
before replacing the cover.
Fit the cover, making sure the connector is
fitted to the PCB and the wires are clear of the
setting adaptor. Secure with the top and bottom
fixing screws
(fig.24)
. Make sure the maximum
temperature stop is still in position.
Note:
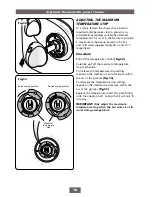
If adjustment of the maximum
temperature stop is required, refer to section
’Adjusting the maximum temperature stop’.
Replace the temperature control knob by push
fitting onto the adaptor shaft, noting that it will
only fit one way.
Check that the flow control is positioned at
‘stop’
(fig.25)
.
Switch the electricity supply back on at the
isolating switch. Check that both water supplies
are still turned on.
Once the installation of the riser rail is complete,
the shower is ready for normal operation.
Fig.25
Fig.24
WARNING
COVER RETAINING SCREWS
ONLY
the
SUPPLIED SCREWS
should be
used. The use of none supplied screws
WILL
invalidate product specifications & warranty.


