background image

57

1

5

9

3

7

11

2

6

10

4

8

12

13

14

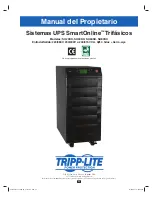
2 – Instrucciones de Seguridad Importantes

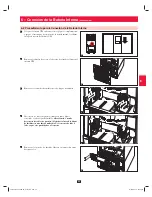
Advertencias Sobre la Batería

El sistema UPS no requiere mantenimiento de rutina. No hay partes útiles para el usuario en el interior. Por la razón que sea únicamente personal 

• 

de servicio calificado debe abrir los paneles de acceso.

Las baterías presentan un riesgo de descarga eléctrica y quemaduras derivadas del alta corriente de un corto circuito, las baterías deben ser 

• 

remplazadas por personal de servicio capacitado que observe las debidas precauciones. Apague el sistema UPS antes de conectar o desconectar 
las baterías internas. Use herramientas con asas/mangos aislantes. No abra las baterías. No puentee o haga corto circuito con las terminales de la 
batería con ningún objeto.

Remplace las baterías por baterías equivalentes disponibles en Tripp Lite. No opere el sistema UPS sin baterías.

• 

Las baterías son reciclables. Refiérase a las regulaciones locales para los requerimientos de disposición y destrucción de las baterías.

• 

No arroje las baterías al fuego, mutile las baterías o abra las tapas de la batería.

• 

Los fusibles de la batería deberán ser remplazados únicamente por personal calificado. Los fusible quemados deberán ser remplazados 

• 

únicamente por fusibles del mismo número y tipo.

Existen voltajes potencialmente letales dentro de esta unidad en tanto la suministro de la batería este conectado. El servicio y reparación deberá 

• 

ser hecho únicamente por personal capacitado, con el sistema UPS apagado o puesto en modo de derivación. Desconecte las baterías internas 
(si están presentes) antes de efectuar cualquier servicio apagando el interruptor de circuitos de las baterías internas y quitando el/los fusible(s) 
de la batería. Desconecte las baterías externas (si están presentes) apagando el interruptor de circuitos del gabinete de baterías externas y 
desconectando los cables de las baterías externas del sistema UPS.

No conecte o desconecte las baterías cuando el sistema UPS esté operando con el suministro de las bacterias o cuando la unidad no esté en modo 

• 

de derivación.

No quite las fundas protectoras de plástico que cubren las baterías internas.

• 

Las baterías internas y externas deben ser remplazadas por baterías equivalentes disponibles de Tripp Lite.

• 

Antes de conectar un gabinete de baterías externas al sistema UPS, lea la documentación del gabinete de baterías externas. Use únicamente 

• 

gabinetes para baterías externas que hayan sido aprobadas por Tripp Lite.

Si el sistema UPS permanece apagado por periodos extendidos, deberá encenderse periódicamente para permitir que las baterías se recarguen. 

• 

El sistema UPS deberá encenderse y recargarse de forma ininterrumpida por un período de 24 horas cada 3 meses. Fallar en recargar las baterías 
periódicamente puede causar daños irreversibles a las baterías.

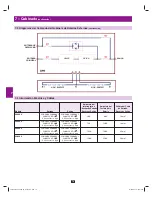
Advertencias en la Instalación del Cableado Eléctrico

Vea la 

• 

Sección 7-1

 para Advertencias sobre la instalación del cableado eléctrico

200706017 93-2688 SU manual 4C.indd   57

200706017 93-2688 SU manual 4C.indd   57

11/29/2007   2:03:09 PM

11/29/2007   2:03:09 PM

Содержание SmartOnline 3-Phase UPS Systems SU20KX

Страница 1: ...40 415V AC 3O 4 wire ground wye Not suitable for mobile applications 1111 W 35th Street Chicago IL 60609 USA 1 773 869 1234 www tripplite com Copyright 2007 Tripp Lite All trademarks are the sole prop...

Страница 2: ...down Procedure Single UPS 27 9 7 Preliminary Checklist Parallel UPS 28 9 8 Start Up Procedure Parallel UPS 28 9 9 Shutdown Procedure Parallel UPS 29 9 10 Manual Bypass Procedure Parallel UPS 30 9 11 S...

Страница 3: ...dundancy 1 1 capability for increased capacity or fault tolerance Up to 80kVA capacity in a compact footprint up to 160kVA in parallel redundancy 1 1 configuration High input power factor and high eff...

Страница 4: ...ystem after final installation Use the levelers to provide long term support When moving the UPS system push from the front or rear not from the sides Do not attempt to unpack or move the UPS system w...

Страница 5: ...ormed by trained personnel only while the UPS system is turned off or placed into bypass mode Disconnect internal batteries if present before performing any service work by switching off the internal...

Страница 6: ...ss and hold this button for 3 seconds to turn the UPS system s inverter ON OFF Button Press and hold this button for 3 seconds to turn the UPS system s inverter OFF If the UPS system is in online norm...

Страница 7: ...ormation Output Circuit Breaker Switch Q4 Controls AC output power Manual Bypass Circuit Breaker Switch Q3 Controls AC input power to the UPS system during manual bypass operation Bypass Input Circuit...

Страница 8: ...connects the UPS system to another UPS system of identical type and capacity for use in a parallel redundancy 1 1 configuration See Section 7 Wiring and Section 8 Operating Modes for more information...

Страница 9: ...ainer is upright and use a screwdriver to remove its top panel front panel and back panel Also remove the plastic wrap and interior cushioning material Confirm that the model name and rating at the re...

Страница 10: ...ation about input requirements and floor loading requirements The UPS system must be installed in a clean secure environment with a relative humidity less than 90 non condensing Operate the UPS system...

Страница 11: ...ring with a red cable The number of internal battery packs varies with model 6 1 Internal Battery Wiring Diagrams Review the internal battery wiring diagrams prior to connecting the internal batteries...

Страница 12: ...S System Battery Back Connector Fuse Block Bracket 6 Internal Battery Connection continued SU40KX shown 6 1 Internal Battery Wiring Diagrams continued 200706017 93 2688 SU manual 4C indd 12 200706017...

Страница 13: ...of the UPS system Remove the battery cartridge fuses from each fuse block Disconnect the blue and white jumper cables attached to each fuse block Warning When disconnecting the jumper cables pull them...

Страница 14: ...the UPS system some battery compartment slots may remain empty Reconnect the fuse block bracket The letters on the fuse block bracket should be upright when it is in the correct orientation Connect t...

Страница 15: ...black connector located inside the UPS system s battery compartment Connect the red cable for each internal battery pack to the nearest red connector located inside the UPS system s battery compartme...

Страница 16: ...a neutral connection to an IT power distribution system the disconnect device must be a four pole device and must disconnect all line conductors and the neutral conductor If a disconnect device inter...

Страница 17: ...cifications 7 3 UPS System Terminal Block Diagram 7 4 External Battery Cabinet Wiring Diagrams Input Grounding Terminals R R R S S S T T T N N N N Output Bypass Input External Battery Connection N N E...

Страница 18: ...4 wire ground wye 4 wire ground wye SU40KX 220 380V 230 400V 220 380V 230 400V or 240 415V AC 3O or 240 415V AC 3O 75A 120A 14 mm 4 wire ground wye 4 wire ground wye SU60KX 220 380V 230 400V 220 380V...

Страница 19: ...See Section 7 3 and the external battery cabinet s documentation for terminal block diagrams See Section 7 4 for wiring diagrams See Section 7 5 for cable size requirements Cabling should be protecte...

Страница 20: ...cond confirm that the manual bypass circuit breaker switch C is off Third confirm that the output circuit breaker switch D is off Confirm the phase of each cable then connect the cables according to t...

Страница 21: ...to the parallel redundancy port B of each UPS system 7 9 AC Input Output Wiring Parallel UPS Dual Inputs Parallel Redundancy Warnings The total input cable length must be equal to the total output cab...

Страница 22: ...re sine wave AC power that supports the operation of connected equipment 8 3 Auto Bypass Mode Single UPS If the inverter malfunctions due to excessive temperature overload output short circuit abnorma...

Страница 23: ...ystem If the total load exceeds the capacity of the remaining UPS system it will switch to auto bypass mode 8 6 Battery Backup Mode Parallel UPS Similar to on battery backup mode for a single UPS syst...

Страница 24: ...cept with parallel 1 1 UPS systems Note Both UPS systems must be switched into manual bypass mode 8 9 Hot Standby Mode Parallel UPS For added fault tolerance the redundant UPS system acts as the bypas...

Страница 25: ...UPS All circuit breaker switches should be off including the breaker of the external battery cabinet if present Confirm that no voltage potential exists between Neutral and Ground Confirm that the inp...

Страница 26: ...ass reserve mode to online normal mode The BYPASS LED will darken and the NORMAL LED will illuminate 9 4 Battery Start Up Procedure Single UPS Note The battery must be at least partially charged for t...

Страница 27: ...manual bypass circuit breaker switch A then switch off the output circuit breaker switch B 9 6 Shutdown Procedure Single UPS Warning The UPS system shutdown procedure will eliminate the AC power outpu...

Страница 28: ...r UPS systems will damage the UPS systems and create a serious risk of personal injury and property damage All circuit breaker switches should be off including the breakers of the external battery cab...

Страница 29: ...h UPS system see Section 10 6 9 9 Shutdown Procedure Parallel UPS Warning The UPS system shutdown procedure will eliminate the AC power output for all loads Before shutdown confirm that all loads are...

Страница 30: ...il you hear a beep then release the button If the other UPS system can support the connected equipment loads alone the UPS system that was turned off will shut down its inverter and its LCD screen wil...

Страница 31: ...ck Switch on the bypass input circuit breaker switch A and the output circuit breaker switch B of each UPS system Confirm that the LCD screens of both UPS systems read ON MANUAL BYPASS then switch off...

Страница 32: ...LT LED LCD Status Screen ESC Escape Button Scroll Buttons and Enter Button ON Button OFF Button EPO Emergency Power Off Button 10 2 Display Hierarchy A B C D E F G H I J K Control Panel E F G K A B C...

Страница 33: ...other event messages exist the screen will return to the default display Note Pressing the ESC button will return to the default display 10 4 Status Messages and Diagrams The UPS system output is off...

Страница 34: ...witches to battery backup mode See Section 10 10 for more information The UPS system has switched to battery backup on battery mode Connected equipment loads are still receiving AC power inverted from...

Страница 35: ...the cursor Press the enter button to select one of the available menu options 10 6 UPS System Measure Menu Press the enter button to select MEASURE from the main menu Use the scroll buttons or to scro...

Страница 36: ...press the enter button to enter the numeral choice After entering the last numeral press the enter button to confirm the password choice The default user password is 0000 The default administrator pas...

Страница 37: ...urn to the previous menu 10 9 Output Setup Menu Note The UPS system must be in bypass mode to change the output parameters Enter the UPS system setup menu as described in Section 10 7 Use the scroll b...

Страница 38: ...uttons to select the desired setting and press the enter button to confirm the setting Note Press the ESC button to return to the previous menu 10 10 Battery Setup Menu Note The UPS system must be in...

Страница 39: ...s to select the desired setting and press the enter button to confirm the setting Note The default charger current setting is 7A From the BAT DATE SETTING screen use the scroll buttons to select the d...

Страница 40: ...ser login is sufficient From the PASSWORD CHANGE screen use the scroll buttons and the enter button to select the desired menu choice Use the scroll buttons to select the desired settings and press th...

Страница 41: ...ng does not require an administrator login a user login is sufficient From the SERIAL COM ID screen use the scroll buttons to select the desired serial port ID and press the enter button to confirm th...

Страница 42: ...READ from the menu Available statistical data includes the total operating time the number of battery events and the number of bypass events If you wish to reset the statistical data use the scroll bu...

Страница 43: ...from the event log menu Use the scroll buttons to scroll through the event log data Press the ESC button to return to the previous menu If you wish to erase the event log use the scroll buttons and t...

Страница 44: ...tery charge rate for an extended period may damage the battery system Select MANUAL BATTERY TEST to initiate a battery test You must enter the administrator password to confirm the operation Select BU...

Страница 45: ...e ESC button to return to the previous menu 10 17 Other Menu Choices Enter the maintenance menu as described in Section 10 12 Use the scroll buttons to move the cursor to OTHERS then press the enter b...

Страница 46: ...the SNMPWEBCARD accessory 11 3 Input Dry Contact Interface The input dry contact interface receives contact closure signals that allow the UPS system to receive commands and monitor external battery...

Страница 47: ...e normally open 11 6 External Battery Cabinet Temperature Inputs The external battery cabinet temperature input connections P3 P4 P5 P6 allow the UPS system to receive signals from an optional accesso...

Страница 48: ...not normal Output overload warning shutdown The load exceeds the capacity of the UPS system Power module fault shutdown The UPS system has shut down due to an internal power module failure Power modul...

Страница 49: ...ry Contact Circuit Diagram The UPS system has six dry contact output connections These contacts can be normally open or normally closed OUTPUT DRY CONTACT 200706017 93 2688 SU manual 4C indd 49 200706...

Страница 50: ...perature set shut down delay time enable disable alarm and remote shutdown Hardware Baud Rate 2400 BPS Data Length 8 bits Stop Bit 1 bit Parity NONE Pin Assignment Pin 2 TXD Transmit Data Pin 3 RXD Re...

Страница 51: ...requency Loading Battery Voltage UPS abnormal messages with intelligent self diagnosis Interface Standard RS 232 Dry Contact Optional SNMPWEBCARD Others Parallel Redundancy Yes 1 1 for 2 UPS systems o...

Страница 52: ...long an implied warranty lasts and some states do not allow the exclusion or limitation of incidental or consequential damages so the above limitations or exclusions may not apply to you This Warrant...

Страница 53: ...CA 3O 4 hilos tierra wye No es apropiado para aplicaciones m viles 1111 W 35th Street Chicago IL 60609 USA 1 773 869 1234 www tripplite com Derechos de Autor 2007 Tripp Lite Todas la marcas registrada...

Страница 54: ...Apagado Un solo UPS 79 9 7 Revisi n Preliminar UPS en Paralelo 80 9 8 Procedimiento de Arranque UPS en Paralelo 80 9 9 Procedimiento de Apagado UPS en Paralelo 81 9 10 Procedimiento de Derivaci n Man...

Страница 55: ...ancia paralela o hot standby 1 1 incorporada para capacidad incrementada o tolerancia a fallas Hasta 80kVA de capacidad en una compacta base hasta 160kVA en configuraci n de redundancia paralela 1 1 F...

Страница 56: ...necesario instalarlo con los soportes para montaje Use los niveladores puntales para proporcionar un adecuado soporte a largo plazo Cuando mueva el sistema UPS emp jelo del frente o de atr s no de lo...

Страница 57: ...camente por personal capacitado con el sistema UPS apagado o puesto en modo de derivaci n Desconecte las bater as internas si est n presentes antes de efectuar cualquier servicio apagando el interrupt...

Страница 58: ...ndido Presione este bot n y mant ngalo as por 3 segundos para encender el inversor del Sistema UPS Bot n de Apagado Presione este bot n y mant ngalo as por 3 segundos para apagar el inversor del Siste...

Страница 59: ...i n Interruptor de Circuitos de Salida Q4 Controla la salida de energ a CA Interruptor de Circuitos de la Derivaci n Manual Q3 Controla la energ a CA de entrada al sistema UPS durante una operaci n de...

Страница 60: ...otro sistema UPS de i tipo y capacidad id nticos para usarse en una configuraci n de redundancia paralela 1 1 Vea la Secci n 7 Cableado y la Secci n 8 Modos de Operaci n para mayor informaci n Interfa...

Страница 61: ...ara quitar el panel superior panel frontal y panel trasero Tambi n quite el pl stico y el material de acojinamiento interior Confirme que el nombre del modelo y tipo indicado en la parta posterior del...

Страница 62: ...equerimientos de rssitencia carga del piso El sistema UPS debe instalarse en un entorno limpio seguro con una humedad relativa menor al 90 sin condensaci n Opere el sistema UPS a temperaturas interior...

Страница 63: ...var an por modelo 6 1 Diagramas de Cableado de la Bater a Interna Revise los diagramas del cableado de la bater a interna antes de conectar las bater as internas El sistema UPS hasta cuatro m dulos d...

Страница 64: ...1 Diagrama de Cableado de la Bater a Interna continuaci n Conector Trasero de la Bater a del Sistema UPS Conector Trasero de la Bater a del Sistema UPS Bater a Superior Bater a Superior Bater a Infer...

Страница 65: ...del sistema UPS Remueva los cartuchos de fusibles de cada bloque de fusibles Desconecte los cables de puenteo jumpers azul y blanco conectado a cada bloque de fusibles Advertencia Cuando desconecte l...

Страница 66: ...el compartimiento de bater as pueden permanecer vac as Reconecte el soporte del bloque de fusibles Las letras en el bloque de fusibles deber n estar hacia arriba cuando est n orientadas correctamente...

Страница 67: ...al conector negro m s cercano localizado dentro del compartimiento de bater as del sistema UPS Conecte el cable rojo por cada m dulo de bater as internas al conector rojo m s cercano localizado dentro...

Страница 68: ...que requieran una conexi n neutra a un sistema de distribuci n de energ a IT el dispositivo de desconexi n debe ser un dispositivo de cuatro polos y debe desconectar todos los conductores de l nea y...

Страница 69: ...Diagrama del Bloque de Terminales del Sistema UPS 7 4 Diagramas del Cableado del Gabinete de Bater as Externas Entrada Terminales de Tierra R R R S S S T T T N N N N Salida Entrada de Derivaci n Cone...

Страница 70: ...14 mm2 4 hilos tierra wye 4 hilos tierra wye SU40KX 220 380V 230 400V o 220 380V 230 400V o 240 415V AC 30 240 415V AC 3O 75A 120A 14 mm2 4 hilos tierra wye 4 hilos tierra wye SU60KX 220 380V 230 400...

Страница 71: ...ete de bater as externas para diagramas del bloque de terminales Vea la Secci n 7 4 para los diagramas de conexi n Vea la Secci n 7 5 para los requerimientos del calibre de los cables Los cables de es...

Страница 72: ...interruptor del interruptor de circuito de derivaci n manual C est apagado Tercero confirme que el interruptor de circuitos de salida D est apagado Confirme la fase de cada cable entonces conecte los...

Страница 73: ...rada Dual Advertencias de la Redundancia en Paralelo La longitud total del cable de entrada debe ser igual a la longitud total del cable de salida a fin de prevenir la distribuci n desequilibrada de l...

Страница 74: ...quipo conectado 8 3 Modo de Derivaci n Autom tica Un Solo UPS Si el inversor funciona mal debido a temperatura excesiva sobrecarga corto circuito de salida voltaje anormal o problemas con la bater a e...

Страница 75: ...eda cambiar a modo de derivaci n autom tico 8 6 Modo de Respaldo UPS en Paralelo Es similar al Modo de Respaldo para un solo sistema UPS Secci n 8 2 excepto que la carga total del equipo conectado es...

Страница 76: ...Ambos sistemas UPS deben estar en Modo de Derivaci n Manual 8 9 Modo Hot Standby UPS en Paralelo Para mayor tolerancia a fallas el sistema UPS redundante act a como la fuente de energ a derivaci n re...

Страница 77: ...Todos los interruptores de los interruptores de circuito deben estar apagados incluyendo el interruptor de circuitos del gabinete de bater as externas si lo hubiera Confirme que no existen voltajes p...

Страница 78: ...a reserva a modo en l nea normal El LED BYPASS Derivaci n se obscurecer y el LED NORMAL se iluminar 9 4 Procedimiento de Arranque de la Bater a Un Solo UPS Nota La bater a debe estar por lo menos parc...

Страница 79: ...nual A y entonces apague el interruptor de circuitos de salida B 9 6 Procedimiento de Apagado Un Solo UPS Advertencia El procedimiento de apagado del sistema UPS eliminar la salida de energ a CA para...

Страница 80: ...as UPS y crea un serio riesgo de lesiones personales y da os a la propiedad Todos los interruptores de los interruptores de circuito deber n estar apagados incluyendo los interruptores de circuito de...

Страница 81: ...gado UPS en Paralelo Advertencia El procedimiento de apagado del sistema UPS eliminar la salida de energ a CA para todas las cargas Antes de apagar confirme que todas las cargas est n apagadas o coloq...

Страница 82: ...bot n Si el otro sistema UPS puede soportar las cargas del equipo conectad solo el sistema UPS que se apago apagar su inversor y su pantalla LCD indicar LOAD NOT POWERED carga no alimentada La pantall...

Страница 83: ...interruptor de circuitos de la entrada de derivaci n A y el interruptor de circuitos de salida B de cada sistema UPS Confirme que las pantallas LCD de ambos sistemas UPS indican ON MANUAL BYPASS y ent...

Страница 84: ...uencia Output Setup Instalaci n de la Salida Inverter Voltage Voltaje del Inversor 220 230 240 Inverter Frequency Frecuencia del Inversor 50 60Hz ECO Mode Enable Disable Modo ECO Habilitar Deshabilita...

Страница 85: ...iste otro mensaje la pantalla regresar a la pantalla inicial Note Presionando el bot n ESC regresar a la pantalla inicial 10 4 Mensajes de Estado y Diagramas La salida del sistema UPS est apagada y la...

Страница 86: ...te cambie a modo de respaldo Ve al Secci n 10 10 para m s informaci n El sistema UPS ha cambiado a modo de respaldo de la bater a on battery Las cargas del equipo conectado aun est n recibiendo energ...

Страница 87: ...cursor Presione el bot n Entrar para seleccionar una de las opciones del men disponibles 10 6 Men de Mediciones del Sistema UPS Presione el bot n Entrar Para seleccionar MEASURE del men principal Use...

Страница 88: ...n entrar para ingresar el n mero elegido Despu s de ingresar el ltimo n mero presione el bot n entrar para confirmar la selecci n de la contrase a La contrase a predeterminada de f brica para el usuar...

Страница 89: ...resar al men anterior 10 9 Men de Instalaci n de la Salida Nota El sistema UPS debe estar en modo de derivaci n para cambiar los par metros de la Salida Ingrese al men de instalaci n del sistema UPS c...

Страница 90: ...leccionar el ajuste deseado y entonces presione el bot n entra para confirmar el ajuste Nota Presione el bot n ESC para regresar al men anterior 10 10 Men de Instalaci n de la Bater a Nota El sistema...

Страница 91: ...ido para seleccionar los ajustes deseados y presione el bot n entrar para confirmar los ajustes Nota El ajuste predeterminado para la corriente es 7A Desde la pantalla BAT DATE SETTING use los botones...

Страница 92: ...ador con la contrase a de usuario es suficiente Desde la pantalla PASSWORD CHANGE use los botones de recorrido y el bot n entrar para seleccionar el men deseado Use los botones de recorrido para selec...

Страница 93: ...metro no necesita iniciar la sesi n como administrador hacerlo como usuario es suficiente Desde la pantalla SERIAL COM ID use los botones de recorrido para seleccionar el ID deseado para el puerto se...

Страница 94: ...D del men La informaci n estad stica disponible incluye el tiempo total de operaci n el n mero de eventos de la bater a y el n mero de eventos de la derivaci n Si desea restaurar la informaci n estad...

Страница 95: ...l men de registros de eventos Use los botones de recorrido para navegar por el registro de eventos Presione el bot n ESC para regresar al men anterior Si desea borrar el registro de eventos use los bo...

Страница 96: ...e recarga de la bater a por un per odo extendido puede da ar al sistema de bater as Seleccione MANUAL BATTERY TEST para iniciar una prueba de la bater a Debe introducir la contrase a del administrador...

Страница 97: ...a Presione el bot n ESC para regresar al men anterior 10 17 Otras Opciones del Men Ingrese al men de mantenimiento como se describe en la Secci n 10 12 Use los botones de recorrido para mover el curso...

Страница 98: ...ntrada de Contacto Seco La interfaz de entrada de contacto seco recibe instrucciones de cierre de contacto que permiten al sistema UPS recibir ordenes y monitorear las condiciones de la bater a extern...

Страница 99: ...as la Temperatura del Gabinete de Bater as Externas Las conexiones de entrada de la temperatura del gabinete de bater as externas P3 P4 P5 P6 permiten al sistema UPS recibir se ales de un accesorio op...

Страница 100: ...falla en el m dulo de potencia Se ha apagado el sistema UPS debido a una falla del m dulo de potencia interno Advertencia del m dulo de potencia Un m dulo de potencia interno tiene un error pero el si...

Страница 101: ...lida Contacto Seco El sistema UPS tiene seis contactos de salida de contacto seco Estos contactos pueden estar normalmente abiertos o normalmente cerrados SALIDA DE CONTACTO SECO 200706017 93 2688 SU...

Страница 102: ...el tiempo de retrazo para apagar el UPS habilitar deshabilitar la alarma y apagado remoto Hardware Tasa de Bauds 2400 Longitud de Datos BPS 8 bits Bit de Parada 1bit Paridad NINGUNA Asignaci n de Pine...

Страница 103: ...o inteligente Interfaz Est ndar RS 232 Contacto Seco Opcional SNMPWEBCARD Otros Redundancia en Paralelo S 1 1 para 2 sistemas UPS del mismo tipo y capacidad nicamente EPO Est ndar Local y Remoto SRAM...

Страница 104: ...entes y mano de obra al consumidor acorde a la siguiente tabla Producto Modelo Vigencia Sistema de Energ a Ininterrumpible UPS Familia BC OMNI SMART SMARTONLINE MONOFASICOS 2 A os Sistema de Energ a I...

Страница 105: ...prise de terre raccord en toile Ne convient pas aux applications mobiles 1111 W 35th Street Chicago IL 60609 USA 1 773 869 1234 www tripplite com Tous droits r serv s 2007 Tripp Lite Toutes les marqu...

Страница 106: ...Proc dure d arr t Onduleur unique 131 9 7 Liste de contr le pr liminaire Onduleur parall le 131 9 8 Proc dure de d marrage Onduleur parall le 132 9 9 Proc dure d arr t Onduleur parall le 133 9 10 Pro...

Страница 107: ...pour une capacit et une tol rance aux pannes accrues Capacit atteignant 80 kVA dans un encombrement compact jusqu 160 kVA en configuration de redondance active 1 1 Facteur de puissance lev l entr e e...

Страница 108: ...ur long terme apr s son installation d finitive Utiliser les v rins de calage pour supporter l appareil long terme Toujours d placer l onduleur en poussant vers l avant ou vers l arri re jamais vers l...

Страница 109: ...tre effectu s que par un personnel form alors que l onduleur est d sactiv ou mis en mode de d rivation D brancher les batteries internes si les batteries sont pr sentes avant d ex cuter tout entretie...

Страница 110: ...ctionner une commande du menu ou confirmer un changement de param tre Touche ON Presser et tenir cette touche pendant 3 secondes pour mettre l inverseur de l onduleur en marche Touche OFF Presser et t...

Страница 111: ...erie interne pour plus d information Commutateur du disjoncteur de sortie Q4 Contr le la sortie du CA Commutateur du disjoncteur de d rivation manuelle Q3 Contr le l entr e du CA l onduleur pendant qu...

Страница 112: ...avec redondance Ce port DB9 connecte l onduleur un autre onduleur de cat gorie et de capacit identique pour utilisation dans une configuration de redondance parall le 1 1 Voir la Section 7 C blage et...

Страница 113: ...bout et utilisez un tournevis pour enlever le panneau sup rieur et les panneaux avant et arri re Enlever galement le film de plastique et le rembourrage int rieur anti chocs V rifier que le nom et les...

Страница 114: ...entr e et de charge sur le plancher L onduleur doit tre install dans un environnement propre et s curitaire et o l humidit relative ne d passe pas 90 sans condensation Faire fonctionner l onduleur de...

Страница 115: ...rnes varie selon le mod le 6 1 Sch mas de c blage des batteries internes Examiner les sch mas de c blage des batteries internes avant de connecter les batteries internes L onduleur peut comporter jusq...

Страница 116: ...nternes suite Connecteur arri re de la batterie de l onduleur Connecteur arri re de la batterie de l onduleur Partie sup de la batterie Partie sup de la batterie Support de la bo te fusibles Partie in...

Страница 117: ...es fusibles cartouche de la batterie de chaque bo te fusibles D brancher les c bles de pontage bleus et blancs attach s chaque bo te fusibles Avertissement Pour d brancher les c bles de pontage les ti...

Страница 118: ...du compartiment de la batterie demeurent vides en fonction du mod le de l onduleur Raccorder le support de la bo te fusibles Les lettres apparaissant sur le support de la bo te fusibles doivent tre l...

Страница 119: ...nterne au connecteur noir situ l int rieur du compartiment de la batterie de l onduleur le plus pr s Brancher le c ble rouge de chaque bloc batterie interne au connecteur rouge situ l int rieur du com...

Страница 120: ...d un appareil n cessitant une connexion neutre un syst me de distribution de courant IT le dispositif de d branchement doit tre un dispositif t trapolaire et doit d brancher tous les conducteurs d al...

Страница 121: ...tions exactes 7 3 Sch ma du bornier de l onduleur 7 4 Sch mas de c blage du bo tier externe de la batterie Entr e Bornes de mise la masse R R R S S S T T T N N N N Sortie Entr e de d rivation Connexio...

Страница 122: ...0KX 220 380V 230 400V o 220 380V 230 400V o 240 415V AC 30 240 415V AC 3O 75 A 120 A 14 mm2 4 fils fil de mise la fils fil de mise la terre raccord en Y 4 terre raccord en Y SU60KX 220 380V 230 400V o...

Страница 123: ...oir les sch mas de borniers la Section 7 3 et dans la documentation du bo tier de la batterie externe Voir la Section 7 4 pour les sch mas de c blage Voir la Section 7 5 pour le calibre des c bles Les...

Страница 124: ...en position ferm e Ensuite v rifier que le commutateur du disjoncteur de d rivation manuelle C est en position ferm e Troisi mement v rifier que le commutateur du disjoncteur de sortie D est en posit...

Страница 125: ...e parall le La longueur totale du c ble d entr e doit tre gale la longueur du c ble de sortie pour viter l asym trie des charges entre deux onduleurs en mode de d rivation c est dire que l cart entre...

Страница 126: ...reils qui y sont branch s 8 3 Mode d rivation automatique Onduleur unique Si l inverseur est d fectueux en raison d une temp rature excessive d une surcharge d un court circuit la sortie d une tension...

Страница 127: ...8 6 Mode batterie de secours Onduleur parall le Ce mode est semblable au mode batterie de secours pour un onduleur unique Section 8 2 sauf que la charge totale des appareils branch s est partag e par...

Страница 128: ...de d rivation manuelle 8 9 Mode de secours imm diat Onduleur parall le Pour une tol rance aux fautes accrue l onduleur redondant remplit les fonctions de source d alimentation lectrique de d rivation...

Страница 129: ...les commutateurs de disjoncteurs doivent tre en position ferm e y compris le coupe circuit du bo tier de la batterie externe s il est disponible V rifier qu il n y ait aucune diff rence de potentiel e...

Страница 130: ...mode en ligne normal Le T MOIN DEL BYPASS s assombrira et le T MOIN DEL NORMAL s illuminera 9 4 Proc dure de d marrage sur batterie Onduleur unique Remarque La batterie doit tre au moins partiellement...

Страница 131: ...manuelle A puis teindre le commutateur du disjoncteur de sortie B 9 6 Proc dure d arr t Onduleur unique Avertissement La proc dure d arr t de l onduleur coupera l alimentation de sortie en CA pour tou...

Страница 132: ...urs et provoquera un risque s rieux de blessure et de dommages la propri t Tous les commutateurs de disjoncteurs doivent tre en position ferm e y compris les coupe circuits du bo tier de la batterie e...

Страница 133: ...t Onduleur parall le Avertissement La proc dure d arr t de l onduleur coupera l alimentation de sortie en CA pour tous les appareils Avant d arr ter l onduleur v rifier que tous les appareils sont tei...

Страница 134: ...u ce que vous entendiez un bip puis lib rer la touche Si l autre onduleur peut supporter les appareils qui y sont branch s lui seul l inverseur de l onduleur qui a t teint s arr tera et son cran ACL a...

Страница 135: ...disjoncteur de l entr e de d rivation A et le commutateur du disjoncteur de sortie B de chaque onduleur Confirmez que les crans ACL des deux onduleurs indiquent ON MANUAL BYPASS puis allumer le commut...

Страница 136: ...l inverseur 220 230 240 Inverter Frequency Fr quence de l inverseur 50 60 Hz ECO Mode Enable Disable Mode ECO Activer D sactiver Frequency Converter Mode Mode convertisseur de fr quence Battery Setup...

Страница 137: ...an reviendra l affichage par d faut Remarque Appuyer sur la touche ESC pour retourner l affichage par d faut 10 4 Messages et diagrammes d tat La sortie de l onduleur est en position ferm e et les app...

Страница 138: ...e de secours Voir la Section 10 10 pour plus d information L onduleur est pass en mode batterie de secours sur batterie Les appareils qui y sont branch s sont toujours aliment s en CA invers provenant...

Страница 139: ...cer le curseur Presser la touche d entr e pour s lectionner une des options disponibles du menu 10 6 Menu de mesures de l onduleur Presser la touche d entr e pour s lectionner MEASURE partir du menu p...

Страница 140: ...emier chiffre puis appuyer sur la touche d entr e pour saisir le chiffre choisi Apr s avoir saisi le dernier chiffre appuyer sur la touche d entr e pour confirmer le choix de mot de passe Le mot de pa...

Страница 141: ...au menu pr c dent 10 9 Menu de configuration de sortie Remarque L onduleur doit tre en mode de d rivation pour modifier les param tres de sortie Acc der au menu de configuration l onduleur de la mani...

Страница 142: ...er le param tre d sir et appuyer sur la touche d entr e pour confirmer le param tre Remarque Appuyer sur la touche ESC pour retourner au menu pr c dent 10 10 Menu de configuration de la batterie38 Rem...

Страница 143: ...er le param tre d sir et appuyer sur la touche d entr e pour confirmer le param tre Remarque Le param tre par d faut du courant du chargeur est 7 A partir de l cran BAT DATE SETTING utiliser les touch...

Страница 144: ...ilisateur peut le faire partir de l cran PASSWORD CHANGE utiliser les touches de d filement et la touche d entr e pour s lectionner un des choix du menu Utiliser les touches de d filement pour s lecti...

Страница 145: ...pas n cessaire d avoir le statut d administrateur pour modifier ce param tre tout utilisateur peut le faire partir de l cran SERIAL COM ID utiliser les touches de d filement pour s lectionner le port...

Страница 146: ...rtir du menu Les donn es statistiques disponibles incluent la dur e totale de fonctionnement le nombre d v nements de batterie et le nombre d v nements de d rivation Pour remettre les donn es statisti...

Страница 147: ...du menu Utiliser les touches de d filement pour faire d filer les donn es d v nements Appuyer sur la touche ESC pour retourner au menu pr c dent Si vous souhaitez effacer le journal des v nements uti...

Страница 148: ...bit de charge de la pile pendant une dur e prolong e peut endommager la batterie S lectionner MANUAL BATTERY TEST pour proc der un test de la batterie Vous devez saisir le mot de passe administrateur...

Страница 149: ...ur la touche ESC pour retourner au menu pr c dent 10 17 Autres choix de menu Acc der au menu d entretien de la mani re d crite la Section 10 12 Utiliser les touches de d filement pour d placer le curs...

Страница 150: ...BCARD 11 3 Interface d entr e contact sec L interface d entr e contact sec re oit les signaux de fermeture de contact qui permettent l onduleur de recevoir les commandes et de surveiller les condition...

Страница 151: ...tr es de temp rature du bo tier de la batterie externe Les connexions d entr es de temp rature du bo tier de la batterie externe P3 P4 P5 P6 permettent l onduleur de recevoir des signaux d un accessoi...

Страница 152: ...ie Arr t La charge d passe la capacit de l onduleur D faillance du module d alimentation arr t L onduleur s est arr t cause d une d faillance interne du module d alimentation Avertissement du module d...

Страница 153: ...sortie contact sec L onduleur poss de six connexions de sortie contact sec Ces contacts peuvent tre normalement ouverts ou ferm s INTERFACE DE SORTIE CONTACT SEC 200706017 93 2688 SU manual 4C indd 1...

Страница 154: ...ver d sactiver l alarme et l arr t distance Mat riel Vitesse Bauds 2400 BPS Longueur des donn es 8 bits Bit d arr t 1 bit Parit AUCUNE Affectation des broches Broche 2 TXD Transmettre les donn es Broc...

Страница 155: ...ec renseignements d autodiagnostic Interface Standard RS 232 contact sec En option SNMPWEBCARD Autres Redondance parall le OUI 1 1 pour 2 onduleurs du m me type et de la m me capacit seulement EPO Sta...

Страница 156: ...ESSOIRES ET INDIRECTS Certains tats n autorisent pas les restrictions sur la dur e d une garantie implicite et certains autres n autorisent pas l exclusion ni la restriction des dommages accessoires o...

Страница 157: ...X SU40KX SU60KX SU80KX 220 380 230 400 240 415 AC 3 4 220 380 230 400 240 415 AC 3 4 1111 W 35th Street Chicago IL 60609 USA 1 773 869 1234 www tripplite com 2007 Tripp Lite 200706017 93 2688 SU manua...

Страница 158: ...3 9 6 183 9 7 184 9 8 184 9 9 185 9 10 186 9 11 187 10 188 10 188 10 1 188 10 2 188 10 3 189 10 4 189 10 5 191 10 6 191 10 7 192 10 8 192 10 9 193 10 10 194 10 11 196 10 12 197 10 13 198 10 14 199 10...

Страница 159: ...3 14 1 3 Tripp Lite SU20KX SU40KX SU60KX and SU80KX VoIP IP IGBT THD N 1 SU40KX SU60KX SU80KX 1 1 80 160 1 1 200706017 93 2688 SU manual 4C indd 159 200706017 93 2688 SU manual 4C indd 159 11 29 2007...

Страница 160: ...EN 50091 2 A IEC 61000 4 2 4 IEC 61000 4 3 3 EN 50091 1 1 EN 50091 2 A IEC 61000 4 2 4 IEC 61000 4 3 3 IEC 61000 4 4 4 IEC 61000 4 5 4 IEC 61000 4 6 IEC 61000 4 4 4 IEC 61000 4 5 4 IEC 61000 4 6 3 CN...

Страница 161: ...161 1 5 9 3 7 11 2 6 10 4 8 12 13 14 2 24 3 7 1 7 1 200706017 93 2688 SU manual 4C indd 161 200706017 93 2688 SU manual 4C indd 161 11 29 2007 2 04 26 PM 11 29 2007 2 04 26 PM...

Страница 162: ...YPASS BYPASS FAULT FAULT 10 ON ESC ESC ENTER ENTER ON ON 3 OFF OFF 3 24 3 EPO EPO 1 ON 3 1 ON 3 10 10 A A E F G H I J K B C D B C D E F G H I J K 200706017 93 2688 SU manual 4C indd 162 200706017 93 2...

Страница 163: ...SU40KX SU60KX SU80KX SU20KX SU40KX SU20KX SU40KX 6 6 Q4 Q4 Q3 Q3 Q2 Q2 Q1 Q1 A A B C D H H I I G E F B C D E F G H I SU40KX 200706017 93 2688 SU manual 4C indd 163 200706017 93 2688 SU manual 4C indd...

Страница 164: ...t 1 773 869 1234 SNMPWEBCARD RS 232 RS 232 DB9 DB9 1 1 7 7 8 8 11 11 11 11 SU20KX SU40KX SU20KX SU40KX 7 7 H I J K L M N O P 4 H L H P O N M J K I I SU40KX 200706017 93 2688 SU manual 4C indd 164 2007...

Страница 165: ...6 10 4 8 12 13 14 5 2 2 5 1 5 1 12 12 13 13 5 2 5 2 RS 232 4 12 CD ROM 2 1 2 3 4 5 1 4 3 2 5 200706017 93 2688 SU manual 4C indd 165 200706017 93 2688 SU manual 4C indd 165 11 29 2007 2 04 29 PM 11 2...

Страница 166: ...8 12 13 14 5 5 3 5 3 12 12 90 17 F 29 F 62 C 84 C 100 50 50 A B 1 2 3 4 1 2 3 4 50 cm 50 cm 100 cm A B 200706017 93 2688 SU manual 4C indd 166 200706017 93 2688 SU manual 4C indd 166 11 29 2007 2 04 3...

Страница 167: ...10PCS 12V 9AH 10PCS 12V 9AH 10PCS 12V 9AH 10PCS RED RED RED RED BLACK BLACK BLACK BLACK RED RED RED RED BLACK BLACK BLACK BLACK B W1 W1 W1 W1 W2 W2 W2 W2 12V 9AH 10PCS 12V 9AH 10PCS 12V 9AH 10PCS 12V...

Страница 168: ...4 UPS System Battery Back Connector UPS System Battery Back Connector Fuse Block Bracket 6 SU40KX shown 6 1 6 1 200706017 93 2688 SU manual 4C indd 168 200706017 93 2688 SU manual 4C indd 168 11 29 20...

Страница 169: ...169 1 5 9 3 7 11 2 6 10 4 8 12 13 14 6 6 2 6 2 OFF 1 2 3 4 5 1 2 3 4 5 200706017 93 2688 SU manual 4C indd 169 200706017 93 2688 SU manual 4C indd 169 11 29 2007 2 04 31 PM 11 29 2007 2 04 31 PM...

Страница 170: ...170 1 5 9 3 7 11 2 6 10 4 8 12 13 14 6 2 6 2 6 6 7 7 6 6 7 8 9 6 8 9 10 10 200706017 93 2688 SU manual 4C indd 170 200706017 93 2688 SU manual 4C indd 170 11 29 2007 2 04 34 PM 11 29 2007 2 04 34 PM...

Страница 171: ...7 11 2 6 10 4 8 12 13 14 6 6 2 6 2 220 280 240 ON 7 7 6 7 11 11 12 13 13 14 14 240 12 200706017 93 2688 SU manual 4C indd 171 200706017 93 2688 SU manual 4C indd 171 11 29 2007 2 04 36 PM 11 29 2007...

Страница 172: ...14 7 2 2 7 1 7 1 10 32 8 VW 1 FT 1 3 95 35 VNG 0 IT 4 24 R R S S T T N N 7 2 7 2 7 3 7 3 7 4 7 4 7 5 7 5 VNG 0 200706017 93 2688 SU manual 4C indd 172 200706017 93 2688 SU manual 4C indd 172 11 29 200...

Страница 173: ...7 11 2 6 10 4 8 12 13 14 7 SU80KX BP480V26 7 3 7 3 7 4 7 4 R R R S S S T T T N N N N N N 200706017 93 2688 SU manual 4C indd 173 200706017 93 2688 SU manual 4C indd 173 11 29 2007 2 04 38 PM 11 29 200...

Страница 174: ...380 230 400 240 415 AC 3 240 415 AC 3 75A 120A 14 mm2 4 4 SU60KX SU60KX 220 380 230 400 220 380 230 400 240 415 AC 3 240 415 AC 3 125A 160A 22 mm2 4 4 SU80KX SU80KX 220 380 230 400 220 380 230 400 240...

Страница 175: ...U60KX SU80KX SU20KX SU40KX A OFF 9 6 9 6 7 3 7 4 7 4 7 5 7 5 A B 4 5 189 A B 4 5 189 1 1 2 4 2 3 6 5 3 4 5 6 N N N A A B B A 200706017 93 2688 SU manual 4C indd 175 200706017 93 2688 SU manual 4C indd...

Страница 176: ...4 5 189 A B OFF C OFF D OFF 7 3 7 3 7 5 7 5 R R S S T T N N R R S S T T N N 1 1 2 4 5 2 3 3 4 5 A B N N R S T N R S T N R S T N D B A C 200706017 93 2688 SU manual 4C indd 176 200706017 93 2688 SU man...

Страница 177: ...OP1 Res2 OP2 10 10 2 2 1 1 1 1 7 7 7 7 A B 7 9 7 9 Res1 OP1 Res2 OP2 Res1 OP1 Res2 OP2 10 10 2 1 1 2 1 1 7 7 7 7 A B 1 1 2 2 2 2 1 1 B B A B B A 200706017 93 2688 SU manual 4C indd 177 200706017 93 2...

Страница 178: ...178 1 5 9 3 7 11 2 6 10 4 8 12 13 14 8 9 9 8 1 8 1 8 2 8 2 8 3 8 3 8 4 8 4 200706017 93 2688 SU manual 4C indd 178 200706017 93 2688 SU manual 4C indd 178 11 29 2007 2 04 46 PM 11 29 2007 2 04 46 PM...

Страница 179: ...6 8 6 8 2 8 2 1 1 8 7 Modo de Derivaci n Autom tica UPS en Paralelo 8 7 Modo de Derivaci n Autom tica UPS en Paralelo 8 3 8 3 1 1 200706017 93 2688 SU manual 4C indd 179 200706017 93 2688 SU manual 4C...

Страница 180: ...180 1 5 9 3 7 11 2 6 10 4 8 12 13 14 8 8 8 8 8 8 4 8 4 1 1 8 9 8 9 200706017 93 2688 SU manual 4C indd 180 200706017 93 2688 SU manual 4C indd 180 11 29 2007 2 04 47 PM 11 29 2007 2 04 47 PM...

Страница 181: ...T FAULT ESC ESC Enter Enter ON ON OFF OFF EPO EPO 9 2 9 2 9 3 9 3 A ON A OFF A B C D E F G H I J K L M N O I 1 2 1 2 A E F G K A B C D H I J L M N O Salida Derivaci n Manual Entrada de Derivaci n Entr...

Страница 182: ...B B ON AUTO BYPASS BYPASS A ON ON A 3 BYPASS NORMAL 9 4 9 4 A ON A OFF ON A 3 BATTERY 3 4 5 3 1 4 2 5 3 1 2 3 A B A A A A A 200706017 93 2688 SU manual 4C indd 182 200706017 93 2688 SU manual 4C indd...

Страница 183: ...13 14 9 9 5 9 5 9 6 9 6 OFF A 3 BYPASS A ON B 9 6 9 6 OFF A 3 A OFF A OFF 1 1 2 2 3 1 1 2 2 3 A A A B A A 200706017 93 2688 SU manual 4C indd 183 200706017 93 2688 SU manual 4C indd 183 11 29 2007 2...

Страница 184: ...14 9 6 9 6 A OFF A OFF 24 3 9 7 9 7 1 1 1 1 1 2 1 2 10 11 10 11 9 8 9 8 A B A ON 4 5 9 4 1 5 2 1 2 A A A B B A 200706017 93 2688 SU manual 4C indd 184 200706017 93 2688 SU manual 4C indd 184 11 29 200...

Страница 185: ...ON ON A 3 ON 3 BYPASS NORMAL 5 A ON 10 6 10 6 9 9 9 9 OFF 3 LOAD NOT POWERED ONLINE MODE ON AUTO BYPASS A OFF B 3 5 1 4 6 2 3 1 2 4 5 6 A A A A A A B 200706017 93 2688 SU manual 4C indd 185 200706017...

Страница 186: ...9 10 9 10 OFF A 3 LOAD NOT POWERED ONLINE MODE ON AUTO BYPASS 1 A OFF A ON ON MANUAL BYPASS A B OFF 3 1 4 2 3 1 4 2 3 4 3 4 A A A A A A B 200706017 93 2688 SU manual 4C indd 186 200706017 93 2688 SU...

Страница 187: ...FF B 9 11 9 11 A ON A B ON ON MANUAL BYPASS A OFF ON AUTO BYPASS A ON ON A 3 ON 3 5 1 2 3 5 4 5 1 6 2 3 4 5 A A 6 A B A B A A A 200706017 93 2688 SU manual 4C indd 187 200706017 93 2688 SU manual 4C i...

Страница 188: ...evel 4 5 Level 4 5 Level 4 5 Level 4 5 Level 4 5 Level 4 5 Level 4 5 Level 4 5 Level 3 Level 2 Level 2 Level 1 UPS STS 1 2 3 4 PFC 220 230 240 50 60 ECO UPS ID Serial COM ID DCBUS 1 2 3 4 E F G K A B...

Страница 189: ...9 3 7 11 2 6 10 4 8 12 13 14 10 10 3 10 3 ESC 10 4 10 4 UPS 1 1 2 2 3 4 1 1 3 2 2 4 200706017 93 2688 SU manual 4C indd 189 200706017 93 2688 SU manual 4C indd 189 11 29 2007 2 04 53 PM 11 29 2007 2 0...

Страница 190: ...3 7 11 2 6 10 4 8 12 13 14 10 10 4 10 4 UPS UPS 10 10 10 10 5 6 7 8 9 10 5 7 9 6 8 10 200706017 93 2688 SU manual 4C indd 190 200706017 93 2688 SU manual 4C indd 190 11 29 2007 2 04 54 PM 11 29 2007 2...

Страница 191: ...11 2 6 10 4 8 12 13 14 10 10 5 Men Principal 10 5 Men Principal 10 6 10 6 ESC 1 1 2 1 1 2 200706017 93 2688 SU manual 4C indd 191 200706017 93 2688 SU manual 4C indd 191 11 29 2007 2 04 55 PM 11 29 20...

Страница 192: ...8 12 13 14 10 10 7 10 7 UPS 4 0000 0000 10 11 10 11 UPS 10 8 10 8 10 7 10 7 1 1 2 2 3 4 1 2 3 1 4 2 200706017 93 2688 SU manual 4C indd 192 200706017 93 2688 SU manual 4C indd 192 11 29 2007 2 04 56...

Страница 193: ...9 3 7 11 2 6 10 4 8 12 13 14 10 10 8 10 8 10 9 10 9 10 7 10 7 3 1 4 2 3 3 1 4 2 3 200706017 93 2688 SU manual 4C indd 193 200706017 93 2688 SU manual 4C indd 193 11 29 2007 2 04 57 PM 11 29 2007 2 04...

Страница 194: ...7 11 2 6 10 4 8 12 13 14 10 10 9 10 9 6 ESC 10 10 10 10 10 7 10 7 4 1 5 2 6 4 1 5 2 6 200706017 93 2688 SU manual 4C indd 194 200706017 93 2688 SU manual 4C indd 194 11 29 2007 2 04 58 PM 11 29 2007...

Страница 195: ...11 2 6 10 4 8 12 13 14 10 10 10 10 10 26AH 40AH 100AH 140 AH 1 2 3 4 7 ESC 3 4 5 6 3 4 5 6 200706017 93 2688 SU manual 4C indd 195 200706017 93 2688 SU manual 4C indd 195 11 29 2007 2 04 58 PM 11 29 2...

Страница 196: ...9 3 7 11 2 6 10 4 8 12 13 14 10 10 11 10 11 10 7 10 7 ID ID 1 2 3 4 5 1 3 4b 2 4 5 200706017 93 2688 SU manual 4C indd 196 200706017 93 2688 SU manual 4C indd 196 11 29 2007 2 04 59 PM 11 29 2007 2 0...

Страница 197: ...10 10 11 10 11 serial COM ID serial ID RS 232 RS 485 RS 422 ESC 10 12 10 12 2 3 10 7 10 7 7 1 8 2 9 6 6 7 1 2 8 9 200706017 93 2688 SU manual 4C indd 197 200706017 93 2688 SU manual 4C indd 197 11 29...

Страница 198: ...5 9 3 7 11 2 6 10 4 8 12 13 14 10 10 13 10 13 10 12 10 12 ESC 1 2 3 4 5 1 3 5 2 4 200706017 93 2688 SU manual 4C indd 198 200706017 93 2688 SU manual 4C indd 198 11 29 2007 2 05 00 PM 11 29 2007 2 05...

Страница 199: ...9 3 7 11 2 6 10 4 8 12 13 14 10 10 14 10 14 10 12 10 12 ESC ESC 1 2 3 4 5 1 3 5 2 4 200706017 93 2688 SU manual 4C indd 199 200706017 93 2688 SU manual 4C indd 199 11 29 2007 2 05 01 PM 11 29 2007 2 0...

Страница 200: ...11 2 6 10 4 8 12 13 14 10 10 15 10 15 10 12 10 12 10 6 10 6 ESC 1 2 3 4 5 6 1 3 5 6 2 4 200706017 93 2688 SU manual 4C indd 200 200706017 93 2688 SU manual 4C indd 200 11 29 2007 2 05 02 PM 11 29 200...

Страница 201: ...10 16 10 16 Tripp Lite Tripp Lite 10 12 10 12 ESC 10 17 10 17 10 12 10 12 DCBUS VOLT DCBUS UPS ESC 1 1 2 2 1 1 2 2 200706017 93 2688 SU manual 4C indd 201 200706017 93 2688 SU manual 4C indd 201 11 2...

Страница 202: ...NMPWEBCARD Tripp Lite SNMPWEBCARD SNMPWEBCARD Ethernet UPS SNMP telnet 1 773 869 1234 11 3 11 3 UPS P1 P2 2 P3 1 P4 2 P5 3 P6 4 P7 SNMPWEBCARD RS232 200706017 93 2688 SU manual 4C indd 202 200706017 9...

Страница 203: ...4 P1 11 5 11 5 P2 UPS 11 6 11 6 P3 P4 P5 P6 1 773 869 1234 11 7 11 7 P7 Pin 1 12 Pin2 Pin3 Pin4 Pin5 1 773 869 1234 P1 P2 200706017 93 2688 SU manual 4C indd 203 200706017 93 2688 SU manual 4C indd 2...

Страница 204: ...11 8 6 Pin 1 2 UPS Pin 3 4 UPS Pin 5 6 UPS Pin 7 8 UPS 220 Pin 9 10 Pin 11 12 UPS UPS UPS UPS UPS 10 10 10 10 Tripp Lite 200706017 93 2688 SU manual 4C indd 204 200706017 93 2688 SU manual 4C indd 204...

Страница 205: ...205 1 5 9 3 7 11 2 6 10 4 8 12 13 14 11 11 9 11 9 6 OUTPUT DRY CONTACT 200706017 93 2688 SU manual 4C indd 205 200706017 93 2688 SU manual 4C indd 205 11 29 2007 2 05 03 PM 11 29 2007 2 05 03 PM...

Страница 206: ...0 RS232 RS 232 DB9 UPS Tripp Lites PowerAlert SNMP UPS RS 232 2400 BPS 8 1 Pin 2 TXD Pin 3 RXD Pin 5 GND 11 11 11 11 UPS 1 1 UPS UPS 200706017 93 2688 SU manual 4C indd 206 200706017 93 2688 SU manual...

Страница 207: ...S 500 Yes 94 97 0 32 F 104 F 0 C 40 C 90 1 65 68 70 70 520 850 1165 267 412 210 244 12 2 12 2 12 3 12 3 SU20KX SU40KX SU60KX SU80KX SU20KX SU40KX SU60KX SU80KX 267 412 210 244 600 2 927 2 475 2 552 2...

Страница 208: ...tripplite com mailto intlservice tripplite com Tripp Lite 1111 W 35th Street Chicago IL 60609 USA FCC A FCC A 15 1 2 15 Tripp Lite Tripp Lite Note on Labeling Note on Labeling V V O 1111 W 35th Street...

Отзывы: