background image

31

10. Administrator Utility

 Click 

OK

 to enter Firmware Upgrade mode. This may take a few minutes 

as the system prepares to upgrade 

fi

 rmware. Users with active sessions in 

the OSD will be informed that they should logout. (Some KVM consoles 
may be automatically logged out.) The 

Firmware Upgrade Web Page


will appear (Figure 26). It displays the current 

fi

 rmware versions for the 

B060-032-8 and other modules.

  Select the check box for each module that you wish to upgrade. Or, click 

to clear the check box for each module that you do not wish to upgrade.

 Click 

Browse

. The 

Choose 

fi

 le

 dialog box appears.

  Navigate to the directory where the new 

fi

 rmware upgrade package 

fi

 le 

was saved, select the 

fi

 le, and click 

Open

. The path and 

fi

 lename appear 

in the 

Firmware Image File


fi

 eld. (If you have not yet downloaded the 

fi

 rmware upgrade package, see “Downloading the Firmware Upgrade 

Package,” page 30).

  Decide whether to check the 

fi

 rmware version level.

  (a)  If you select Check Firmware Version, the B060-032-8 Administrator Utility compares the 

fi

 rmware level of the B060-032-8 with that of the upgrade 


fi

 les. If it 

fi

 nds that the current 

fi

 rmware version of the B060-032-8 is equal or higher, the 

fi

 rmware upgrade is aborted and the B060-032-8 


automatically resets and returns to the login screen.

  (b)  If you do not select Check Firmware Version, the Utility installs the upgrade 

fi

 les without comparing the version levels.

 Click 

Upgrade

 to begin upgrading the 

fi

 rmware or click Abort to cancel the 

fi

 rmware upgrade. If 

fi

 rmware upgrade is aborted, the B060-032-8 will 

automatically reboot, requiring you to login again. Note: It takes approximately seven minutes to upgrade 

fi

 rmware for a single level installation, and 17 

minutes for a cascaded installation. Please be patient while 

fi

 rmware upgrade is in progress.

 After 

the 

fi

 rmware upgrade completes, the B060-032-8 automatically resets and returns to the login screen.

Upgrading Firmware via the Firmware Upgrade Utility

Before starting the Firmware Upgrade Utility, ensure that both the host computer and 

fi

 rst-level B060-032-8 lie within the same subnet and are not 

physically separated by a router, gateway, or 

fi

 rewall. If you have not yet downloaded the Firmware Upgrade Utility and 

fi

 rmware upgrade package, you 

can obtain them via the Support section at www.tripplite.com. Note: This procedure will not upgrade 

fi

 rmware for cascaded B060-032-8, Console Interface 

Units (CIUs) or Server Interface Units (SIUs).

To upgrade 

fi

 rmware using the Firmware Upgrade Utility:

 Double-click 

the 

B060-032-8 Firmware Upgrade Utility

 icon that 

you’ve downloaded from the Support section at www.tripplite.com. 
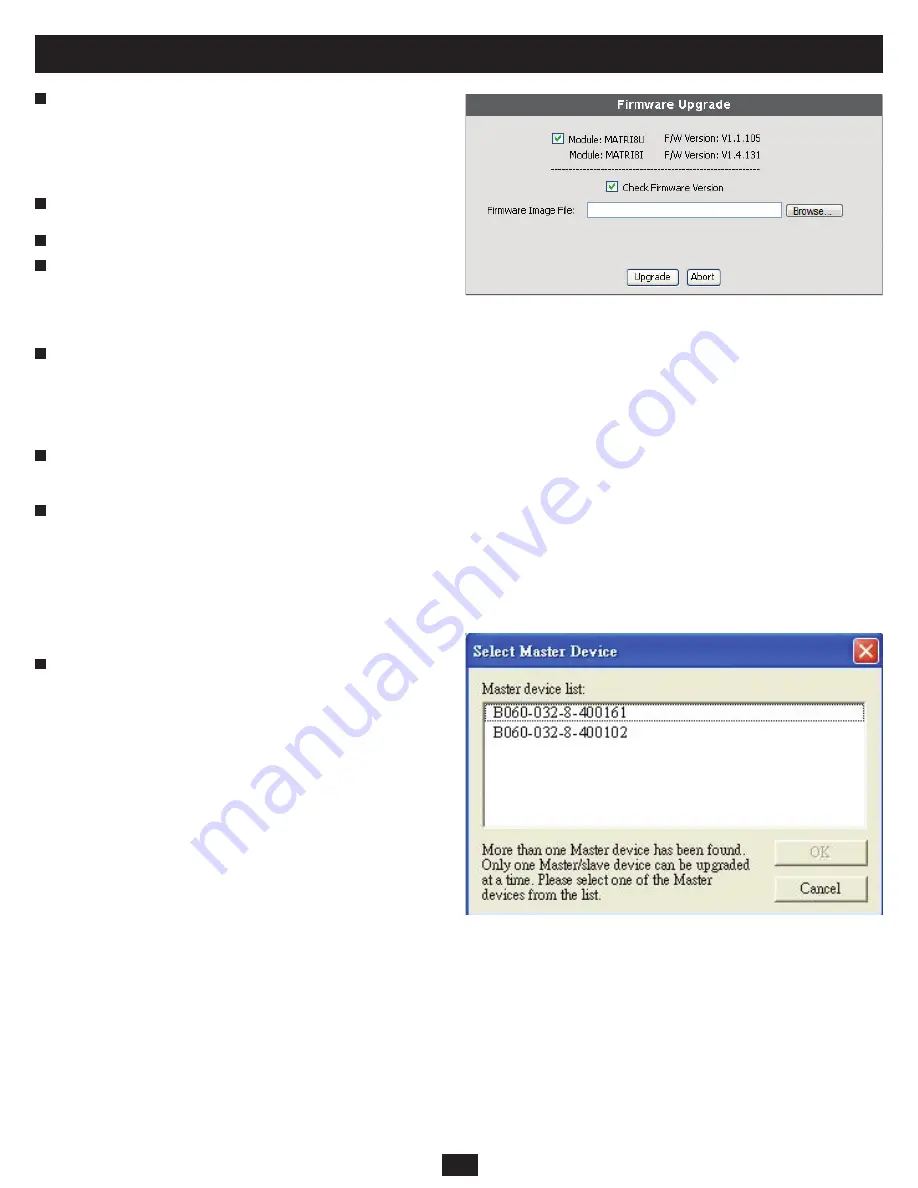
If multiple master (

fi

 rst-level) stations lie within the subnet, the 

Select 

Master Device

 dialog box appears (Figure 27).

3

4

5

6

7

8

9

1

Figure 26: Firmware Upgrade Web Page

Figure 27: Select Master Device Dialog Box

Содержание NetDirector B060-032-8

Страница 1: ...35th Street Chicago IL 60609 USA 773 869 1234 www tripplite com Copyright 2008 Tripp Lite All rights reserved All trademarks are the property of their respective owners W ARRANTY REG ISTRATIO N register online today for a chance to win a FREE Tripp Lite product www tripplite com warranty ...

Страница 2: ...ion 36 11 1 OSD Main Screen 36 11 2 OSD Navigation 37 11 3 Accessing Switches Computers 38 11 4 OSD Functions 39 11 5 Management Menus 41 12 Hotkey Mode 44 12 1 Invoking Hotkey Mode 45 12 2 Hotkey Port Switching 45 12 3 Hotkey Beeper Control 46 12 4 Keyboard Emulation 46 13 Troubleshooting 47 14 Specifications 48 15 Storage Service 49 16 Warranty Warranty Registration 49 1 Introduction Tripp Lite ...

Страница 3: ...allation and operation of this product Failure to comply may invalidate the warranty and cause property damage and or personal injury Installation Warnings Install the KVM switch in a controlled indoor environment away from moisture temperature extremes flammable liquids and gasses conductive contaminants dust and direct sunlight Operate the KVM switch at indoor temperatures between 32 F and 104 F...

Страница 4: ...wing table lists the Console Interface Units CIUs Server Interface Units SIUs and cables available for the B060 032 8 Function CIU SIU or Cable Required Connecting a PS 2 KVM Console to a B060 032 8 B062 002 PS2 Console Interface Unit Connecting a USB KVM Console to a B060 032 8 B062 002 USB Console Interface Unit Connecting B060 032 8 to a PS 2 Server B054 001 PS2 Server Interface Unit Connecting...

Страница 5: ...ing system maintenance It shares the same function with the USER PORT 1 port on the rear panel Switching the USER PORT 1 switch to FRONT deactivates the USER PORT 1 port on the rear panel and activates the USER PORT 1 port on the front panel USER PORT 1 switch must be returned to the REAR position to reactivate the USER PORT 1 port on the rear panel Power Socket The unit s AC power cord plugs in h...

Страница 6: ...r stand on any device when servicing other devices in a rack Stacking The B060 032 8 can be placed on any level surface that will safely support its weight plus the weight of attached cables Ensure that the surface is clean and free of materials that could block the exhaust vents or otherwise interfere with normal operation of the unit A foot pad set is included with the unit Peel the protective b...

Страница 7: ...ce between the B060 032 8 and the CIU must not exceed 500 ft 150m Connect the Server Interface Unit SIU to the computer Select the appropriate SIU for the computer server you are installing See chart on page 4 for more information Plug the connectors on the SIU into the appropriate ports of the computer server you are installing Connect the SIU to the B060 032 8 Use Cat5 cable to connect any avail...

Страница 8: ...tches is cascaded off of the B060 032 8 you cannot cascade additional levels of B060 032 8 KVM switches from the B007 008 switch All computer servers attached to the B060 032 8 and its cascaded KVM switches will be displayed in the parent B060 032 8 s OSD In cascaded installations the number of bus connections between a parent and child KVM switch determines the number of users that can simultaneo...

Страница 9: ...tches If you only have one bus connection only one of the consoles attached to the master B060 032 8 will be able to access the cascaded B060 032 8 at any given time Without multiple bus connections a console connected to the master B060 032 8 Switch cannot access the cascaded switch unless there are no other consoles accessing the cascaded B060 032 8 at the same time Repeat for each second level ...

Страница 10: ...sition in the installation After cascading a B007 008 KVM switch you cannot cascade any more KVM switches from it To cascade a B007 008 KVM switch Use a Cat5 cable to connect a KVM port on the B060 032 8 to B054 001 PS2 SIU Connect the SIU cables to the console ports of the B007 008 KVM switch to be cascaded Using appropriate cables connect computers servers to the cascaded B007 008 KVM switch Att...

Страница 11: ...nnot exceed 33 ft 10m The maximum distance between the first level master B060 032 8 and the last B060 032 or B060 016 2 in the daisy chain cannot exceed 66 ft 20m Use Cat5 cables to connect Console Interface Units CIUs to the consoles to be attached to the daisy chained B060 032 or B060 016 2 KVM Switch Use Cat5 cables to connect a Server Interface Unit SIU to each computer server to be attached ...

Страница 12: ...satile OSD especially for cascaded and daisy chained installations The B060 032 8 Administrator Utility enables network administrators to securely manage the B060 032 8 Matrix KVM Switch from anywhere in the world at any time Super administrators can manage users and groups control port access upgrade firmware versions and perform many other administrative functions using the intuitive and easy to...

Страница 13: ... value from 1 254 except 10 and 254 which are reserved for the B060 032 8 See Factory Default Settings page 49 for a list of B060 032 8 default network settings Note If you are using a proxy server your computer s proxy server settings may need to be modified before accessing the B060 032 8 Enter 192 168 0 10 in your Web browser s address bar and hit the ENTER key The B060 032 8 Login page appears...

Страница 14: ...SETTING This option allows you to enable the IP Installer with access to the B060 032 8 Disable IP Installer access or give View Only access to the IP Installer To assign an IP address from the command line Power off the B060 032 8 At the command line enter the following command arp s IP address MAC address IP address is an IP address suitable for the network segment that the B060 032 8 resides on...

Страница 15: ...puter see next section After the certificate is installed it will be recognized as trusted To install the Security Certificate In the Security Alert dialog box click View Certificate The Certificate dialog box appears Note Upon opening the certificate you will notice there is a red and white X logo over the certificate to indicate that it is not trusted Click Install Certificate Follow the Install...

Страница 16: ...e Session icon allows Super Administrators to see information about all the users who are currently logged into the B060 032 8 and provides information about each of their sessions It also gives Super Administrators the ability to end a user s session Log Super Administrators and Administrators can click on the Log icon to open the Event Log Web page where they can view all events that took place ...

Страница 17: ... their Station Names changed cascaded B007 008 KVM switches names are changed in the same way as ordinary ports Note Assigning a name to a station makes it possible to find it later using the search function To assign a station name to the B060 032 8 Click on the target station in the tree view to select it From the Administration menu choose Station Management The Station Management Web Page appe...

Страница 18: ...on Management Web Page appears Figure 7 In the Webpage Session Timeout field type the number of minutes to elapse before an inactive user is timed out of the B060 032 8 Administrator Utility Click Save Network configuration is a Super Administrator function After logging into the B060 032 8 Administrator Utility you should configure the network settings Network settings are configured through the ...

Страница 19: ...Typically port 80 is used for Hyper Text Transfer Protocol HTTP communications while port 443 is used for HTTP over Secure Socket Layer HTTPS Failure to assign a port for each field will cause the B060 032 8 Administrator Utility to function incorrectly System Event Reports The B060 032 8 can be configured to send an e mail notification whenever the DHCP server assigns a new IP address to the B060...

Страница 20: ...s can create modify and delete up to 255 additional groups in the B060 032 8 The default group cannot be modified or deleted Grouping users together simplifies KVM port management by enabling actions to be performed that affect an entire group of users The User Management Web Page can still be used to change individual user account settings See User Management page 22 To add groups From the Admini...

Страница 21: ...or icon To modify groups Open the Group Management Web Page Figure 11 Select a group name and click Modify The Group Information Web Page appears Edit the group account settings and then click Save The Group Management Web Page reflects the changes you made to the group name To delete groups Open the Group Management Web Page Figure 12 Select a group name and click Delete The following dialog box ...

Страница 22: ...ame field Usernames may be up to 15 characters long Legal characters include a z A Z 0 9 space hyphen square brackets parentheses and period Enter a password and then reenter the password to confirm it Passwords may be up to 15 characters long Legal characters include a z A Z 0 9 space hyphen square brackets parentheses and period Select an account type for the user The following table shows the p...

Страница 23: ...sts all KVM ports in the installation KVM ports whether on the root station daisy chained or cascaded are listed in order of position in the installation Click to apply the type of access rights you wish to assign for the user to each KVM port Note Users granted access to a daisy chained B060 032 B060 016 2 or a cascaded B007 008 will have access to all of the ports on that KVM Users granted acces...

Страница 24: ... Page Figure 18 Select a username and click Delete The following dialog box appears Figure 19 Click OK to delete the user The user is removed from the User Management Web Page 1 2 3 Figure 18 User Management Web Page Delete User Figure 19 Delete User Confirmation Dialog Box ...

Страница 25: ...from the User Information page see User Management page 22 To add groups to ports directly from the Group Information page see Group Management page 20 By default a user who has access to a port that is cascaded to another KVM will have access to all ports on that KVM In cascaded B060 032 8 installations the administrator can assign access on a port by port basis Additionally cascaded B060 032 8 i...

Страница 26: ...at and until you have assigned port access rights or restrictions for all users and groups If you make a mistake by adding a user or group to the wrong access rights box highlight the username or group name again and click the corresponding leftward facing arrow The selected user or group will be removed from the box and replaced in its former position Click Save The selected users or groups are g...

Страница 27: ...e 49 In cascaded installations you can restore KVM port defaults for up to 2 levels of KVM switches at a time If you want to restore KVM port defaults for more than two levels of KVM switches repeat this procedure for each third level KVM switch for which you wish to restore KVM port defaults KVM port defaults will be restored for any fourth level KVM switches at the same time In daisy chained ins...

Страница 28: ...ns the port ID on the monitor The default is the Upper Left Corner The setting Other has no functionality at this time It is included for possible future functionality Display Duration Display duration determines the length of time that the port ID displays on the screen after a KVM port change The table below explains the choices Option Description Always On Displays the Port ID at all times User...

Страница 29: ...he user will be logged out and required to enter their username and password to regain access Choose a value from 1 180 minutes A value of zero disables this option Default is zero disabled Screen Blanker If there is no input from the KVM console for the amount of time set here the screen is blanked Enter a value from 1 30 minutes A value of zero disables this option Default is zero disabled Hotke...

Страница 30: ... To upgrade the firmware for all possible devices in the installation choose a firmware upgrade package with an FW extension Note Only B060 032 8 switches and their attached Console Interface Units CIUs and Server Interface Units SIUs can be upgraded using a firmware upgrade package with an FW extension Any other KVM switch its attached CIUs and SIUs regardless of their type cannot be upgraded fro...

Страница 31: ...e Version the Utility installs the upgrade files without comparing the version levels Click Upgrade to begin upgrading the firmware or click Abort to cancel the firmware upgrade If firmware upgrade is aborted the B060 032 8 will automatically reboot requiring you to login again Note It takes approximately seven minutes to upgrade firmware for a single level installation and 17 minutes for a cascad...

Страница 32: ...ion level of the B060 032 8 to that of the Firmware Upgrade Utility installation file Click Next to begin the Check Firmware Version process If the B060 032 8 s firmware version level is equal to or higher than that of the installation files a prompt appears asking if you wish to continue with the firmware upgrade Click Yes to continue Click Upgrade to continue with the firmware installation or Ab...

Страница 33: ...e to the latest firmware version If you have already upgraded to the latest firmware version in you do not need to upgrade the firmware again 6 6 5 4 4 3 2 1 7 7 8 8 Figure 30 Firmware Upgrade Utility Main Screen Update in Progress Figure 31 Firmware Upgrade Utility Main Screen Update Complete 10 18 Replacing the Root B060 032 8 If you replace the root first level B060 032 8 with a child lower lev...

Страница 34: ...16 Action Description Backup Backs up root station settings user and group accounts user profiles port access rights and shortcuts Restore Deletes current root station settings user and group accounts user profiles port access rights and shortcuts and restores to those saved in the configuration backup file To back up system settings Click the Backup icon The Backup and Restore Settings Web Page a...

Страница 35: ...wing three ways to view log file events Today Select this option to view only events that happened today All Select this option to view all events in the log file Range Select this option to view events that happened over a period of one or more days Enter the beginning date in the From field and the ending date in the To field Click OK The System Log Web Page will appear Figure 36 The log file di...

Страница 36: ... console module The B060 032 8 OSD provides a visual menu driven mouse enabled interface that offers quick and convenient computer access and control as well as efficient system administration including user management access rights passwords etc Changes made in the OSD are reflected in the B060 032 8 Administrator Utility and vice versa Each OSD menu option activates a function that configures an...

Страница 37: ...on the B060 032 8 TYPE This column lists the SIU connecting a computer server to the B060 032 8 The designation MXCHAIN identifies daisy chained KVMs the designation MXKVM identifies cascaded KVMs NOTE This column lists the Port Note assigned to it or the model name of the KVM Switch Daisy Chained to it Figure 39 Welcome Screen Figure 40 Super Administrator Main Screen 3 11 2 OSD Navigation Use th...

Страница 38: ...bers describe a path from the first level KVM switch through the KVM installation to the target device In Hotkey mode page 44 you can type a port ID to switch directly to any KVM port in the installation Cascaded Installation Port IDs The port numbers that comprise the port ID in cascaded installations are displayed in the following order from left to right 1 The port number of the first level B06...

Страница 39: ...only the KVM ports the user has set as personal Accessible The OSD lists only the KVM ports that the user has been given access to Accessible Powered The OSD lists only the KVM ports that the user has been given access to and that are powered on VIEW MODE defaults at Accessible Powered SET PERSONAL VIEW If there are KVM switches cascaded from the KVM ports of the first level KVM switch you can cre...

Страница 40: ...IMEOUT requiring them to enter their password to regain access to the KVM switch The user can enter a time from 1 180 minutes with zero deactivating this setting This setting defaults at zero disabled SCREEN BLANKER This setting allows the user to determine how much inactive time must pass before the users screen goes blank requiring mouse activity to display the screen again The user can key in a...

Страница 41: ...s and Admin Accessible numbers A Z 0 9 Press the ENTER key to add the new user Note User names and passwords created in the OSD will appear in ALL CAPS and must be entered in ALL CAPS when logging in to the Administrator Utility MODIFY USER Selecting this setting opens up a screen that gives you 3 options RESET USER PASSWORD CHANGE USER TYPE and ACCOUNT CHANGE USER GROUP Super Admin To change a us...

Страница 42: ...es available Full or View 3 Highlight the level of access you want to give the user and hit the ENTER key To revoke user access for a port 1 After selecting the desired port highlight the DELETE ACCESS USER option and hit the ENTER key A list of all users with access to the selected port appears 2 Highlight the user you want to revoke access from and hit the ENTER key 3 Press Y to confirm or N to ...

Страница 43: ...d a DHCP server will automatically pull an IP address To manually configure the IP Settings 1 Highlight MANUAL IP ADDRESS and hit the Enter key A page opens up displaying the following settings IP ADDRESS SUBNET MASK GATEWAY PRIMARY DNS SERVER and ALTERNATE DNS SERVER 2 Select each choice and enter the corresponding numerical address as given to you by your network administrator Note These setting...

Страница 44: ...ched but is powered off the monitor screen will be blank and the mouse and keyboard will have no effect After the Scan Interval is up Auto Scan mode will switch to the next KVM port As each KVM port is accessed an S appears in front of the port ID display to indicate that it is being accessed under Auto Scan mode While Auto Scan mode is in effect the console goes into View Only mode To regain keyb...

Страница 45: ... zeros e g 1 1 1 or 01 01 01 The port ID numbers display on the command line as you type them If you make a mistake use BACKSPACE to erase the wrong number Press ENTER After you press ENTER the designated KVM port is accessed and you automatically exit Hotkey mode Auto Scanning Auto Scan mode switches among all the accessible KVM ports at regular time intervals see SCAN MODE on page xx for informa...

Страница 46: ...101 104 key keyboard can emulate the functions of the Mac keyboard The emulation mappings are listed in the table below Note When using key combinations press and release the first key CTRL then press and release the activation key PC Keyboard Mac Keyboard SHIFT SHIFT CTRL CTRL Get Windows Image Get Mac Image CTRL 1 Get Mac Image CTRL 2 Get Mac Image CTRL 3 Get Mac Image CTRL 4 Get Mac Image ALT A...

Страница 47: ...irmware upgrade process was See Recovering from a Failed Firmware Upgrade page 33 prematurely aborted and now some of the modules are inoperable I can t upgrade the firmware version Make sure that you have selected the correct firmware upgrade package and try again When upgrading the firmware through the B060 032 8 Administrator Utility use a firmware upgrade package with an FW extension When the ...

Страница 48: ...ons Maximum 8 000 Console Connections 8 Port Selection OSD Hotkeys Console Port Connectors 8 RJ45 Female Computer Server Connectors 32 RJ45 Female Daisy Chain Connectors 1 HPDB 15 Female LAN Connectors 1 RJ45 Female Power Connectors 1 IEC 320 C13 Reset Switch Yes Power On Off Switch Yes Firmware Upgrade Recovery Switch Yes Extra User Port 1 Yes on Front Panel User Port LEDs 8 Green Server Port LED...

Страница 49: ...D CON SEQUENTIAL DAMAGES Some states do not allow limitations on how long an implied warranty lasts and some states do not allow the exclusion or limitation of incidental or consequential damages so the above limitations or exclusions may not apply to you This Warranty gives you specific legal rights and you may have other rights which vary from jurisdiction to jurisdiction Tripp Lite 1111 W 35th ...

Отзывы: