background image

7

1. Product Overview

1.9 Connecting the System

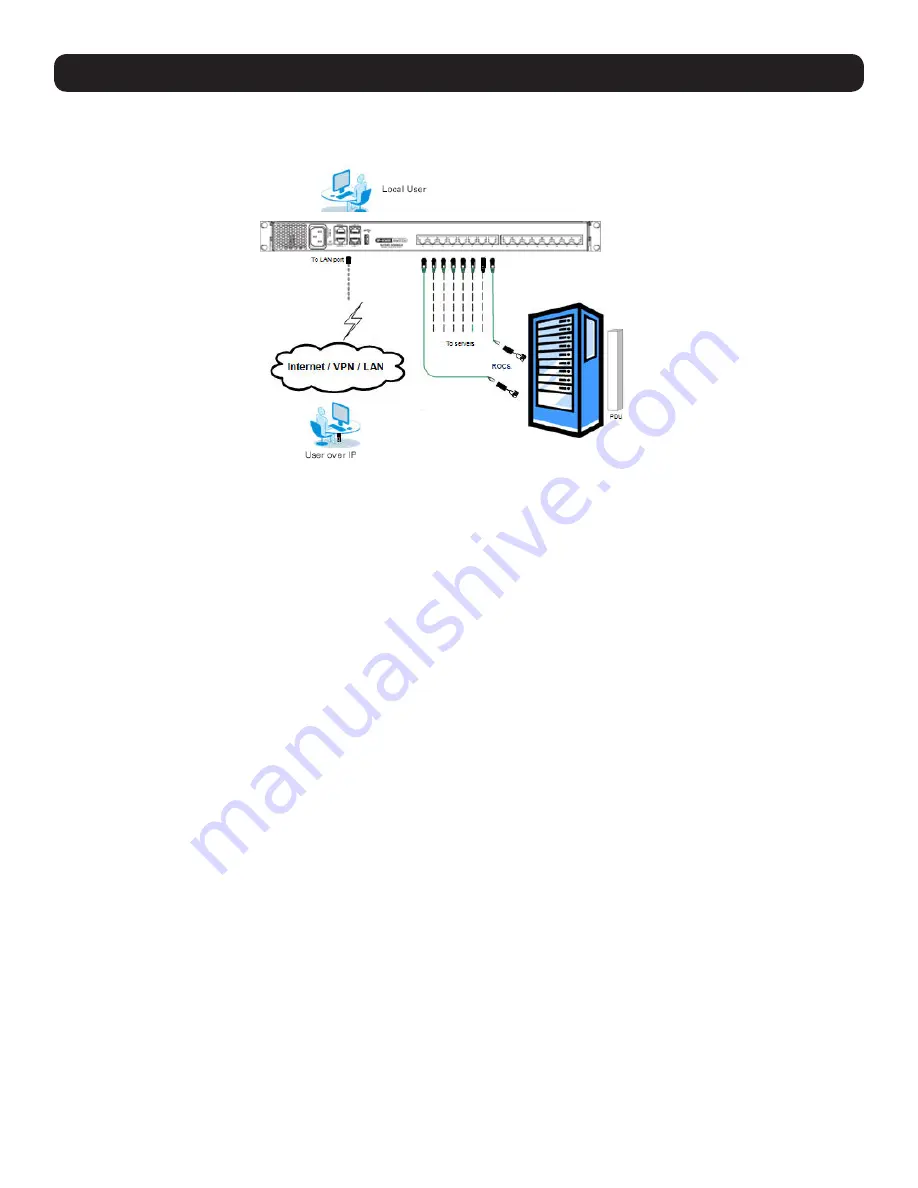
The figure below illustrates the NetCommander IP system overview. 

1.  Make sure that power to all the devices you will be connecting has been turned off.
2.  Connect a Cat5e/6* cable from an available server port on the back of the KVM to an SIU (B078-101-PS2, B078-101-USB-1 or B078-

101-USB2) appropriate for the computer you are adding.

3.  Connect the SIU’s connectors to the corresponding ports on the computer/server.
4.  Repeat steps 2 and 3 for each computer/server you are adding.
5.  Connect a Cat5e/6 cable from your network to the LAN 1 port on the back of the KVM.
6.  Connect a second Cat5e/6 cable from your network into the KVM’s LAN 2 port.
7. 

Optional: 

Connect up to two serial devices to the RJ45 Serial Ports 1 and 2 on the back of the KVM switch (See the 

Configuring Serial 

Port Settings

 section of the Owner’s Manual for details on configuration. See the 

Serial Pinout

 section in the Owner’s Manual for the 

pinout information).

8.  Connect the included power cord between the C14 outlet on the back of the unit and a Tripp Lite Surge Protector, Power Distribution Unit 

(PDU), or Uninterruptible Power Supply (UPS). There is no Power On/Off switch, so plugging in the power cord will power  
on the KVM.

9.  Turn on the power to all of the connected devices.

* To ensure proper functionality, shielded Cat5e/6 cable must be used with the B078-101-USB2, and is recommended for all other SIUs for best performance.

1.10 Initial Settings (Default IP Address)

By default, the NetCommander IP is set to have the network’s DHCP server pull an IPv4 address. Referencing the unit’s MAC address (found 
on the bottom panel of the KVM), have your network administrator provide you with the IP address assigned by the DHCP server. You can 

also obtain the IP address by logging into the KVM’s OSD via the local console and navigating to the F2 Settings menu.
On networks that do not have a DHCP server, the KVM boots with the default static IPv4 address of 192.168.0.254.

Note:

 There is no default IPv6 address for the KVM switch. An IPv6 address can be automatically assigned via DHCP server, a Stateless address can be 

assigned, or a static address can be manually entered.

To configure an IP address for the KVM, you can use the local console OSD or the Web Configuration Interface. Both methods are described 
in the following sections.

Содержание NetCommander B070-016-19-IP2

Страница 1: ...ration 21 PROTECT YOUR INVESTMENT Register your product for quicker service and ultimate peace of mind You could also win an ISOBAR6ULTRA surge protector a 100 value www tripplite com warranty Este manual completo esta disponible en español en la página de Tripp Lite www tripplite com support Ce manuel complet est disponible en français sur le site Web de Tripp Lite www tripplite com support Полна...

Страница 2: ...nexpensive Cat5e 6 cabling and B078 101 USB2 B078 101 USB 1 and B078 101 PS2 SIUs Java based application allows Windows computers to control a target server via web browser from any location over a secured IP connection A non browser client is available that allows Windows computers to remotely access the KVM without a browser and without installing Java NetCommander AXS software is available to a...

Страница 3: ...nce Follow all warnings and instructions marked on the device Use of this equipment in life support applications where failure of this equipment can reasonably be expected to cause the failure of the life support equipment or to significantly affect its safety or effectiveness is not recommended This device is designed for IT power distribution systems with up to 230V phase to neutral voltage Do n...

Страница 4: ...el If the following conditions occur unplug the device from the wall outlet and bring it to qualified service personnel for repair o The power cord or plug has become damaged or frayed o Liquid has been spilled into the device o The device has been exposed to rain or water o The device has been dropped or the cabinet has been damaged o The device exhibits a distinct change in performance indicatin...

Страница 5: ...nsole out flip up the cover to access the LCD screen keyboard and touchpad 3 LCD Controls The LCD On Off button is located here as well as buttons to control the position and picture settings of the LCD screen 4 Keyboard 5 2 Button Touchpad 6 Rackmounting Brackets Secure the chassis to a system rack located at each corner of the unit 7 Lock LEDs The Num Lock Caps Lock and Scroll Lock LEDs are loca...

Страница 6: ... port to a B078 101 PS2 B078 101 USB 1 or B078 101 USB2 SIU which in turn connects to the computer server To ensure proper functionality shielded Cat5e 6 cable must be used with the B078 101 USB2 and is recommended for all other SIUs for best performance 1 8 Rackmounting the NetCommander IP Follow all instructions in section 1 5 Safety of this guide before rackmounting Make sure to write down the ...

Страница 7: ...ite Surge Protector Power Distribution Unit PDU or Uninterruptible Power Supply UPS There is no Power On Off switch so plugging in the power cord will power on the KVM 9 Turn on the power to all of the connected devices To ensure proper functionality shielded Cat5e 6 cable must be used with the B078 101 USB2 and is recommended for all other SIUs for best performance 1 10 Initial Settings Default I...

Страница 8: ... press the left Shift key twice to open the OSD 2 Press the F2 key to open the Settings menu and then press the F2 key again to open the IPv6 Settings menu 3 In the IPv6 Settings menu with the Mode field at the top of the screen highlighted press the Spacebar key to toggle between DHCP Stateless and Static DHCP is selected by default and automatically assigns an IP address via the IPv6 DHCP server...

Страница 9: ...ilar to the one below will likely appear To resolve this issue install a supported version of Java 1 8 or 1 9 Once a supported JRE has been installed restart the browser and retry accessing the KVM Web Configuration Interface The installed version of Java may require the KVM Web Configuration Interface be added to an exception list In such cases upon logging into the KVM application a popup window...

Страница 10: ...he panel that opens click the Add button then enter the URL of the relevant KVM device 4 Click the OK buttons to close the windows Restart the browser and retry accessing the KVM WEB Configuration Interface Only SSL connections are allowed You must start the IP address with HTTPS not HTTP 1 Open your web browser see section 1 4 Client Computer Compatibility for browser support Enter in the KVM s I...

Страница 11: ...ificate Installation 3 Upon installing the certificate or accepting the unrecognized certificate for the current session the initial web page will appear and the Java application will launch Before the installation completes a Security Warning popup may appear stating the connection to the website is untrustworthy This is a security issue similar to the one you get from your web browser Click the ...

Страница 12: ...Launcher is selected then click the OK button Google Chrome The targets jnlp file is downloaded to the status line in the browser Click it to launch the Interface If the login page does not appear on its own click the Log On button in the center of the web page to open If clicking on the Log On button does not open the login page add targets jnlp to the end of your IP address See Troubleshooting a...

Страница 13: ...he toolbar above the Configuration menu tabs to save the network settings Upon clicking Save you will be prompted to reboot the KVM to finish the implementation of the new Device settings Click Yes to proceed Troubleshooting Below is a list of tips that may help resolve common issues when accessing the KVM Interface Verify that file downloads are enabled in the browser If a supported JRE has not b...

Страница 14: ...e logging on the first time verify the latest Java version 1 8 or 1 9 is installed on your computer If the Java Runtime Environment is not installed on the client PC a popup window similar to the one below will likely appear To resolve this issue install a supported version of Java 1 8 or 1 9 Once a supported JRE has been installed restart the browser and retry accessing the KVM Web Configuration ...

Страница 15: ...n In the panel that opens click the Add button then enter the URL of the relevant KVM device 4 Click the OK buttons to close the windows Restart the browser and retry accessing the KVM WEB Configuration Interface Only SSL connections are allowed You must start the IP address with HTTPS not HTTP 1 Open your web browser see section 1 4 Client Computer Compatibility for browser support Enter in the K...

Страница 16: ... Certificate Installation 3 Upon installing the certificate or accepting the unrecognized certificate for the current session the initial web page will appear and the Java application will launch Before the installation completes a Security Warning popup may appear stating the connection to the website is untrustworthy This is a security issue similar to the one you get from your web browser Click...

Страница 17: ...Start Launcher is selected then click the OK button Google Chrome The targets jnlp file is downloaded to the status line in the browser Click it to launch the Interface If the login page does not appear on its own click the Log On button in the center of the web page to open If clicking on the Log On button does not open the login page add targets jnlp to the end of your IP address See Troubleshoo...

Страница 18: ...Java Web Start cache prior to accessing the KVM Web Configuration Interface To clear the cache open a command prompt type the following command then press the Enter key javaws uninstall For troubleshooting purposes the Interface can be opened directly through the browser s text field Type the following command then press the Enter key https IP address of the KVM Device targets jnlp Ensure the Java...

Страница 19: ...ne of four ways Select a port from the Data Pane of the My Targets screen and click on the Display icon in the toolbar Select a port from the Data Pane of the My Targets screen and press the Enter key Double click on a port in the Data Pane of the My Targets screen Administrator s Only Double click on a port in the graphic of the KVM s rear panel Note A Target Server with a Remote Exclusive Sessio...

Страница 20: ...rvers A computer that is connected but is powered off does not have a sun icon When a server is busy when an account is accessing it in an Exclusive Session the entire line appears in red characters Navigating the OSD To move the highlight bar throughout the list press the h and i arrow keys To jump from one column to the next when relevant press the Tab key To exit the OSD or return to a previous...

Страница 21: ...chance to win a FREE Tripp Lite product No purchase necessary Void where prohibited Some restrictions apply Open to U S residents only See www tripplite com for details FCC Notice Class A This device complies with part 15 of the FCC Rules Operation is subject to the following two conditions 1 This device may not cause harmful interference and 2 this device must accept any interference received inc...

Отзывы: